|
|
Post by hendrik on Jul 18, 2013 4:20:51 GMT -5
So yesterday I came across the following topic at heresy online and I was godsmacked. This conversion looked AWESOME²!! To honour raverboi, who came up with the conversion i've dubbed it a raver pattern thunderbolt. Unfortunatly the topic missed any information on how to build it so I had to do some thinking of my own?however, the conversion proved to be a real fun, and after spending a whole evening on building and overthinking it i've finally finished my version. Halfway through building it my fingers got too glued up to take any pictures with my camera but i'm sure you'll be able to follow how it as made. 95% of this conversion used parts of the valkyrie. the only things not supplied in the kit were two small hinged doors from a chimera kit to decorate it a bit more, and the autocannons and lascannons. 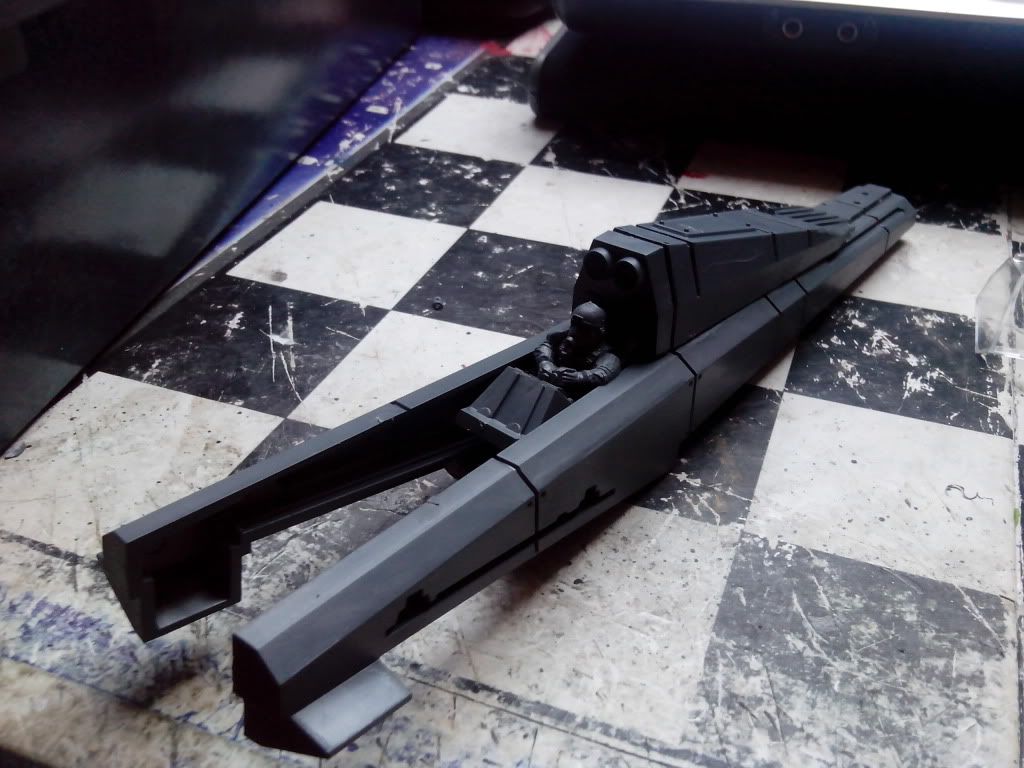 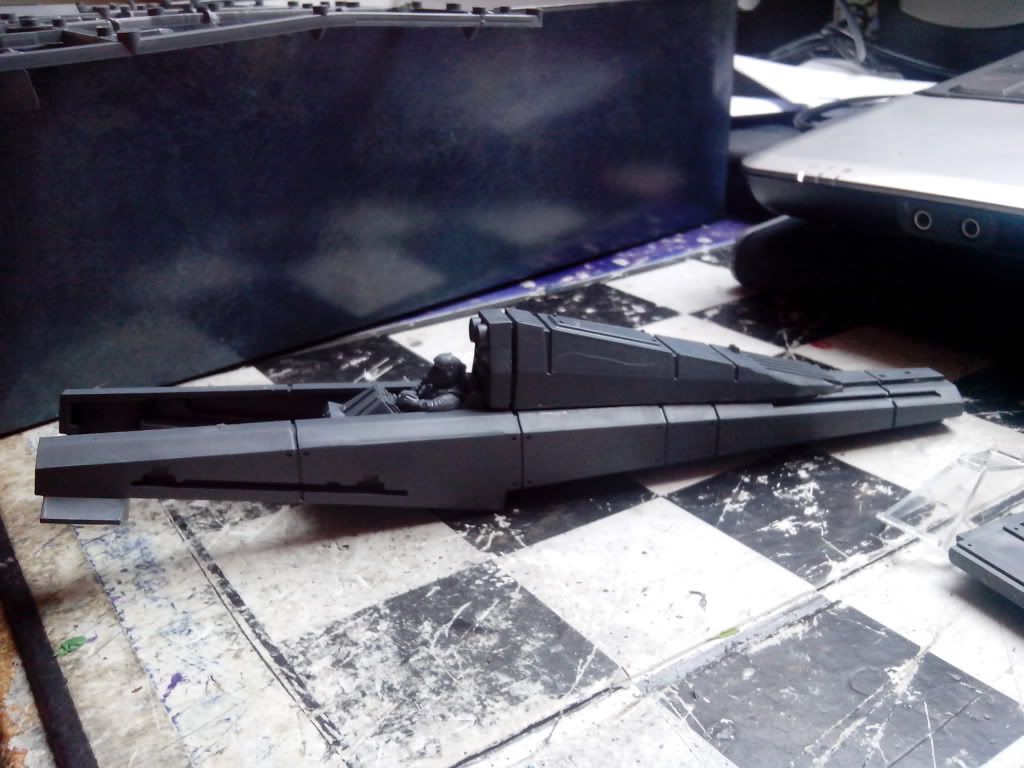 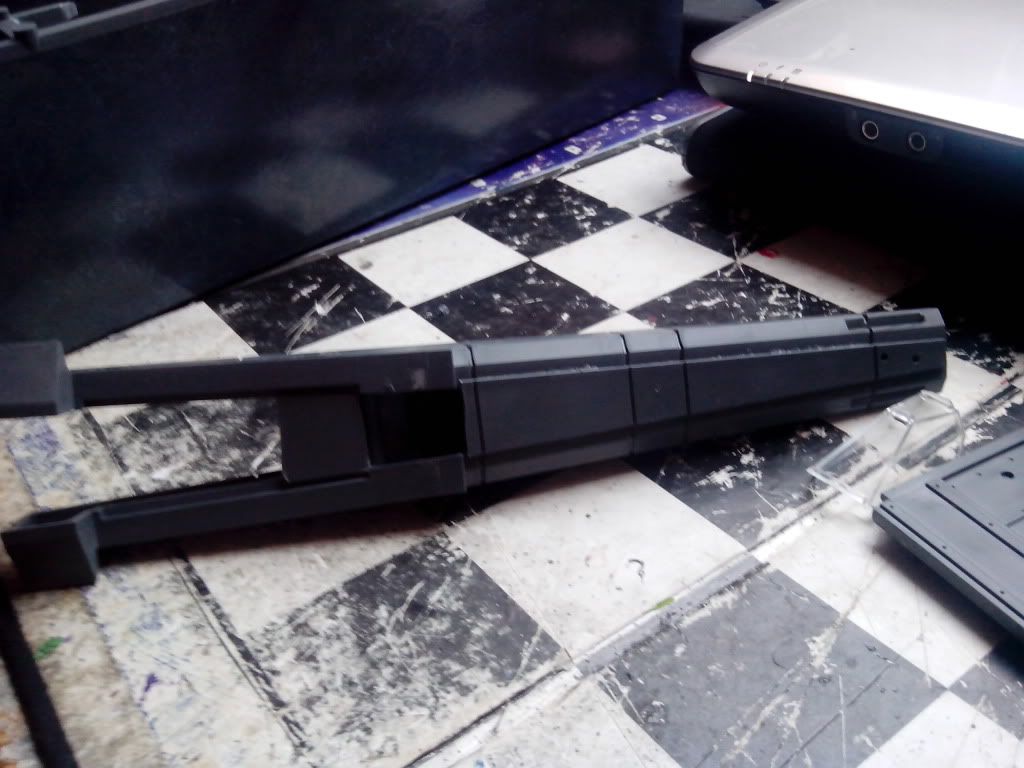 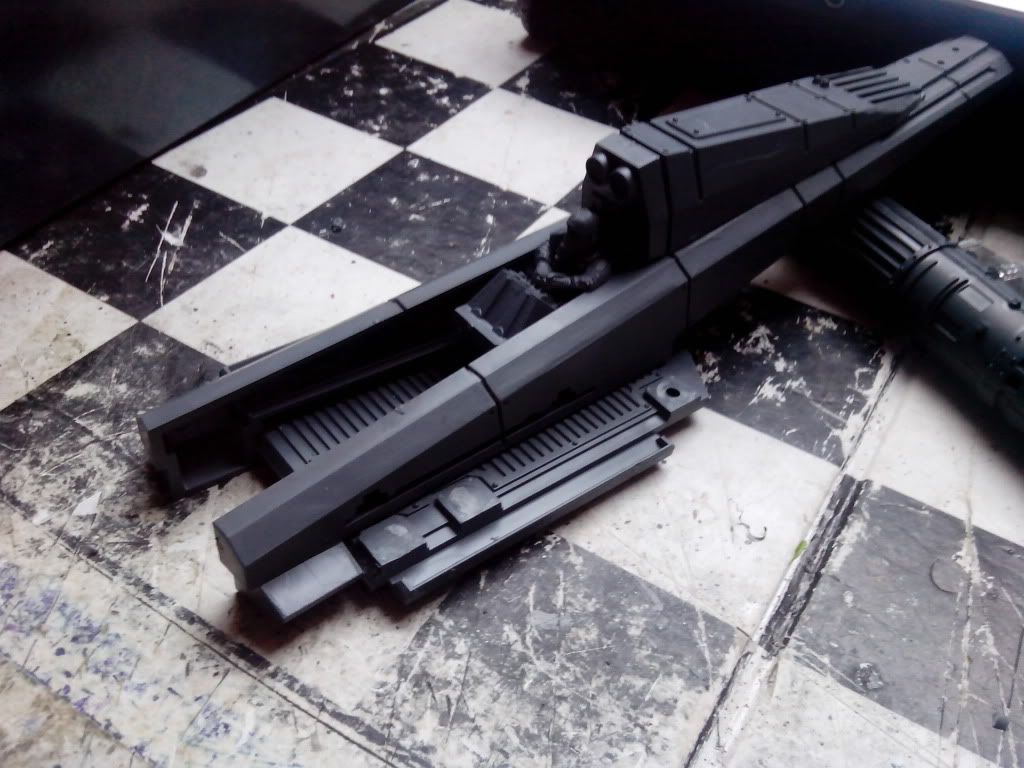 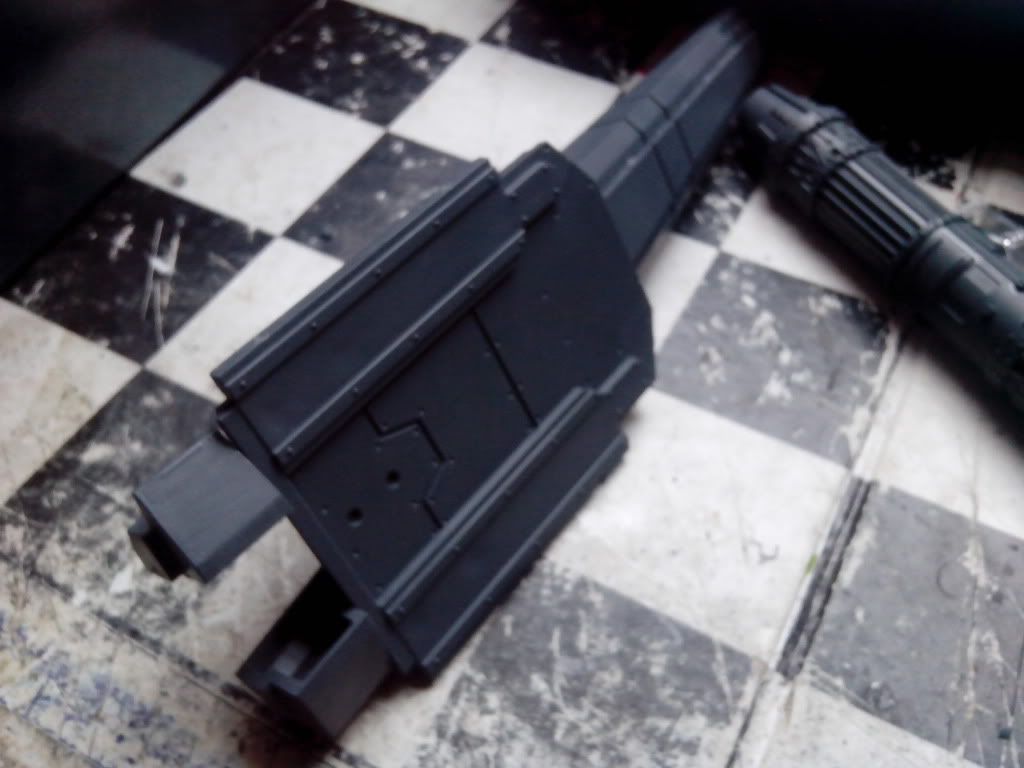 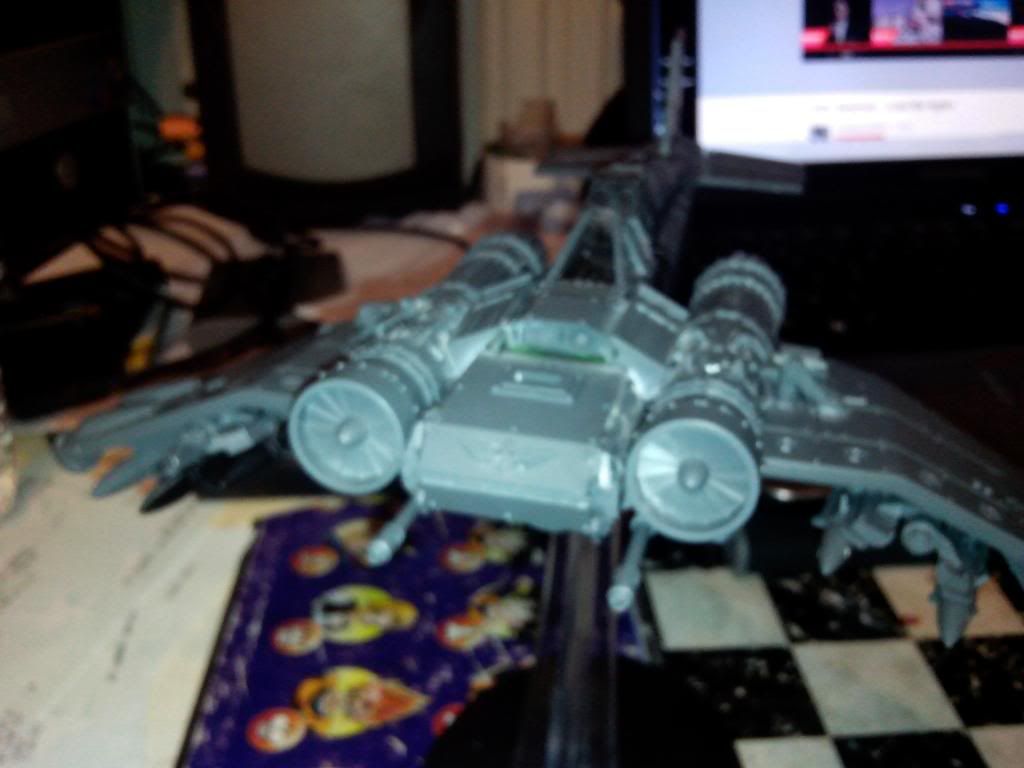 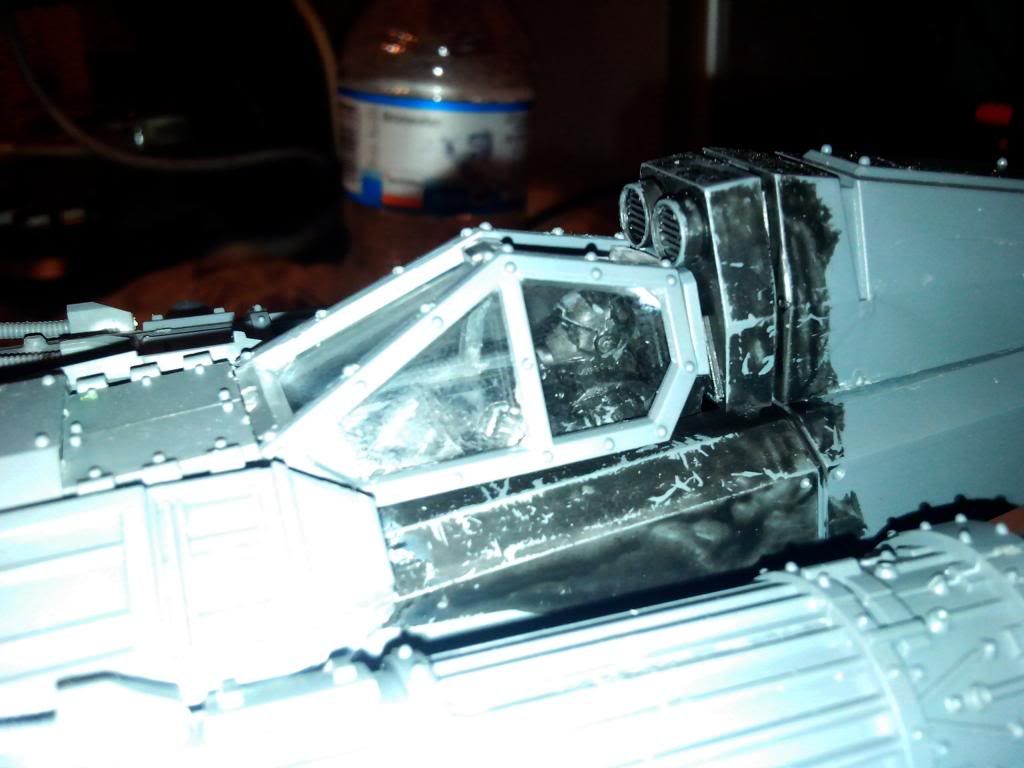 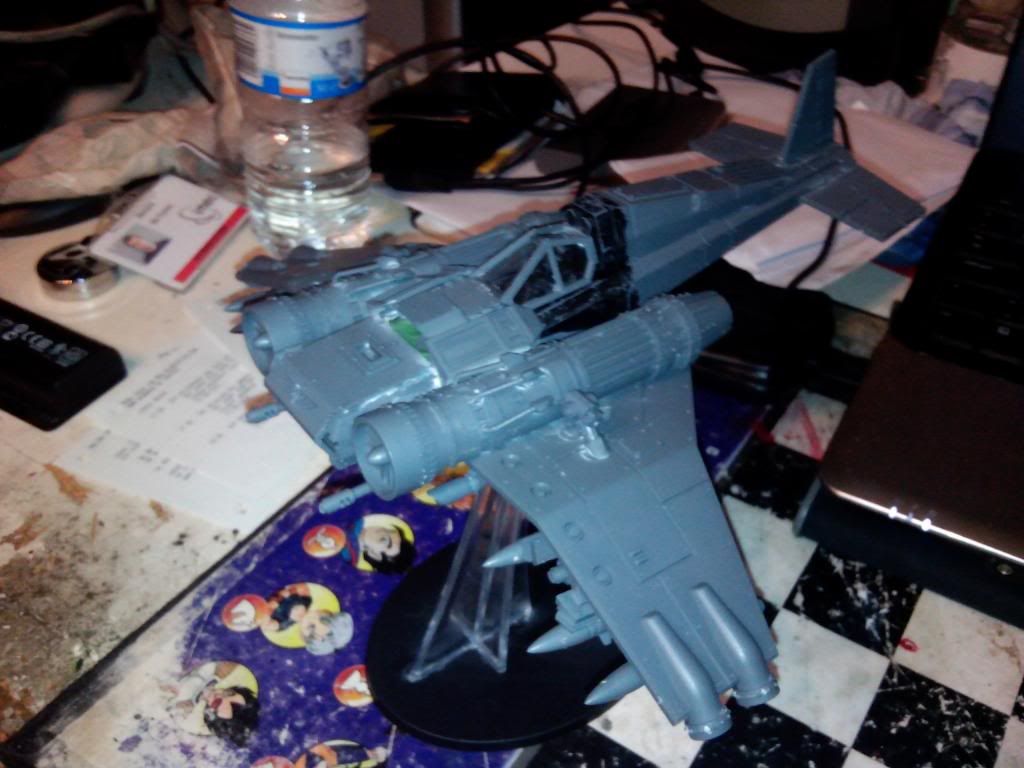 All in all this was a rather easy conversion. The hardest part was removing some armoured panels from the wing to provide a more even gluing between the engines and the wings, although some greenstuff could have done the same work more easely. But most of all, this is a "cheap" conversion since for the money you would pay for an actual thunderbolt you could build two of these bad boys!! |
|
|
|
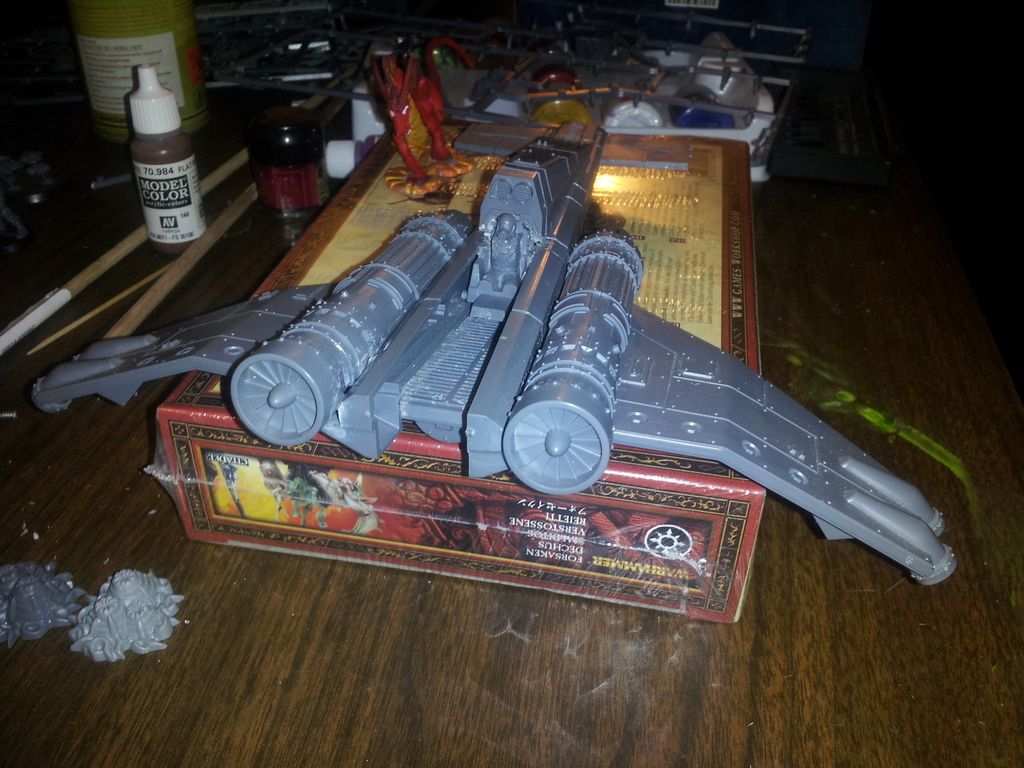
Post by hendrik on Jul 20, 2013 11:31:39 GMT -5
|
|
|
|
Post by RedsandRoyals on Jul 20, 2013 11:44:01 GMT -5
That's freaking awesome. How easy was it to do? It looks like it wouldn't be too difficult...
Reds
|
|
|
|
Post by hendrik on Jul 20, 2013 13:25:34 GMT -5
It was actually a really easy conversion with only minimal cutting involved. The only reason it took a whole evening to make is because the pictures of raverboi weren't that clear, nor did they show all sides of the flyer so i had to do some testfitting work etc. The hardest part was cutting off a raised section of the wings of the valkyrie. With acces to a dremel this would have been ne problem but i was too lazy to get it out so used my standard cutter...
I'll give a short description of the building process:
-build the main/tail section as seen in the first picture (original post), cutt off two small pieces of plastic (you'll see which one when you have the pieces in your hand. Use cut down "inner section" pieces that go inside the tail bars to make the angle of the tail. attach the block thingy behind the cockpit
-Build the gunner his seat. this is made by using the upper seat in the valkyrie kit and cutting the sides a bit untill it fits in the position where you want him to be. Use the glass to see when it's ok. If not wanting clear glass this step can be skipped and then the conversion is even easier!
-add the bottom plate. Cut of the raised sections and the side bars in which you slot the doors on the valkyrie. The wings will be glued there.
-Build the wings as normal, but remove the raised sections on the upper side. This will allow the engine to rest on the entire wing instead of just the raised section. Glue the wings on the bottom plate.
-Build the engines as normal, glue the engines on top of the wing.
The front section was made using the two door, in the bottom section i made an extra cut so it could be bend easier. If you want i can provide more detail shots of each section. against the upper plate a remaining piece of the ""inner section" pieces that go inside the tail bars" was glued so to provide an area upon which i could glue some things.
By now the hull should be done, the only section remaining is the copula and decorating the nose a bit more.
-The cockpit was completed be using a trapzeium like piece from the valkyrie kit (I can't seem to find the piece back on my vendettas immediatly, anyway, it has the perfect angle to rest the front of the copula upon so you'll recognise it i believe.
- I added the bow structure with one of the sensor pieces in it(the things that usually hold the side gun of the valk),right next to this the innder corners of the passenger compartment of the valkyirie were glued.
-By now you'll notice, just like on the raverboi his version the nose is open from the side. I fixed this by gluing a cut in half landing gear from the valkyrie nose against it, only leaving a really small gap left.
-the tail rudder was made using the normal tail rudders from the valkyrie (1 was cut into two)
-the autocannons and lascannons are from the heavy weapon team kit, and sipmly glued underneth the wings. I also build one of the missile pods but with two closed of sides to create and extra fuel depot/bomb/whatever, it just added some more mass to the flyer and didn't look bad.
I hope these instructions are clear enough, if not just ask for clearer instructions/pictures
|
|
|
|
Post by hendrik on Jul 20, 2013 13:34:31 GMT -5
more pictures of the tabletop paintjob, i might put on some more paint but for now it's finished.  (note those missiles are only not standing straight because i accidently turned them a bit. They are magnetised so can be put straight again with no problem. 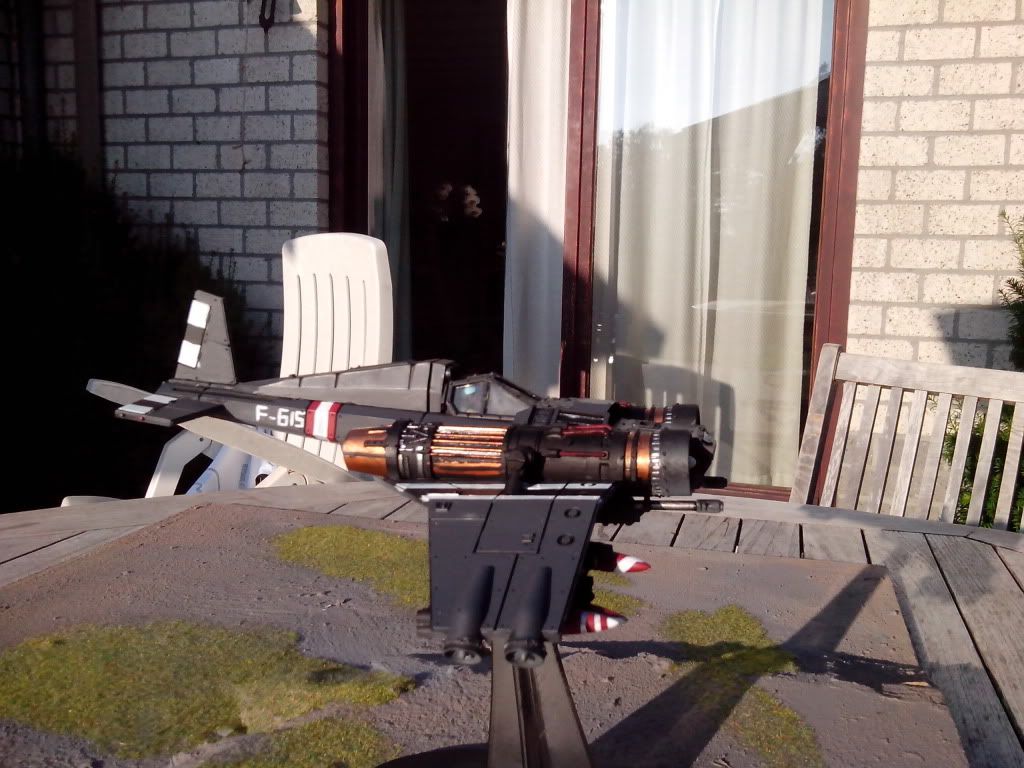 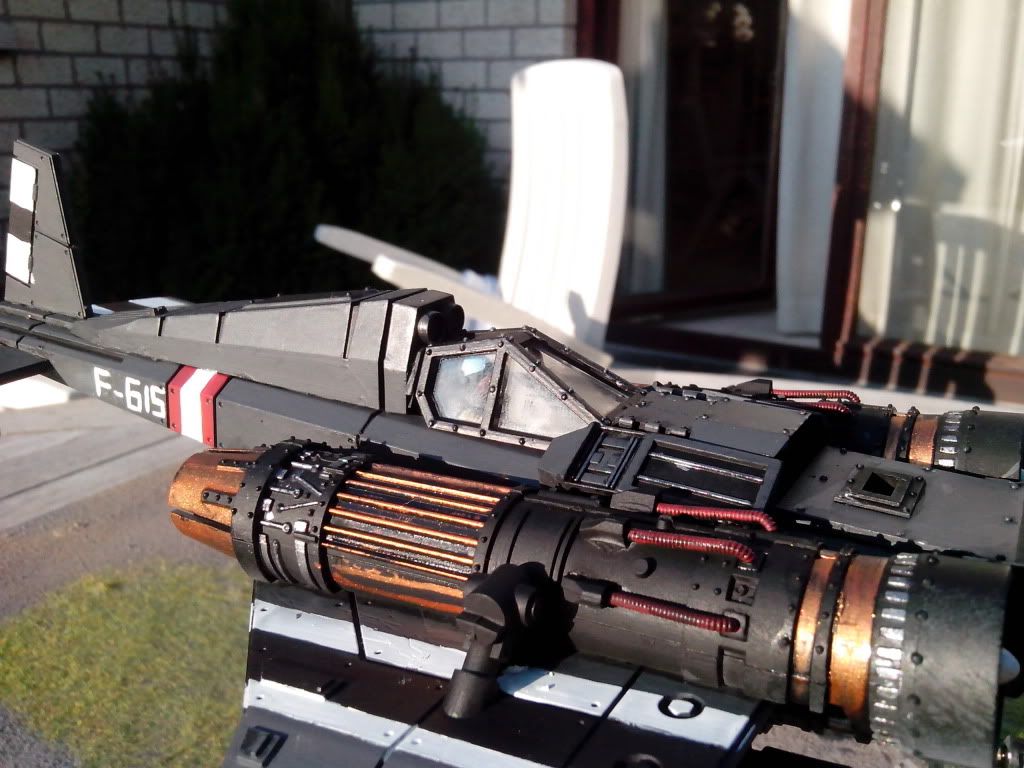 I named this thunderbolt F-615 in honour of both the F16 pilots in our belgian airforce, and as a reference to my old class in high school (which always had a 15 at the end, the forward number being the year we were in). His alias is raver II (the second) as seen here: 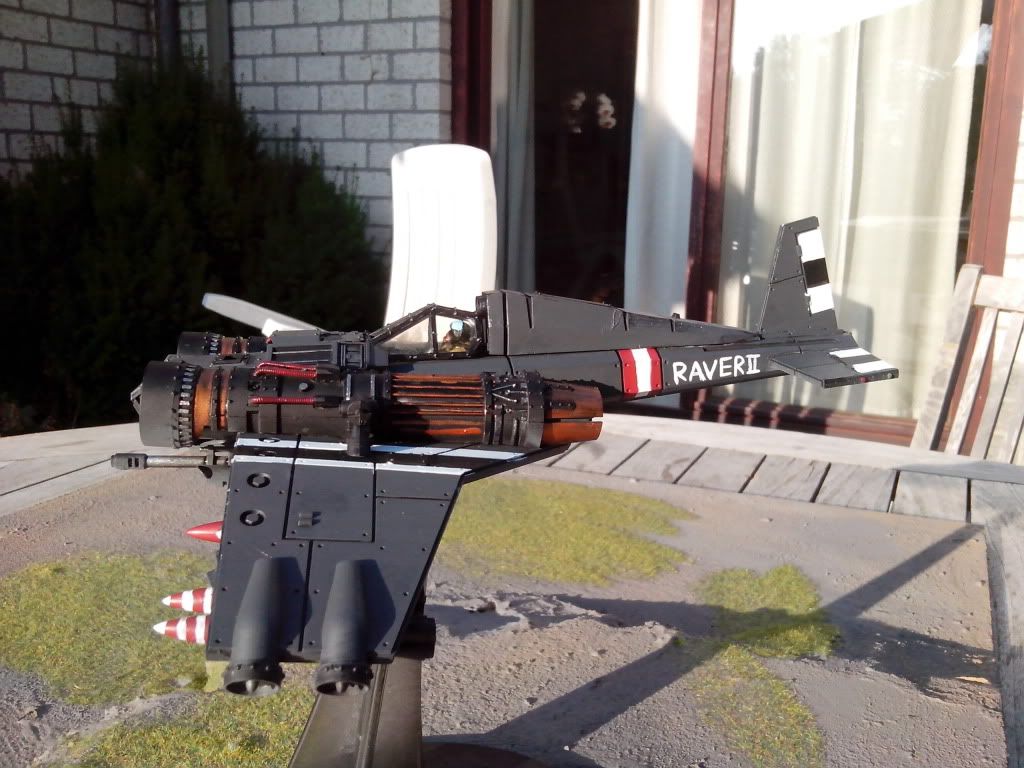 weapon systems: 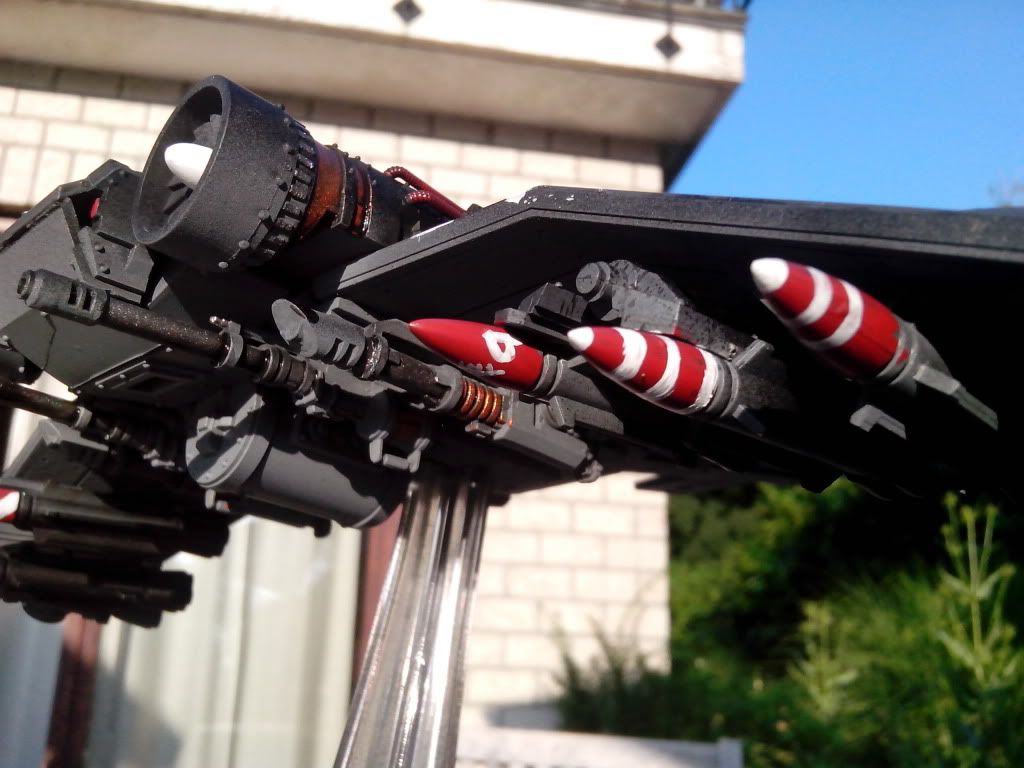 |
|
|
|
Post by Trooper One-Nine-Seven-Four on Jul 20, 2013 14:27:16 GMT -5
Okay... That is a pretty spiffy conversion. Job's a good 'un!  |
|
|
|
Post by AshotNINJA on Jul 20, 2013 21:32:12 GMT -5
nice... cool conversion... cool colour scheme
and i have all the parts needed spare in my bits box..hehe.. stolen
although after dry fitting most of it together, ive noticed odd bits that i feel need sorting.. like the angles of the front wings to the rear wings seems odd, they angle against each other, and the gap behind the turbine under the engine when attached to the wings.
question , did you attach the front wings into the regular slots on the long bits? its hard to tell from pics..
|
|
|
|
Post by littlemac on Jul 21, 2013 13:36:34 GMT -5
When I finish my umpteen other projects I have going, I am so going to do this. It doesn't even look like a conversion! So well done.
|
|
|
|
Post by hendrik on Jul 21, 2013 14:15:55 GMT -5
|
|
|
|
Post by AshotNINJA on Jul 21, 2013 19:28:13 GMT -5
yeah those pics are pretty damm handy... the only part im seeming to be missing is the floor section cos i used them for the ac130 build... but i can rig up something with plasticard
|
|
|
|
Post by hendrik on Jul 22, 2013 3:10:15 GMT -5
well a flat piece of plasticard would have been more usefull since that wouldn't recuire all that cutting away work, I'dd add some texture to it by adding some extra plates or the like. Do post pictures of yours!
|
|
|
|
Post by jimble on Jul 24, 2013 13:55:03 GMT -5
that looks absolutely amazing |
|
|
|
Post by Warsmith Wolf on Jul 25, 2013 18:22:33 GMT -5
Excellent, now I can add a Thunderbolt AND an Avenger to my Elysians, for the price of one 'Bolt!
|
|
|
|
Post by hendrik on Jul 26, 2013 5:49:14 GMT -5
this one (http://www.heresy-online.net/forums/showthread.php?t=119091) would not be yours then?
|
|
|
|
Post by Warsmith Wolf on Jul 26, 2013 7:28:12 GMT -5
this one (http://www.heresy-online.net/forums/showthread.php?t=119091) would not be yours then? ...I like the look of that. The one I found was in fact on DakkaDakka. |
|
|
|
Post by hendrik on Jul 27, 2013 19:15:47 GMT -5
i'm not sure i like their statline though, AV10, and only 2 hullpoints means even a tactical squad has a big chance of taking them out
|
|
|
|
Post by Warsmith Wolf on Jul 28, 2013 5:22:09 GMT -5
i'm not sure i like their statline though, AV10, and only 2 hullpoints means even a tactical squad has a big chance of taking them out Avenger. Bolt. Cannon. Seven shots of Screw Marines, plus two lascannons and another payload of thy choice. INCLUDING AUTOCANNONS. For cheaper than a Russ. Why would you take one? Why wouldn't you? |
|
|
|
Post by hendrik on Jul 28, 2013 17:03:59 GMT -5
my bank account hates you!  nah! i need to get more games in to make another investment in games workshop worth it! |
|
|
|
Post by that1guy on Aug 29, 2015 19:40:54 GMT -5
 got to this point and your tutorial kind of jumps to complete... not sure how to get past this point yet but I'm working on the pilots arms at the moment, so between that & painting him up before the canopy goes on I've got a bit on my plate. How do I get his console to stay upright during glue? Did you back it with anything to keep it propped up at the proper angle during the glue's dry time? 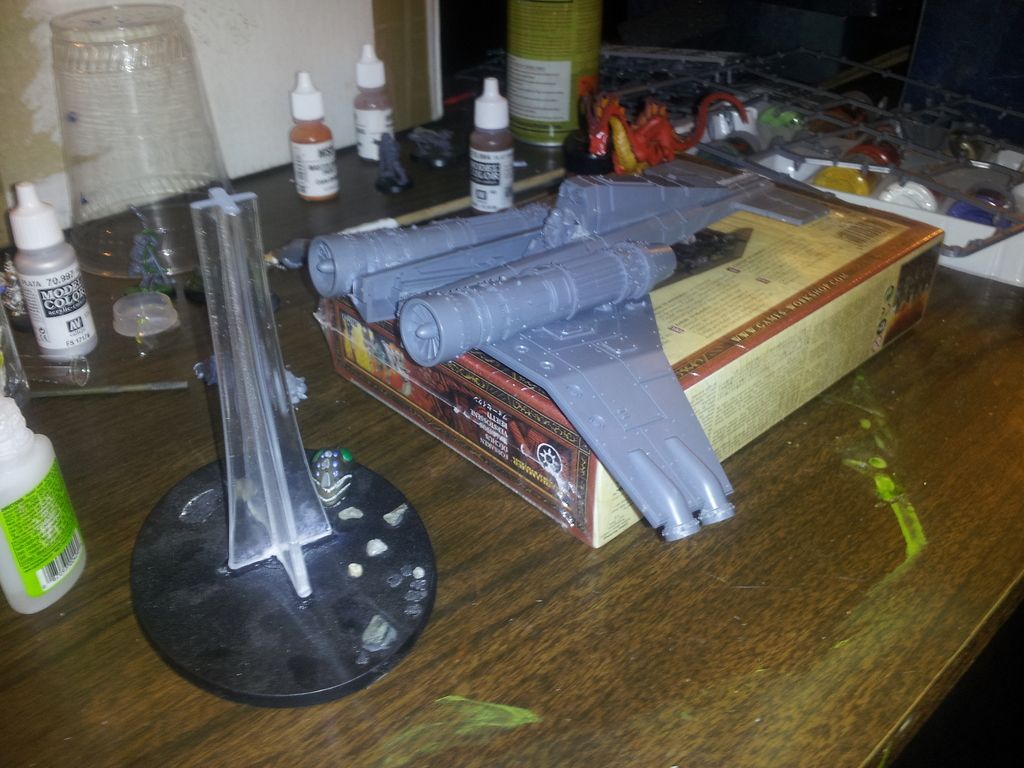 I've been really determined to mount two sets of twin-linked auto cannon's but at this point I'll probably settle for your recipe. 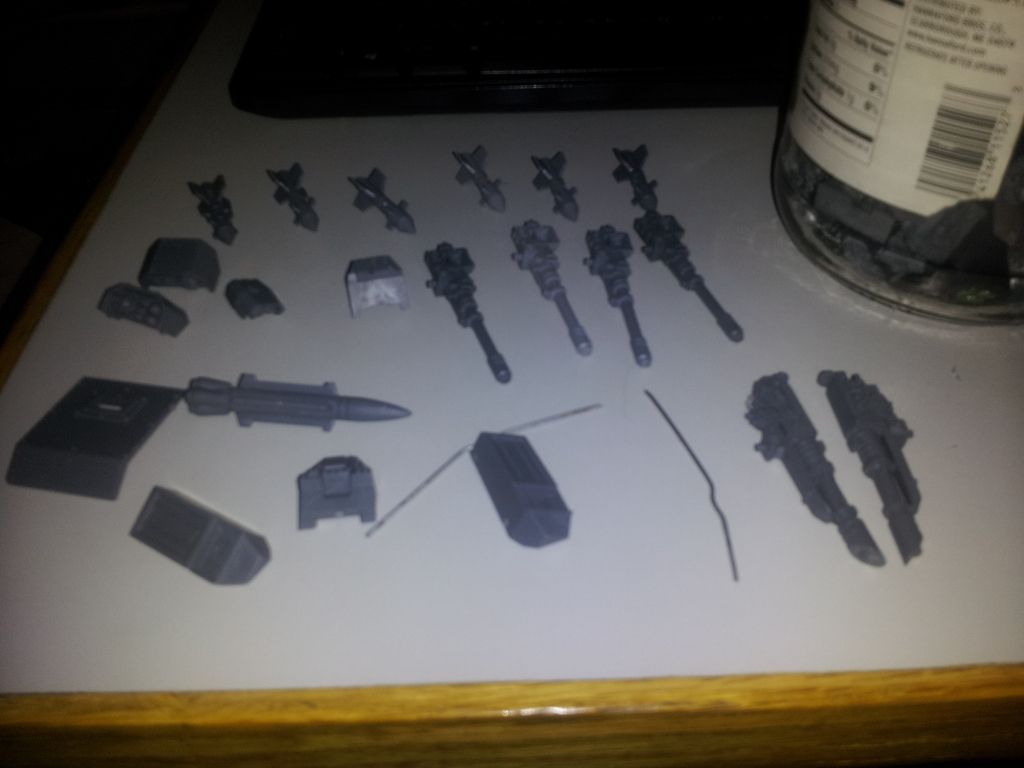 This is what I've got for parts found, the vertical tail fin is still around here but it broke from it's glue so I'm trying to figure out how to secure it into a more stable position. |
|
|
|
Post by that1guy on Dec 13, 2018 20:50:59 GMT -5

This is kind of what happened when I failed at the first try and let my buddy give the kit bash an attempt. Got another Valkyrie and I'm going to try again. |
|