Post by Deleted on Apr 21, 2008 19:18:21 GMT -5
This may be rough in format for a bit while I transfer these articles over from my main forum.
I'm going to compile and consolidate my entire Bahzhakhain project here in this thread so I dont loose parts of it here or there, and can better look at it as a comprehensive set. Many of the articles below were written with this article set in mind, and some were not and are yet to be adapted and edited to this purpose. Also many of them have yet to be edited to include/adress the comments and discussion that were attached to them. On the bottom of most articles (if they have been posted somewhere) is the link to it's original thread.
--------------------------------------------------------------------------------
Welcome to the Bahzhakhain. There will doubtlessly be introductions explaining and repeating these words throughout the article set so I will keep it brief. The Bahzhakhain is the Biel-Tan style of an ultra-fast attack on the enemy, often using Waveserpent and Falcon grav transport tanks to deliver the powerful aspect warriors of Khaine. The attack is based on the peerless speed of our tanks, and the elite nature of our warriors. Before our opponent knows we are there we are cleaning our weapons of their filthy blood. We give the opponent no time to react, no time to comprehend where and how we will utterly crush them. This article set is looking at the most efficient and synergetic way to build and play a mechanized Bahzhakhain CC intensive army. There are other forms of the Bahzhakhain, but I find the CC version the most competitive. This is not a guide to friendly play, and not a guide to competitive play, but a guide to how to play this style and play it best. The attitudes and method of how you apply it is up to you.
In the articles below we will look at as many aspects of the army as I am able to fathom. These articles will include analysis on:
-roles of the army (main CC killers, locking units, support fire, hit and run support CC).
-how to fight in battle groups
-dealing with armour
-target priority
-proper allocation of force
-general tips and tricks of the bahzhakhain method (measuring, protecting hatch blocking, specific unit tactics, etc)
-how other roles/units take over when you loose a unit
-the speed build of this style. 24-36" The importance of vehicle speed and precision
-the importance of upgrades and equipment
-and anything else I can think of or is requested of me that I find fitting.
--------------------------------------------------------------------------------
We will start with a few points on the Eldar army as a whole, and some general issues I feel are worth saying here.
-Dealing with the structural changes in the 4th edition-
The big change for the Biel-Tan army is the change of the force organizational chart back to its norm. We no longer can take our Scoprions, Banshees, and other elite aspect warriors in large numbers as troops. We now are forced to take the normal troop choices of craftworld vanilla. There have been many changes, however, to make the Biel-Tan army, and indeed the Eldar army itself, still function with deadly precision. It is my position that the Biel-Tan way has become even more effective and deadly because of these structural changes, once they are apparent. It is true that in smaller point games it may appear to be harder to cope with the lack of aspect warriors, and much easier in larger points were you only take the requisite troops choices. It merely takes different methods to play at these points levels, but this was true before 4th edition as well. Below I will try to address all of these issues and other to illustrate how to continue the Biel-Tan style and format, in this new structure.
In third edition almost all of our aspect warriors were found in the elites choice, and in 4th edition we have an additional elites choice, and an excellent one at that, this being the Harlequin Troupe. So from the onset it appears that it is going to be very hard to fit in all the precise tools we need from the elites choices. One thing that helped this was the movement of the Warp Spiders to the fast attack chart, opening up quite a bit of room there. Also guardian jetbike units were moved to troops, giving an additional choice there (helping make up for the loss of the FSoD as noted below) to take more Warp Spiders. These small changes help relieve quite a bit of the stress and crowding of our force organization chart when it comes to our aspect warriors.
Almost all of our units through the whole codex have been improved in some way. Aspect warriors most of all, have been refined to their particular roles, given stronger equipment and abilities to these ends, and have overall become far more deadly towards their particular targets. This helps compensate for the fewer aspect warriors that we can take, especially at lower points levels. Also the troop choices which we are now forced to take are far superior than in 3rd edition, and if used correctly, and not just to fill in for the lack of aspect warriors, they prove themselves often quite sufficient.
Here is the big part of the whole structural change. We are now required to take at least two troop choices made up of units we may never have wanted to take before in the first place. But the troop choices have been greatly improved so are not as much the ball and chain as many, including myself, suspected. Jetbikes are now Troop choices and are about 2/3 the cost, making them a much more practical choice. They are fast, they are resilient, and like the Dire Avengers they can take a toll on light infantry, light vehicles, and can lock enemies in CC. The Dire Avengers have taken huge increases as noted above and in their entry. We also have access to the Alaitoc pathfinders which against the right target can be very useful. As always I do not suggest solitary squads of rangers, or even pathfinders, unless you have a particular target in mind that they are fit for. Small groups of rangers/pathfinders will cause few deaths and lack the huge utility of their pinning weapons when found in small numbers. Note that this is not an argument against rangers/pathfinders, it is just a nudge into the path of using them correctly for their proper roles when misuse of rangers is a common mistake.
Mechanized Armies: This is where the troop choices really start pulling their weight. On top of the basic improvements to jetbikes and Dire Avengers, they open up a whole new role in the army. Well, yes the role existed before but now there is a larger and more capable availability. In my last battle I played a 1350pt battle against IG which had 2 jetbike squads, and a Dire Avenger squad in a Waveserpent. In previous battles I’ve had my IG opponent do a massive redeployment, shooting as he backpedals, making it much harder to chase them down and finish them, especially with my slower units such as scorpions. His actions doubled the requisite mobility on my part. To counter that this battle I had each of my jetbike squads turbo-boost into his flanks and because of their resilience and greater threat of my transports, I only lost one bike. These engaged smaller squads on the fringes (command squads, heavy weapon squads, and just those on the sides) to make a large damaging impact, and to disallow him to re-deploy to either flank. Because of their firepower against light infantry they heavily damage squads before they charged them, and with their resilience they whittled down the guardsmen until they ran and were wiped. My Dire Avengers blade-stormed one squad in cover, charged it, wiped it, and consolidated into two enemy squads, thus eliminating the threat of three squads in one turn. All together it was like facing six fewer squads as my troop choices eradicated or locked enemy squads in CC. At the same time my aspect warriors, mini-council, and vehicles took down other units and threats, and then turned to the units locked down by my troop choices that weren’t wiped by wounds or sweeping advances.
By using the strengths of these troop choices it was like fighting only one flank at a time and crushing it. While this is particularly fitting against light infantry targets such as tau/IG/orcs/tyranids/DE, it will still work against MEQ and tougher targets, as long as you pick your targets right (sending jetbikes against squads without rending or power weapons, possibly smaller squads, Dire Avengers against CC squads) and making the most of your heavy hitters, such as using your banshees on the ultramarine assault squad, the fire dragons on the terminator squad, etc. In this way the troops choices can hold their weight regardless of the target, and in effect making it so you don’t always have to use your mobility to attack solitary enemies, or flanks, but take the offensive to even the toughest opponents by locking half of them down and crushing the other half. This is also excellent at stopping your opponents fast units from taking objectives, or even leaving their table quarter if you are lucky and play well.
That all aside, these units definitely still have the ability to tear lighter targets asunder, destroy the Leman Rus from behind, wipe an HQ squad in one turn, and all those other capabilities we look to our aspect warriors for when concerning MEQ, or larger squads. Our troops choices can do that too, as long as we look to the right kind of target, just like every other option in our army.
Playing at lower points levels:
In times of old many people used the FSoD (flamy squad of death) to fill up troop slots easily for few points, and make a good suicide unit. The FSoD was a five to six squad (typically) of storm guardians, often in a falcon, with two flamers, possibly a destructor warlock+witchblade, and possibly haywire grenades. This squad could pop out and take down twenty guardsmen, or a tank, or cause other significant damage that often times won their points back and caused major problems for the enemy. This squad is no longer possible, as the guardians are now a ten-man minimum baring them from falcons, requiring more points for the base squad, and an expensive Waveserpent. So we have lost a valuable troops choice, and a multi-role one at that! This was a big blow to many people. This and the combination of having to take the limited troops choices instead of our aspect warriors at the 1000pt and below arena makes things much more challenging. It is a different game. Units must be used much more conservatively as no matter what you do you’re going to get about three marine kills per turn with a blade-storming Dire Avenger squad, about six to seven kills from a full squad of scatter War Walkers, which will be easily killed by return fire. To take down an army with much superior resilience you must depend on your assets. They are tough and very well equipped to kill you. You are fragile and equipped for a much lighter foe. You must use your mobility. Focusing your lighter fire all at once on a smaller opposition.
An example: You face a standard MEQ army. You do not have any Banshees, Fire Dragons, Harlequins, and but only four Starcannons found on your two War Walkers. You have a squad of six jetbikes, a mounted Dire Avenger squad, two War Walkers, two Vypers, and a Farseer. Everything is a large amount of your points total at this size of game. You need every last unit. You have excellent mobility, grabbing objectives would be easy but you cannot take the enemy head on. Your options lie in your mobility. You do have a considerable amount of firepower, large numbers of shots, just lacking AP3. The key is concentration of forces, and so as your enemy marches on the objectives you attack one flank and crush it. If you have time you can move onto the other flank and take it down too. Most marines do not have the mobility to catch you, to catch up to 36” star engines, 24” turbo boosting, 12+d6” jump troops. But they may try, and you use this to separate their army. They may send an assault squad at your Vypers. Let them come, and then descend with your Vypers, jetbikes, and War Walker fire. As they advance on the objectives you are whittling them down and they will want to get you. The key to taking resilient enemies is to kill them piecemeal and you can use your mobility to draw this out.
This is using your mobility to combine fire on a solitary foe, eradicating them. This is important when you cannot allocate squad A to enemy squad A, B to B and so on, your units must use their strengths and work together. Destruction is not even required, when you may out maneuver him to the objectives. These are basic rules that apply to 40k at any points level, but here they are paramount, with the structure changes and the lower points level.
--------------------------------------------------------------------------------
The most famous tactic of the Biel-Tan is the fear and awe inspiring Bahzhakhain. This is the fast moving charge utilizing total mobility to allocate forces and crush the enemy completely. Most often we see this as a transport based army, with jet-bikes, and jump-troops. When the vehicle rules for 4th edition came out many stopped using this strategy, believing their vehicles were no longer worth it. “Flying coffin” being the term used most often. With the 4th edition codex I believe this to have changed. I believe the transport rush to be again fully viable, if not more so.
Transports Reborn:
The main point that makes this whole tactic workable again is the vectored engine. Yes many people advocate against them as another piece that just adds to the unnecessary cost of your transport. There are times when this is definitely true, but there is a place for it. If you are unable to hide your vehicles and they get shot at on the first turn, the vectored engines definitely help but where it becomes a godsend is on your first big rush. A vehicle destroyed result for skimmers means complete death. Those who do not die from the crash (which most do die) will die from being trapped in the wreckage; easily destroyed thereafter, especially as most of those being transported in the Eldar army are either close range shooting, or close combat units. But with vectored engines a vehicle has to either get a destroyed result (1/6 chance after actually getting a glancing hit, this often taking a considerable amount of firepower in itself) or get a shot-down result (another 1/6 chance, with the other 4 results besides the destroyed being meaningless) and if they do manage to get a crash result to get at the gooey innards they have to blow it up twice. Yes you may have lost your expensive 150pt transport but unless they survive and have bright lances, they’re never going to make back their points anyway generally.
Their role is to get their cargo there intact. If they merely get shot down then the passengers can safely get out and charge next turn. Very…very few armies have the power to shoot down 4 transports 2 times in a 1500pt list, in one turn. The cost of the upgrade may seem like a lot for an upgrade, but look at it in the scope of for 3-4 vehicles in a 1500 point list. This doesn’t make for 10% of your list and it may make the entire operation viable. Yes there are other upgrades that are important too; spirit stones, holo-fields where able, sometimes star engines. But we should all know that mobility is the most expensive thing in the game, more than resilience, and more than firepower. The Eldar thrive on it, and while you should never pay for upgrades in excess, there is a point when you should know its worth.
I don’t advocate vectored engines on every vehicle all the time. I merely wish to illustrate that this gives a strong backbone to the Bahzhakhain transport rush. But it is not the only part. Many people believed that when our previous aspect warrior troops choices became elites, that it became too expensive and difficult to pack in enough power along with all these transports. There are a few things that save us from this.
The Hurdle of Troops Choices:
One being that jet-bikes are an excellent troops choice to take most of the time. Against light infantry they can cut swaths in enemy squads and are resilient enough to tackle large enemy squads until transported squads, or jump-pack squads arrive (and also have the possible role of occupying any heavy weapon squads that might be a risk to your transports). Against MEQ targets they are excellent at pursuing those troublesome Landspeeders, Rhinos, and the aforementioned heavy weapon squads. In the 4th edition codex this unit has become quite viable points wise. Because of their mobility and troops choice status they fit in very well in the Bahzhakhain army structure. Also their resilience can attract those low AP weapons that often target vehicles. Many of my opponents realize they cannot down the vehicle in a worthwhile way, so just shoot at my non-vehicle based units until my troops disembark. This is perfectly fine with me.
Another very viable troops choice is the Dire Avengers. These work very well in a Serpent of Fury format, and when used against horde armies I haven’t felt a lack for the heavier duty Scorpions in that sector of battle. With these two units, which are actually cheaper than aspect warriors and can fill many of the same roles, I find that the handicap from the structural change of the army choices can be easily overcome.
Non-Transported and Supporting Units:
The next point is our supporting and non-transport based units. Our Warp Spiders, as mentioned in their unit entry, are now a Fast Attack choice, and so are much easier to include in our Bahzhakhain lists. Both the Warp Spiders and the Swooping Hawks took large increases to their ability to fight their respective foes. Sadly these are not Meq Killers, and against those kinds of opponents the Eldar will have to continue to use our mobility and focusing of force. But either way, these two options work very well for deep striking in, or coming up the board 12”+ at a time. They host a large amount of firepower and are as much of a threat to horde opponents as your transported units. While Vypers are still good cover fire, I find that the boost to the other fast attack units is more worthy, and that the new jet-bikes fill the same role better (ie; do it, and do it from your troops section), though having more vehicles for your opponent to have to deal with does make the vehicle saturation harder to deal with.
The Eldar army as a whole has shifted from close combat domination to close action fighting (short range shooting), and some of our bigger guns. There have been considerable increases to the abilities of Swooping Hawks, Dire Avengers, Warp Spiders, Fire Dragons, Wraithguard, the Wraithlord, the Fire Prism, and others. And yes, while we have increases to all the close combat aspects, and units like the Harlequins, and improved Shinning Spears, the overall format of the Eldar army has become much more conducive to the above mentioned units. The 4th edition rules limited many of us to this army instead of our expensive and well painted Waveserpents, but now with a 4th edition codex that makes the transport army viable again we have many flavours of Biel-Tan and the Bahzhakhain that are intensely competitive. With the avatar, new wraithguard, and various other units and unit changes, a footslogging Biel-Tan is something to be feared. Try them all and realize that you are no longer limited to any single one to have an effective force. I have used all of them and enjoyed them a lot, though my style will always be mechanized in one form or another. 4th edition has given us much freedom.
This army is based around its incredible speed. Without the transports of the Bahzhakhain it would find itself unable to allocate the immensely powerful warriors of Biel-Tan. With a capacity for 36” of movement in a single turn the mechanized host is able to out maneuver any opposing army (besides other Eldar at times) in the game. We are capable of deploying all across our deployment zone and then completely redeploying at the front door of our enemy. Unless our opponent knows us, they cannot divine what will attack where, when, or how. With this speed the enemy has one turn to try to stop us dead, or run like hell. Neither is an easy task, especially not in a single turn. Our huge range of movement allows for precise assaults and attacks: engineering exactly where we wish to make contact. We also may, at the very last moment, rush to contact based objectives while our opponent has had to footslog and move towards the objectives starting turn three, or maybe even turn one. We are fast, mysterious, aloof, and unpredictable. We may be caught off guard but we can react so quickly the enemy will think we attacked first. Below I will speak on the above traits of our army, and others.
Deployment:
Each battle starts with deployment. Most mechanized commanders worst fear is loosing the first turn roll before the meat of our army gains Skimmer Moving Fast (SMF). To minimize damage we start by deploying our transports behind any available size three/area terrain. Different hobby shops and gaming rooms have a varied amount of such terrain, with some only having a few pieces, and some having pseudo-city fight boards. The more terrain, the better for us, but when there is a lack we put our Waveserpents and most essential units behind cover and hope for the best with the others. This is our weakest time, when we are not moving, but there is much that can be wrought from deployment.
There are two main forms, or extremes, in deployment. One is to deploy as the strongest unified formation, to deploy in the best position to move for objectives, separated into self-sufficient attack groups, and other setups, which ignore the specific deployment of your opponent. The other is to set up in relation to your opponent. Your enemy puts down an HQ squad at the back of his DZ between two buildings, so you place a five-man reaper squad in a direct line of sight (LoS) to it. Your opponent places a Leman Russ in a back corner, so you mirror it with Fire Dragons in a Falcon, in order to deal with the threat.
Most players do not use just one or the other but a combination of the two. This means that a lot of the time if you deploy first and put down a Fire Prism on your right flank your opponent is going to deploy something on the opposite side to try to deal with it. With your massive 36” movement range you can deploy where is safest and then attack where you want, so within what is safe you can manipulate your opponents deployment, trying to fragment his army, pull some parts of it away to give you flanks and non-unified formations, or at least make it so your opponent is left scratching his head over the question of where or what the hell you are going to do. Each unit you have is a different kind of threat to your opponent, and after figuring out what each squad means to your enemy you can better control his actions, and before fighting or even moving commences you can start shaping your attack and plan. In time your opponents will realize that your deployment is merely for safety purposes and that it does not necessarily indicate your plans. Most players will pick this up early, but those near subconscious habits of going “…mmmmk, I’ll counter that with this…so it goes here”.
Maximum speed, denying redeployment and counter-actions:
A good bunch of the time, depending on scenarios prospective opponents and other factors, you either will or will have the ability to drive directly into the enemy DZ and start assaults early before your opponent has a chance to re-deploy or cause casualties to you. Sometimes you will have to move to mid-field to safe staging points (intervening area three terrain) before making this attack, which will give you further options of where and what to attack, with your opponent having less of a clue of your intentions. Many armies will have at least some fast units that move 12” or more as quick reactionary units (chaos raptors, land speeders, warp spiders, etc) which will try to reinforce your points of attack. The suddenness of your attack will make these units less effective, or need to move further to get to you, or they will be assaulted first before they can actually react. Most armies and units only move 6” in the movement phase, and few of them have fleet moves. With this slow speed, once we disembark the enemy is unable to escape by normal means. Say you move your transports up to the enemy’s doorstep, and he backpedals 6”, you disembark and advance 6”+d6”+6”, almost definitely catching him in assault. There will be attempts to block your hatches and elsewhere in this article I will speak on this, but for the most part the bulk of your opponents army will be locked down and unable to escape. Part of this is using locking units like the Dire Avengers, jetbikes, and others, but the typical enemy is stuck in your net on turn two.
If you were footslogging, or moving 12” or less each turn, you will lack the capacity to outmaneuver most opponents unless you skillfully utilize pinning weapons, and focused fire on their transports and mobile units. As a footslogging force, other than what to shoot with ranged weaponry (and even then, sometimes), the enemy can see your intentions and plans unfolding and the quicker commander will counter them, or even ignore your feeble attempts to come to grasps with him, and carry on with his own plans.
This speed also allows a similar effect as seen by those quick reactionary units like the Raptors, and Landspeeders, etc., except our entire army can function this way. By the nature of our speed we may break up in formations or attack with united strength most of the time. While when a normal army must separate to move for objectives, or lend support to a flank, it takes a lot of perceivable time to properly react and rejoin unless you have good firing angles and firepower behind it. A lot of the available firepower in many armies is also infantry based, meaning if they move they cannot shoot. When such armies do need to react and attack they may not be able to bring their best unit for the situation to bear, because they cannot get in place in time. The Eldar army is made up of very specialized warriors, if we cannot use the right tool we may falter, and be defeated. With our transports we can allocate what we need, where we need it. One can easily start to see the advantages we court with our peerless speed.
The above backs up the importance of speed for initiative and unity, which we build our army upon. Most armies are best created with units that either offer static fire support (Dark Reapers, Pathfinders, etc), or units that can move 24-36”. This is so that if you choose to attack immediately all of your units may attack in unison, and so that other slower units are not found out in the open when the rest of your infantry is in CC, making it the only target of remaining enemy guns. The Warp Spiders are a good example (ignoring the deep strike option with some prefer, and some do not). Warp Spiders are an excellent unit, but unless they can advance in cover will find themselves out in the open during the turn that your transports are waiting to be able to disembark they are the only infantry unit in view open to any enemy guns in range and LoS. Slower units are less efficient than mechanized units (jetbikes, vehicles, and mounted squads) unless you intend on a slower approach, or a denser battlefield like city-fight.
Also the Star Engines upgrade helps your mobility substantially on the initial rush, and when switching flanks, etc.
As the name implies, I am Algavinn, a commander of Biel-Tan. Over the years my Biel-Tan army has taken many different forms, but the ultra-fast Bahzhakhain mechanized, CC intensive, transport army is my specialty. Any thread which heads in that direction catches my attention very quickly and tends to get a lengthy treatise from me. There are a few main techniques and strategies, which I tend to employ with great success in my mechanized rush and I often speak on in posts but I thought it would be easier to make a post more or less fully explaining these concepts so I could reference them for full clarity.
My army is broken down into different roles in which units will fall. These different roles are 1; the core of my army, 2; the locking section of my army (which includes a possible hit&run section to work in concert with locking units for a combination that has the effect of a core unit), and 3; the supporting section of my army.
The Close Combat Core:
The core of my army is made up of CC oriented squads (typically Howling Banshees, Striking Scorpions, and Harlequins) and their transports. This section will be transported directly to the enemy where each squad will disembark and begin a process of assaulting or multiply assaulting (engaging more than one squad at once), wiping a kill zone, attempting to consolidate into more infantry, and continuing the process from here. There are many nuances and details to this process, such as assaulting a section on my opponents front line that will allow the best flow of CC, that being: the path along which I can have my CC squads consolidate after each combat to keep them in CC and out of the enemy’s shooting phase, as well as working towards the most threatening units to my CC, eventually joining up with my locking squads to assist them in finishing their combatants, and from the initial assault after disembarkation they are attempting to assault units that would be firing heavy and special weapons at my transports such as auto/lascannons and plasma/melta guns.
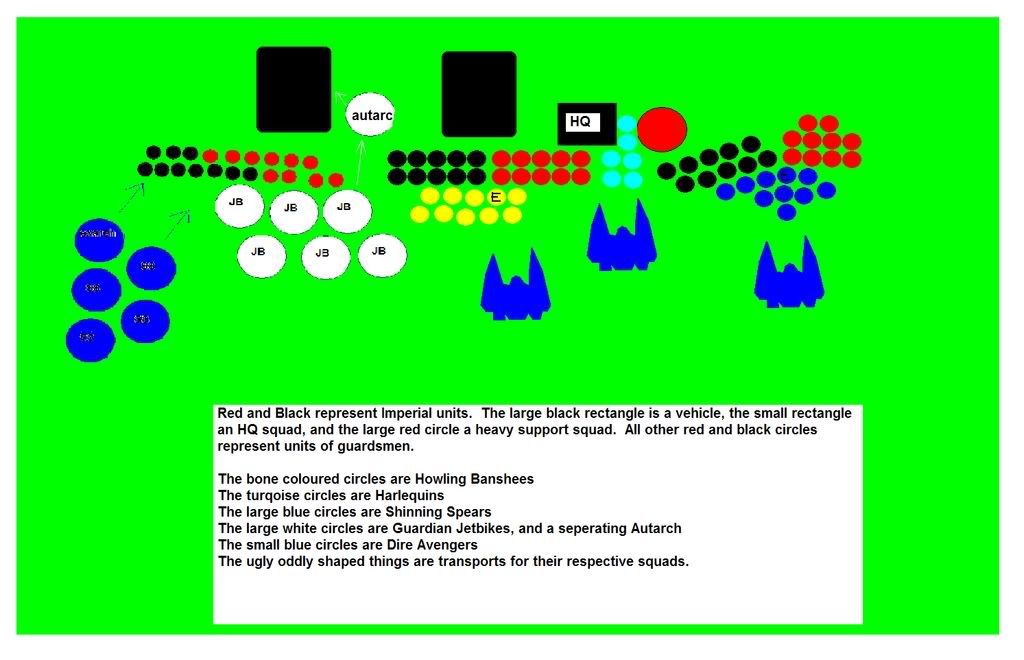
I often have two kinds of core units. One that is a full size aspect squad such as Striking Scorpions or Howling Banshees, which will charge straight into the meat of the enemy and start lowering their numbers. The second kind is a smaller more specialized, or even more elite unit such as the Harlequins. While very powerful the Harlequins can get unlucky with their rending and normal attacks potentially leaving some enemies alive to strike back, especially against tougher units, and with the Harlequins not being able to take a Waveserpent they are stuck in squads of five to six for this type of army, and as it is they are quite fragile. With this in mind I often have my large aspect squads attack the front and open a path (with the help of supporting fire and sometimes tank shocks) to my opponent’s small but important squads often found in the rear of the formation such as HQ, vehicles, and heavy weapon units. This can be seen in my diagram with the bone coloured banshees assaulting the front while the Harlequins go for double assaulting the enemy HQ and heavy weapon squad.
All in all this section of my army is tasked with the bulk of the killing.
Supporting Section:
The locking section is what I really want to talk about with this post, but first I will mention and get out of the way the supporting section. The supporting section is the simplest facet. This section is made up of supporting CC and ranged elements that assist the other portions of my army in their battlefield roles, or take care of special tasks they cannot efficiently do.
The first part of this would be things like supporting fire. Fire Prism’s, Vyper’s, Warwalker’s, Ranger’s, etc., these are some of the units that could contribute fire to units I am about to assault-units that have broken and are running away, which I don’t want to dedicate my CC units to chasing down where I would potentially be ruining the setup for my next assault-and shooting smaller opposing squads (such as HQ/heavy support units).
The second role of this section would be taken up by such squads as Fire Dragons, mini-councils, Rangers, Wraith constructs, or other units that may not normally go with my army but are taken to shore up some kind of deficiency in the list. If the core of my army is not made to take down vehicles, and my supporting section would be hard pressed to take down a Land Raider or Monolith and I am expecting one, then I may take Fire Dragons to fill this important role. I personally tend to pack a lot of units in my army that could deal with such a threat such as rending Harlequins, units with Haywire grenades, and the occasional other fusion gun, but sometimes when you play in a tournement atmosphere these type of ‘just in case’ support units show up. Pathfinders for that nasty C`tan that wins every year? Wraithguard squad to hold your table quarter from those damn X and X from army Y?
Another thing I find worth mentioning on the supporting fire section, is that in this kind of army, once you make your 24-36” rush towards the enemy and assault with your aspect warriors on the second turn, there doesn’t tend to be turning back. Because of this one must be very precise and a lot of this comes from expensive tooled up and resilient vehicles and after dropping their cargo the transports are, for the most part, relieved of this battlefield role and it would be terribly inefficient to be done with them at this point. Most opponents, however, overlook the empty Waveserpent, or at least are too occupied with your disgorged army hacking his squads to little bits to dedicate much fire to them. This means you will often have the chance to move your transports 12” or less to get a firing solution on the sides or back of enemy vehicles. I generally take my Waveserepents with a Scatterlaser and Shuriken Cannon, meaning I have seven strength 6 shots to poor into opposing armour. Between my empty Waveserpents and Falcon most enemy vehicles get dealt with without me ever having to dedicate part of my army’s core to anti-armour.
It is time to be onwards to the good stuff, though.
The Locking Section:
(I will try to make a posh Microsoft Paint™ illustration to show how all of this goes down after I finish writing, but I’ll try it just here for a start. It’s only 4am, I’ll have plenty of time later.)
The Biel-Tan army is a force of few, but elite warriors. It is easy for our attacks to be bogged down unless we strike first and maintain the initiative. Against Imperial Guard armies our CC units can quickly become bogged down as we find our Striking Scorpions are being counter-assaulted by 6 squads at once, or that after the first round our Howling Banshees are being whittled down bit by bit because they assaulted two Space Marine Tactical Squads at once and are not strong enough to achieve a definitive victory. This is where the locking section comes in. It helps maintain the initiative by being the metaphorical bully that holds your arms behind your back while the child of Khaine punches you in the stomach.
Now to be a bit more straight-forward (how unEldar-like of me). I first started using locking units when my main gaming partner, an Imperial Guard commander, started redeploying his army away from whichever flank I charged into. This would leave me to easily crush the flank I initially engaged but would force me to either re-embark or footslog all the way across the long table edge to his next formation. After this I started assaulting directly into the middle of his formation, or spread out a bit, but with this I didn’t maintain local superiority and each of my squads would get counter assaulted by one or two more squads. I usually won but it wasn’t very clean, to be sure. So as a remedy I took two jetbike squads and sent one into each of his flanks to assault one or more units. This made it so he could not re-deploy to the flanks and I had enough squads ‘locked down’ with my jetbikes that my core CC units were not being overwhelmed.
This seemed like a very solid and useful tactic, but the small jetbike squads I was using just wasn’t enough, especially if I ran up against Space Marines or something more individually powerful. While Space Marines are far more expensive than guardsmen, therefore meaning fewer units my locking units had to hold back, there is still more power available in the kill zone to hit back at me. So with this I started working on developing more effective locking units and combos.
The basics of a locking unit is a squad which A: has the mobility or potential to assault units I want out of the way at the same time as the core of my army engages and B: has the resilience to survive at least 2 rounds against the squad(s) it is engaging. The locking squad doesn’t necessarily need to take down what it’s fighting, though weakening it up before the core CC units engage it would be ideal, as by the point they come to the rescue they may be weak a few models.
With this in mind I started using a ‘lock pattern’ Dire Avenger squad in a Waveserpent. With their above average weapon skill, initiative, and the option of Defend and a Shimmershield for the Exarch, the squad is fairly durable against most opponents as long as they are not overstretched. Against tougher opponents like those with power weapons, or CC squads with multiple attacks, the Dire Avengers are suited to reducing their foes’ potential damage. Against weaker opponents they may manage to win or at least start weakening the squad(s) they have assaulted. This squad does very well, especially when shooting first so that they may more safely assault multiple squads. I like Dire Avengers for locking down things that are a bigger CC risk to my core units, perhaps Tyranid rippers, Space Marine Assault Squads, or even Monstrous Creatures, each of which could severely wound, or at least slow down, one of my advancing core units in some situations.
Another of my locking units, my favorite really, are my jetbikes. I bolstered their number to six from the smaller squads I started using in the beginning and added an Autarch. The jetbike models themselves are very mobile so can get where I need them to support in CC or perform locking duties, and with their T4 3+Sv they are good at surviving between combats and lasting in drawn out locking actions. Like the Dire Avengers, the jetbikes are able to toss some shuriken fire into a squad before they commit to close combat. The Autarch brings a lot to this unit. Firstly are the plasma grenades which allows this squad to go first and cause some damage and hopefully clear out some of the kill zone before an otherwise numerically superior force strikes back. Secondly the bulk of the kills from this unit will usually be coming from the Autarch, especially as it begins to take losses.
A lot of what this unit combo does for me, however, is in its supporting role where as jetbikes they are able to fly over the front lines of the opponent and any intervening close combats to fire on and assault important and vulnerable enemy units. Because of the Autarch’s shooting and CC potential this can often be an unexpected and game turning attack. Imperial Guard HQ squads, Eldar seers, heavy weapons squads, vehicles and other high-value high-impact units. With their mobility, massed strength four and 6 weaponry, and the Autarch’s options for a lance, fusion gun, and haywire grenades they are quite adept at anti-armour. One beautiful thing about this squad is it’s ability to separate. In the linked/below picture (however I manage to attach it) we see the Autarch separating from the bike squad before they carry on to start locking down a squad where they will not need the Autarch’s plasma grenades, and he swoops over the front line to attack a tank which is a potential threat to Eldar transports and other units. In my last 2,000 point game I had three laden transports within line of sight of an Imperial Guard Basilisk and Leman Russ, so I had my Autarch and jetbikes separate. The jetbikes went for the side and front armour of the Basilisk, and the Autarch fired on the side of the Leman Russ. I got lucky and managed to destroy them both. Afterwards the Autarch reformed with the jetbikes and then went after infantry squads on that flank.
So now let’s get into some more of the fun stuff. The locking section isn’t just for holding things in place and some, albeit potentially devastating, support action but can form a vital portion of my kills against opposing army’s. This is achieved by locking units working together with a hit and run unit. One of the most effective and easily thought of would be the Shinning Spears. This squad is straight deadly on the first turn, but tends to be hard to keep alive long enough to make them worth it, as even after the reduction they are an expensive squad. Using them by themselves usually just gets them killed, but here they can make a real difference. Add an Autarch to the squad and you have an extremely powerful unit, worthy to be the very hammer-fall of the Bahzhakhain rush, but to really shine (no pun intended) they need a locking unit to hold their victims in place for them so they can retain that immense power every assault phase until all the units the locking squad was holding are expended. In the picture below the Shinning spears would assault, withdraw, and then assault the other squad being locked down. If the jetbikes had locked down a third squad the Shinning Spears would continue assaulting and withdrawing until they were all eliminated, thus forming a self sufficient flank, which afterwards can assist other combats. Sometimes in this technique, until I have shooting units out of the way I may not choose to withdraw until it is my opponents turn to stay out of the shooting phase, but keep in mind this may be more dangerous than leaving every assault depending on what enemy units are engaged.
The other two choices for this position are Harlequins, and Warp Spiders. The Harlequins are strong enough to take on opponents by themselves but due to their vulnerability as detailed before it is good to have them working in concert with another squad, and with a locking unit potentially holding two to three enemy squads in combat, it is quick and safe for the small Harlequin squad to assault wipe and consolidate from one to the next (the same being true for Shinning Spears and Warp Spiders).
For this kind of list the Warp Spiders aren’t as fitting because of their lack of speed to keep up with the rest of the army, but this technique would work well with them elsewhere, especially with a kitted out Autarch in the squad.
Well that pretty much concludes the main mechanics behind my Bahzhakhain transport rush. Below is my posh illustration of a transport rush on an Imperial Guard force utilizing the above techniques. The entire army rushes forward at full speed using turbo boosts and star engines to approach ideal locations for assaulting on the second turn. If I hold back or don't get close enough the enemy is able to fall back and possibly redeploy to the sides to overwhelm my locking units, so it must be close, but not too close. If I tank shock into the enemy or get too deep they may wrap around me and go for back shots or block the exit, forcing me to move again or not be close enough for my CC squads to engage. Typically the jetbikes try to turbo boost behind some close terrain up a flank, but if not I just try to rely on target saturation and luck/unluck depending on who is rolling. Come second turn the Dire Avengers lock the right flanks, the Autarch and jetbikes separate with the jetbikes locking the left flank and the Autarch flies over this engagement to fire on an enemy vehicle. With the jetbikes now holding the left flank in place the Shinning Spears commence assault runs on the captive enemy. The Howling Banshees assault the center of the straddled enemy while the Harlequins go for the HQ squad lending leadership to the whole of the IG army, and a heavy weapon team that threatens the transports. The transports and support fire units (Fire Prism, and Vyper’s not pictured) take side/back shots on any live vehicles, and set themselves up to fire on any IG squads that run without being able to be pursued and attempt to cut off escape routes. The shown IG army is obviously under strength, but it fills the purpose of illustration.
Hopefully this has given insight into the workings of a CC intensive mechanized army; The Bahzhakhain. Below will be the picture of my diagram, and a sample list which implements the above tactics.
HQ:
130-Autarch-Jetbike-Mandiblasters-Power Sword-Fusion Gun
Elites:
162-Harlequins (6) 6xHarlequins Kiss-Shadowseer
187-Howling Banshees (10) Exarch-Executioner-War Shout
165-Wave Serpent-Scatter Laser-Shuriken Cannon-Soul Stones-Vectored/Star Engines
Troops:
132-Guardian Jetbikes (6)
152-Dire Avengers (10) Exarch-Defend-Powersword and Shimmershield
165-Wave Serpent-Scatter Laser-Shuriken Cannon-Soul Stones-Vectored/Star Engines
Fast Attack:
70-Vyper-Scatter laser-Shuriken Cannon
70-Vyper-Scatter laser-Shuriken Cannon
237-Shinning Spears (5) Exarch-Star Lance-Skilled Rider-Withdraw
Heavy Support:
220-Falcon-Scatter laser-Shuriken Cannon-Star/Vectored Engines-Holo Field-Soul Stone
160-Fire Prism-Holo Fields-Soul Stones
www.40konline.com/community/index.php?topic=145328.msg1758716#msg1758716
I've been playing Eldar for about 15 years now and there never was a day when people didn’t say; "What? you're taking that upgrade! BUT ITS SOOO EXPENSIVE!" Most of these people were not seeing the overall utility that this upgrade gave to not just the unit that took it, but the entire army. There is no army in which upgrades play such a major role for than the Eldar. This is true from grenades, to exarches and their abilities, to the legendary (a.k.a. infamous) Holo-Fields, which can change the entire role of a unit in the battle. The commander who buys every upgrade available in an attempt to make his units capable of approaching every situation will end up having half the units of a balanced army, and a third of a bare bones army. In this post I will speak of my own particular style and why I take such upgrade saturated units, and where I do not take these upgrades. Before I even begin I state rule one: You should never EVER take all upgrades just because you can, upgrades which do not contribute to the overall theme of your armies method, upgrades you don’t necessarily expect to actually use, or upgrades that you do not understand how to use correctly.
I also want to get this out now. There is a point when equipment comes in when building an army list, but no matter how badass an upgrade, or a single unit is, having a balanced army that can deal with expected enemy threats (such as anti-personnel needs, anti-tank, dealing with the enemies firepower and CC, etc) is number one. An army with one HQ two-five man troop squads and a Super Heavy is not balanced, and is not likely to win. Even such important upgrades as a Falcon’s Holo-Field’s, or that Farseer with Guide can be done without if you play intelligently with a balanced army. Make your army, then enhance it.
I am a Biel-Tan player to the core, and am fully mechanized. I find that the most important thing in 40k, and indeed in war, is maintaining the initiative. Eldar are able to this with disgusting speed and elite troops so as to be able to make precision attacks and attain local superiority with ease. While our vehicles and units are the base of all of this, for me the equipment seals the deal. My typical list is as follows:
HQ: 130 8%
125-Autarch-Jetbike-Mandiblasters-Scorpion Chain Sword-Fusion Gun
Elites: 512 32%
168-Harlequins (6)-5x Harlequins Kiss-Shadow Seer
189-Howling Bansees (10)-Exarch-Executioner-Acrobatic-War Shout
155-Wave Serpent-2xShuriken Cannons-SS-Vectored Engines-Star Engines
Troops: 560 35%
152-Dire Avengers (10)-Exarch-Twin Shuriken Catapults-Defend
155-Wave Serpent-2xShuriken Cannons-SS-Vectored Engines-Star Engines
132-Jetbikes (6)
121-Jetbikes (3)-Warlock-Destructor
Fast Attack: 60 4%
60-Vyper-2xShuriken Cannon
Heavy Support: 345 22%
185-Falcon-Scatter Laser-Shuriken Cannon-SS-Holo Fields-Star Engines
160-Fire Prism-SS-Holo Fields
-1607-
There are many fully valid philosophies on how to purchase upgrades when looking at an army or a unit as a whole. They all tend to be on a spectrum between taking no upgrades in an attempt to maximize the sheer number of units deployed, and taking as many upgrades as possible to field a ‘true grit’ elite force. Either end, as with all extremes, errs on folly. Taking too many upgrades will cause your force to be heavily outnumbered by even the smallest opposing army, which will loose you the initiative, because of army balance (not being able to take all the units and unit types you want and need, as stated above in the second paragraph), being able to be easily manipulated with so few units to his many, and other reasons. Taking too few upgrades can make units borderline useless; nothing but meat shields which are hard to wield and get in the way.
There are many aspects to upgrades, equipment, and extra options, one of them being opportunity cost. This is an economy term meaning basically what you could get instead of what you have. Where this comes in, in 40k is in decisions like should I take an extra Swooping Hawk, or give my Exarch a Sunrifle? Well you get an extra body with the additional standard hawk, but the Sunrifle does three times the firepower of a normal Lasblaster, at the Exarch’s higher ballistic skill, and you get the utility of causing pinning checks. In this particular instance it seems like from the information given that it would be best to get this upgrade because of the trade off benefits verses its costs. Where this conclusion may become wrong is when you make the choice of getting upgrades so often that every casualty you take dramatically reduces your ability to defeat the enemy (be it by having many tooled up exarch’s or characters, unused equipment taking up the place of the ablative wounds you need to protect what is really important, or having to sacrifice important squads when there could have been better alternatives, etc.).
As another way of putting this lets look at it this way. If I need to crush my opponent’s flank I know I need two intact squads on location to do it. If I take bare-bones squads and transports I know that I need at least four squads and corresponding transports to ensure that I will get the necessary forces where and when I need them due to incoming fire, local resistance, and my basic troop’s damage capabilities. If I take specific upgrades that will help me arrive, retain my squad numbers, and increase my killing efficiency, I will use more points but need less. In this same example I will only need three squads and vehicles to make sure I will have local superiority and the ability to crush this flank as opposed to four.
Some people prefer to take numerous basic squads instead of a few well-equipped units, such as the above. I personally take the route of fielding fewer units than many of my fellow Biel-Tan Brethren. The reason for this is that when you take several basic squads there are many situations in which you are depending on luck more so than I am. If you get lucky you will have more units than I have on the table but it is much easier for you to take a devastating hit than I will. Here is an example:
Say you take a Falcon and just add Spirit Stones to it, giving you a 140pt tank. I will take the same unit with Spirit Stones, but add Vectored Engines and Holo-Fields for an extra 55 points, putting me at 195. A lucky shot will still bring down my tank despite these expensive upgrades, but it statistically takes a high volume of fire (which it absorbs), or a severely unlikely shot, while a basic Falcon has a high chance of being destroyed in a given game if it is saturated with fire. Lets look at the opportunity cost here. You will have 55 points more than me to spend, but I will most likely have my tank on the table all game, while you may or may not complete the objectives you set out for it. In my mind this dependability is worth paying 4/3 the points.
Some upgrades do not make such a significant difference in the scope of your whole army, as the dependability of your transports might be. Below I will talk about ‘army themes’ which is my take on how to say if each upgrade is really worth its points, or if something else would better take its place.
Army Themes and Upgrade Choices:
Each army has it’s own particular method of beating the enemy. Some armies are massive! They use their numbers to gain resilience, and either out last the enemy while using CC or ranged power to slowly destroy them (some IG, Orks, etc). Some armies are inherently resilient but few in numbers, able to weather large amounts of damage while using their elite CC or ranged status to kill the enemy (Space Marines). My army uses incredible speed and a high degree of close combat prowess to draw out or zero in on groups of enemy units and with local superiority I destroy them. When taking upgrades and equipment they should generally be supporting the theme of your army (such as those listed above). The massed army will take some upgrades to kill the enemy, but will mostly use points on models. The second army will try to push and maintain its resilience, as well as maximizing its killing power. My army will take whatever is necessary to ensure speed, and attack power.
The method of my attack in a standard 1v1 annihilation battle is thus: On the first turn I am deployed in whatever way keeps my transports safe from enemy fire, and then it launches full speed either to a staging area (someplace in the middle, out of line of sight where it can more easily attack in the next turn), or into the enemy lines. My fast skimmer transports with the addition of Star Engines are typically able to make it all the way on the first turn. It also allows me to arrive at once instead of piecemeal, and at ideal locations instead of just 3” too far away or 6” to the right from where I wanted to be. With this speed the enemy has one turn to try to shoot at my transports before I disembark. My defensive upgrades (Spirit Stones, Holo-Fields, Vectored Engines) make it unlikely that in this one turn of shooting the enemy can shoot down more than one transport, and often times it will merely crash instead of killing the passengers.
In my last five or six games I have had four transports shot down, now. Only two of them were actually destroyed, and only one of them still having passengers on board. After the first turn, my units disembark, and overpower the flank, and then continue on. When a transport is shot down, enough of my army has made it through (typically a bare minimum of ¾ transports) to lock down the enemy, and keep them secure or kill them while reinforcements arrive (be this jetbike units, Quick Reaction Force transports waiting behind to fill gaps, or the squad from the transport that was shot down).
In light of this strategy many of my upgrades are seen as vital to the success of my attack. So we know that they follow my ‘theme’ of speed and local superiority. Points wise, these are affective upgrades; I still have enough manpower to destroy a flank, and if used correctly an entire army at once. Without the upgrades taken I would be playing a different type of army, one not capable of moving on the first turn, attacking on the second, and wiping on the third or forth. It would take more time, and more forces, but with these upgrades and their correct use it is very much possible. In other armies there are good and bad upgrade choices, such as adding all the above vehicle upgrades I did to a vehicle that isn’t needing that huge resilience or speed, such as a Fire Prism that will most likely spend the game in a secluded table corner shooting through narrow firing lanes at distant enemies, not needing to deploy greatly or taking much, of any, opposing fire.
This is not a full discussion on the topic of upgrades and equipment, but an in-depth look at an Eldar army, which attempts to use the available upgrades to a high degree of efficiency. The above army and strategy it uses functions, and functions excellently while using a large amount of upgrades. I write this, not only to help the community see another aspect of the Biel-Tan army, and how to better use and choose their upgrades, but to try to stop people from ignorantly telling others not to take this or that upgrade because it is ‘too’ expensive. When an upgrade is a fraction of the cost of the wielder, and increases its efficiency or performance by a large amount, or contributes significantly to the army as a whole it is worth it. There is a value to every upgrade that is based off of its opportunity cost, and greater use within the army. Look at these factors before writing off an item or an army. The upgrade may or may not fit into the army, but be aware of why it does or doesn’t. My army has 30% of its points cost in upgrades. This does not cripple it. In other armies it may not function with such upgrades, but the Eldar are capable of fielding such an equipment heavy elite force.
I'm going to compile and consolidate my entire Bahzhakhain project here in this thread so I dont loose parts of it here or there, and can better look at it as a comprehensive set. Many of the articles below were written with this article set in mind, and some were not and are yet to be adapted and edited to this purpose. Also many of them have yet to be edited to include/adress the comments and discussion that were attached to them. On the bottom of most articles (if they have been posted somewhere) is the link to it's original thread.
--------------------------------------------------------------------------------
Welcome to the Bahzhakhain. There will doubtlessly be introductions explaining and repeating these words throughout the article set so I will keep it brief. The Bahzhakhain is the Biel-Tan style of an ultra-fast attack on the enemy, often using Waveserpent and Falcon grav transport tanks to deliver the powerful aspect warriors of Khaine. The attack is based on the peerless speed of our tanks, and the elite nature of our warriors. Before our opponent knows we are there we are cleaning our weapons of their filthy blood. We give the opponent no time to react, no time to comprehend where and how we will utterly crush them. This article set is looking at the most efficient and synergetic way to build and play a mechanized Bahzhakhain CC intensive army. There are other forms of the Bahzhakhain, but I find the CC version the most competitive. This is not a guide to friendly play, and not a guide to competitive play, but a guide to how to play this style and play it best. The attitudes and method of how you apply it is up to you.
In the articles below we will look at as many aspects of the army as I am able to fathom. These articles will include analysis on:
-roles of the army (main CC killers, locking units, support fire, hit and run support CC).
-how to fight in battle groups
-dealing with armour
-target priority
-proper allocation of force
-general tips and tricks of the bahzhakhain method (measuring, protecting hatch blocking, specific unit tactics, etc)
-how other roles/units take over when you loose a unit
-the speed build of this style. 24-36" The importance of vehicle speed and precision
-the importance of upgrades and equipment
-and anything else I can think of or is requested of me that I find fitting.
--------------------------------------------------------------------------------
We will start with a few points on the Eldar army as a whole, and some general issues I feel are worth saying here.
-Dealing with the structural changes in the 4th edition-
The big change for the Biel-Tan army is the change of the force organizational chart back to its norm. We no longer can take our Scoprions, Banshees, and other elite aspect warriors in large numbers as troops. We now are forced to take the normal troop choices of craftworld vanilla. There have been many changes, however, to make the Biel-Tan army, and indeed the Eldar army itself, still function with deadly precision. It is my position that the Biel-Tan way has become even more effective and deadly because of these structural changes, once they are apparent. It is true that in smaller point games it may appear to be harder to cope with the lack of aspect warriors, and much easier in larger points were you only take the requisite troops choices. It merely takes different methods to play at these points levels, but this was true before 4th edition as well. Below I will try to address all of these issues and other to illustrate how to continue the Biel-Tan style and format, in this new structure.
In third edition almost all of our aspect warriors were found in the elites choice, and in 4th edition we have an additional elites choice, and an excellent one at that, this being the Harlequin Troupe. So from the onset it appears that it is going to be very hard to fit in all the precise tools we need from the elites choices. One thing that helped this was the movement of the Warp Spiders to the fast attack chart, opening up quite a bit of room there. Also guardian jetbike units were moved to troops, giving an additional choice there (helping make up for the loss of the FSoD as noted below) to take more Warp Spiders. These small changes help relieve quite a bit of the stress and crowding of our force organization chart when it comes to our aspect warriors.
Almost all of our units through the whole codex have been improved in some way. Aspect warriors most of all, have been refined to their particular roles, given stronger equipment and abilities to these ends, and have overall become far more deadly towards their particular targets. This helps compensate for the fewer aspect warriors that we can take, especially at lower points levels. Also the troop choices which we are now forced to take are far superior than in 3rd edition, and if used correctly, and not just to fill in for the lack of aspect warriors, they prove themselves often quite sufficient.
Here is the big part of the whole structural change. We are now required to take at least two troop choices made up of units we may never have wanted to take before in the first place. But the troop choices have been greatly improved so are not as much the ball and chain as many, including myself, suspected. Jetbikes are now Troop choices and are about 2/3 the cost, making them a much more practical choice. They are fast, they are resilient, and like the Dire Avengers they can take a toll on light infantry, light vehicles, and can lock enemies in CC. The Dire Avengers have taken huge increases as noted above and in their entry. We also have access to the Alaitoc pathfinders which against the right target can be very useful. As always I do not suggest solitary squads of rangers, or even pathfinders, unless you have a particular target in mind that they are fit for. Small groups of rangers/pathfinders will cause few deaths and lack the huge utility of their pinning weapons when found in small numbers. Note that this is not an argument against rangers/pathfinders, it is just a nudge into the path of using them correctly for their proper roles when misuse of rangers is a common mistake.
Mechanized Armies: This is where the troop choices really start pulling their weight. On top of the basic improvements to jetbikes and Dire Avengers, they open up a whole new role in the army. Well, yes the role existed before but now there is a larger and more capable availability. In my last battle I played a 1350pt battle against IG which had 2 jetbike squads, and a Dire Avenger squad in a Waveserpent. In previous battles I’ve had my IG opponent do a massive redeployment, shooting as he backpedals, making it much harder to chase them down and finish them, especially with my slower units such as scorpions. His actions doubled the requisite mobility on my part. To counter that this battle I had each of my jetbike squads turbo-boost into his flanks and because of their resilience and greater threat of my transports, I only lost one bike. These engaged smaller squads on the fringes (command squads, heavy weapon squads, and just those on the sides) to make a large damaging impact, and to disallow him to re-deploy to either flank. Because of their firepower against light infantry they heavily damage squads before they charged them, and with their resilience they whittled down the guardsmen until they ran and were wiped. My Dire Avengers blade-stormed one squad in cover, charged it, wiped it, and consolidated into two enemy squads, thus eliminating the threat of three squads in one turn. All together it was like facing six fewer squads as my troop choices eradicated or locked enemy squads in CC. At the same time my aspect warriors, mini-council, and vehicles took down other units and threats, and then turned to the units locked down by my troop choices that weren’t wiped by wounds or sweeping advances.
By using the strengths of these troop choices it was like fighting only one flank at a time and crushing it. While this is particularly fitting against light infantry targets such as tau/IG/orcs/tyranids/DE, it will still work against MEQ and tougher targets, as long as you pick your targets right (sending jetbikes against squads without rending or power weapons, possibly smaller squads, Dire Avengers against CC squads) and making the most of your heavy hitters, such as using your banshees on the ultramarine assault squad, the fire dragons on the terminator squad, etc. In this way the troops choices can hold their weight regardless of the target, and in effect making it so you don’t always have to use your mobility to attack solitary enemies, or flanks, but take the offensive to even the toughest opponents by locking half of them down and crushing the other half. This is also excellent at stopping your opponents fast units from taking objectives, or even leaving their table quarter if you are lucky and play well.
That all aside, these units definitely still have the ability to tear lighter targets asunder, destroy the Leman Rus from behind, wipe an HQ squad in one turn, and all those other capabilities we look to our aspect warriors for when concerning MEQ, or larger squads. Our troops choices can do that too, as long as we look to the right kind of target, just like every other option in our army.
Playing at lower points levels:
In times of old many people used the FSoD (flamy squad of death) to fill up troop slots easily for few points, and make a good suicide unit. The FSoD was a five to six squad (typically) of storm guardians, often in a falcon, with two flamers, possibly a destructor warlock+witchblade, and possibly haywire grenades. This squad could pop out and take down twenty guardsmen, or a tank, or cause other significant damage that often times won their points back and caused major problems for the enemy. This squad is no longer possible, as the guardians are now a ten-man minimum baring them from falcons, requiring more points for the base squad, and an expensive Waveserpent. So we have lost a valuable troops choice, and a multi-role one at that! This was a big blow to many people. This and the combination of having to take the limited troops choices instead of our aspect warriors at the 1000pt and below arena makes things much more challenging. It is a different game. Units must be used much more conservatively as no matter what you do you’re going to get about three marine kills per turn with a blade-storming Dire Avenger squad, about six to seven kills from a full squad of scatter War Walkers, which will be easily killed by return fire. To take down an army with much superior resilience you must depend on your assets. They are tough and very well equipped to kill you. You are fragile and equipped for a much lighter foe. You must use your mobility. Focusing your lighter fire all at once on a smaller opposition.
An example: You face a standard MEQ army. You do not have any Banshees, Fire Dragons, Harlequins, and but only four Starcannons found on your two War Walkers. You have a squad of six jetbikes, a mounted Dire Avenger squad, two War Walkers, two Vypers, and a Farseer. Everything is a large amount of your points total at this size of game. You need every last unit. You have excellent mobility, grabbing objectives would be easy but you cannot take the enemy head on. Your options lie in your mobility. You do have a considerable amount of firepower, large numbers of shots, just lacking AP3. The key is concentration of forces, and so as your enemy marches on the objectives you attack one flank and crush it. If you have time you can move onto the other flank and take it down too. Most marines do not have the mobility to catch you, to catch up to 36” star engines, 24” turbo boosting, 12+d6” jump troops. But they may try, and you use this to separate their army. They may send an assault squad at your Vypers. Let them come, and then descend with your Vypers, jetbikes, and War Walker fire. As they advance on the objectives you are whittling them down and they will want to get you. The key to taking resilient enemies is to kill them piecemeal and you can use your mobility to draw this out.
This is using your mobility to combine fire on a solitary foe, eradicating them. This is important when you cannot allocate squad A to enemy squad A, B to B and so on, your units must use their strengths and work together. Destruction is not even required, when you may out maneuver him to the objectives. These are basic rules that apply to 40k at any points level, but here they are paramount, with the structure changes and the lower points level.
--------------------------------------------------------------------------------
The most famous tactic of the Biel-Tan is the fear and awe inspiring Bahzhakhain. This is the fast moving charge utilizing total mobility to allocate forces and crush the enemy completely. Most often we see this as a transport based army, with jet-bikes, and jump-troops. When the vehicle rules for 4th edition came out many stopped using this strategy, believing their vehicles were no longer worth it. “Flying coffin” being the term used most often. With the 4th edition codex I believe this to have changed. I believe the transport rush to be again fully viable, if not more so.
Transports Reborn:
The main point that makes this whole tactic workable again is the vectored engine. Yes many people advocate against them as another piece that just adds to the unnecessary cost of your transport. There are times when this is definitely true, but there is a place for it. If you are unable to hide your vehicles and they get shot at on the first turn, the vectored engines definitely help but where it becomes a godsend is on your first big rush. A vehicle destroyed result for skimmers means complete death. Those who do not die from the crash (which most do die) will die from being trapped in the wreckage; easily destroyed thereafter, especially as most of those being transported in the Eldar army are either close range shooting, or close combat units. But with vectored engines a vehicle has to either get a destroyed result (1/6 chance after actually getting a glancing hit, this often taking a considerable amount of firepower in itself) or get a shot-down result (another 1/6 chance, with the other 4 results besides the destroyed being meaningless) and if they do manage to get a crash result to get at the gooey innards they have to blow it up twice. Yes you may have lost your expensive 150pt transport but unless they survive and have bright lances, they’re never going to make back their points anyway generally.
Their role is to get their cargo there intact. If they merely get shot down then the passengers can safely get out and charge next turn. Very…very few armies have the power to shoot down 4 transports 2 times in a 1500pt list, in one turn. The cost of the upgrade may seem like a lot for an upgrade, but look at it in the scope of for 3-4 vehicles in a 1500 point list. This doesn’t make for 10% of your list and it may make the entire operation viable. Yes there are other upgrades that are important too; spirit stones, holo-fields where able, sometimes star engines. But we should all know that mobility is the most expensive thing in the game, more than resilience, and more than firepower. The Eldar thrive on it, and while you should never pay for upgrades in excess, there is a point when you should know its worth.
I don’t advocate vectored engines on every vehicle all the time. I merely wish to illustrate that this gives a strong backbone to the Bahzhakhain transport rush. But it is not the only part. Many people believed that when our previous aspect warrior troops choices became elites, that it became too expensive and difficult to pack in enough power along with all these transports. There are a few things that save us from this.
The Hurdle of Troops Choices:
One being that jet-bikes are an excellent troops choice to take most of the time. Against light infantry they can cut swaths in enemy squads and are resilient enough to tackle large enemy squads until transported squads, or jump-pack squads arrive (and also have the possible role of occupying any heavy weapon squads that might be a risk to your transports). Against MEQ targets they are excellent at pursuing those troublesome Landspeeders, Rhinos, and the aforementioned heavy weapon squads. In the 4th edition codex this unit has become quite viable points wise. Because of their mobility and troops choice status they fit in very well in the Bahzhakhain army structure. Also their resilience can attract those low AP weapons that often target vehicles. Many of my opponents realize they cannot down the vehicle in a worthwhile way, so just shoot at my non-vehicle based units until my troops disembark. This is perfectly fine with me.
Another very viable troops choice is the Dire Avengers. These work very well in a Serpent of Fury format, and when used against horde armies I haven’t felt a lack for the heavier duty Scorpions in that sector of battle. With these two units, which are actually cheaper than aspect warriors and can fill many of the same roles, I find that the handicap from the structural change of the army choices can be easily overcome.
Non-Transported and Supporting Units:
The next point is our supporting and non-transport based units. Our Warp Spiders, as mentioned in their unit entry, are now a Fast Attack choice, and so are much easier to include in our Bahzhakhain lists. Both the Warp Spiders and the Swooping Hawks took large increases to their ability to fight their respective foes. Sadly these are not Meq Killers, and against those kinds of opponents the Eldar will have to continue to use our mobility and focusing of force. But either way, these two options work very well for deep striking in, or coming up the board 12”+ at a time. They host a large amount of firepower and are as much of a threat to horde opponents as your transported units. While Vypers are still good cover fire, I find that the boost to the other fast attack units is more worthy, and that the new jet-bikes fill the same role better (ie; do it, and do it from your troops section), though having more vehicles for your opponent to have to deal with does make the vehicle saturation harder to deal with.
The Eldar army as a whole has shifted from close combat domination to close action fighting (short range shooting), and some of our bigger guns. There have been considerable increases to the abilities of Swooping Hawks, Dire Avengers, Warp Spiders, Fire Dragons, Wraithguard, the Wraithlord, the Fire Prism, and others. And yes, while we have increases to all the close combat aspects, and units like the Harlequins, and improved Shinning Spears, the overall format of the Eldar army has become much more conducive to the above mentioned units. The 4th edition rules limited many of us to this army instead of our expensive and well painted Waveserpents, but now with a 4th edition codex that makes the transport army viable again we have many flavours of Biel-Tan and the Bahzhakhain that are intensely competitive. With the avatar, new wraithguard, and various other units and unit changes, a footslogging Biel-Tan is something to be feared. Try them all and realize that you are no longer limited to any single one to have an effective force. I have used all of them and enjoyed them a lot, though my style will always be mechanized in one form or another. 4th edition has given us much freedom.
This army is based around its incredible speed. Without the transports of the Bahzhakhain it would find itself unable to allocate the immensely powerful warriors of Biel-Tan. With a capacity for 36” of movement in a single turn the mechanized host is able to out maneuver any opposing army (besides other Eldar at times) in the game. We are capable of deploying all across our deployment zone and then completely redeploying at the front door of our enemy. Unless our opponent knows us, they cannot divine what will attack where, when, or how. With this speed the enemy has one turn to try to stop us dead, or run like hell. Neither is an easy task, especially not in a single turn. Our huge range of movement allows for precise assaults and attacks: engineering exactly where we wish to make contact. We also may, at the very last moment, rush to contact based objectives while our opponent has had to footslog and move towards the objectives starting turn three, or maybe even turn one. We are fast, mysterious, aloof, and unpredictable. We may be caught off guard but we can react so quickly the enemy will think we attacked first. Below I will speak on the above traits of our army, and others.
Deployment:
Each battle starts with deployment. Most mechanized commanders worst fear is loosing the first turn roll before the meat of our army gains Skimmer Moving Fast (SMF). To minimize damage we start by deploying our transports behind any available size three/area terrain. Different hobby shops and gaming rooms have a varied amount of such terrain, with some only having a few pieces, and some having pseudo-city fight boards. The more terrain, the better for us, but when there is a lack we put our Waveserpents and most essential units behind cover and hope for the best with the others. This is our weakest time, when we are not moving, but there is much that can be wrought from deployment.
There are two main forms, or extremes, in deployment. One is to deploy as the strongest unified formation, to deploy in the best position to move for objectives, separated into self-sufficient attack groups, and other setups, which ignore the specific deployment of your opponent. The other is to set up in relation to your opponent. Your enemy puts down an HQ squad at the back of his DZ between two buildings, so you place a five-man reaper squad in a direct line of sight (LoS) to it. Your opponent places a Leman Russ in a back corner, so you mirror it with Fire Dragons in a Falcon, in order to deal with the threat.
Most players do not use just one or the other but a combination of the two. This means that a lot of the time if you deploy first and put down a Fire Prism on your right flank your opponent is going to deploy something on the opposite side to try to deal with it. With your massive 36” movement range you can deploy where is safest and then attack where you want, so within what is safe you can manipulate your opponents deployment, trying to fragment his army, pull some parts of it away to give you flanks and non-unified formations, or at least make it so your opponent is left scratching his head over the question of where or what the hell you are going to do. Each unit you have is a different kind of threat to your opponent, and after figuring out what each squad means to your enemy you can better control his actions, and before fighting or even moving commences you can start shaping your attack and plan. In time your opponents will realize that your deployment is merely for safety purposes and that it does not necessarily indicate your plans. Most players will pick this up early, but those near subconscious habits of going “…mmmmk, I’ll counter that with this…so it goes here”.
Maximum speed, denying redeployment and counter-actions:
A good bunch of the time, depending on scenarios prospective opponents and other factors, you either will or will have the ability to drive directly into the enemy DZ and start assaults early before your opponent has a chance to re-deploy or cause casualties to you. Sometimes you will have to move to mid-field to safe staging points (intervening area three terrain) before making this attack, which will give you further options of where and what to attack, with your opponent having less of a clue of your intentions. Many armies will have at least some fast units that move 12” or more as quick reactionary units (chaos raptors, land speeders, warp spiders, etc) which will try to reinforce your points of attack. The suddenness of your attack will make these units less effective, or need to move further to get to you, or they will be assaulted first before they can actually react. Most armies and units only move 6” in the movement phase, and few of them have fleet moves. With this slow speed, once we disembark the enemy is unable to escape by normal means. Say you move your transports up to the enemy’s doorstep, and he backpedals 6”, you disembark and advance 6”+d6”+6”, almost definitely catching him in assault. There will be attempts to block your hatches and elsewhere in this article I will speak on this, but for the most part the bulk of your opponents army will be locked down and unable to escape. Part of this is using locking units like the Dire Avengers, jetbikes, and others, but the typical enemy is stuck in your net on turn two.
If you were footslogging, or moving 12” or less each turn, you will lack the capacity to outmaneuver most opponents unless you skillfully utilize pinning weapons, and focused fire on their transports and mobile units. As a footslogging force, other than what to shoot with ranged weaponry (and even then, sometimes), the enemy can see your intentions and plans unfolding and the quicker commander will counter them, or even ignore your feeble attempts to come to grasps with him, and carry on with his own plans.
This speed also allows a similar effect as seen by those quick reactionary units like the Raptors, and Landspeeders, etc., except our entire army can function this way. By the nature of our speed we may break up in formations or attack with united strength most of the time. While when a normal army must separate to move for objectives, or lend support to a flank, it takes a lot of perceivable time to properly react and rejoin unless you have good firing angles and firepower behind it. A lot of the available firepower in many armies is also infantry based, meaning if they move they cannot shoot. When such armies do need to react and attack they may not be able to bring their best unit for the situation to bear, because they cannot get in place in time. The Eldar army is made up of very specialized warriors, if we cannot use the right tool we may falter, and be defeated. With our transports we can allocate what we need, where we need it. One can easily start to see the advantages we court with our peerless speed.
The above backs up the importance of speed for initiative and unity, which we build our army upon. Most armies are best created with units that either offer static fire support (Dark Reapers, Pathfinders, etc), or units that can move 24-36”. This is so that if you choose to attack immediately all of your units may attack in unison, and so that other slower units are not found out in the open when the rest of your infantry is in CC, making it the only target of remaining enemy guns. The Warp Spiders are a good example (ignoring the deep strike option with some prefer, and some do not). Warp Spiders are an excellent unit, but unless they can advance in cover will find themselves out in the open during the turn that your transports are waiting to be able to disembark they are the only infantry unit in view open to any enemy guns in range and LoS. Slower units are less efficient than mechanized units (jetbikes, vehicles, and mounted squads) unless you intend on a slower approach, or a denser battlefield like city-fight.
Also the Star Engines upgrade helps your mobility substantially on the initial rush, and when switching flanks, etc.
As the name implies, I am Algavinn, a commander of Biel-Tan. Over the years my Biel-Tan army has taken many different forms, but the ultra-fast Bahzhakhain mechanized, CC intensive, transport army is my specialty. Any thread which heads in that direction catches my attention very quickly and tends to get a lengthy treatise from me. There are a few main techniques and strategies, which I tend to employ with great success in my mechanized rush and I often speak on in posts but I thought it would be easier to make a post more or less fully explaining these concepts so I could reference them for full clarity.
My army is broken down into different roles in which units will fall. These different roles are 1; the core of my army, 2; the locking section of my army (which includes a possible hit&run section to work in concert with locking units for a combination that has the effect of a core unit), and 3; the supporting section of my army.
The Close Combat Core:
The core of my army is made up of CC oriented squads (typically Howling Banshees, Striking Scorpions, and Harlequins) and their transports. This section will be transported directly to the enemy where each squad will disembark and begin a process of assaulting or multiply assaulting (engaging more than one squad at once), wiping a kill zone, attempting to consolidate into more infantry, and continuing the process from here. There are many nuances and details to this process, such as assaulting a section on my opponents front line that will allow the best flow of CC, that being: the path along which I can have my CC squads consolidate after each combat to keep them in CC and out of the enemy’s shooting phase, as well as working towards the most threatening units to my CC, eventually joining up with my locking squads to assist them in finishing their combatants, and from the initial assault after disembarkation they are attempting to assault units that would be firing heavy and special weapons at my transports such as auto/lascannons and plasma/melta guns.
I often have two kinds of core units. One that is a full size aspect squad such as Striking Scorpions or Howling Banshees, which will charge straight into the meat of the enemy and start lowering their numbers. The second kind is a smaller more specialized, or even more elite unit such as the Harlequins. While very powerful the Harlequins can get unlucky with their rending and normal attacks potentially leaving some enemies alive to strike back, especially against tougher units, and with the Harlequins not being able to take a Waveserpent they are stuck in squads of five to six for this type of army, and as it is they are quite fragile. With this in mind I often have my large aspect squads attack the front and open a path (with the help of supporting fire and sometimes tank shocks) to my opponent’s small but important squads often found in the rear of the formation such as HQ, vehicles, and heavy weapon units. This can be seen in my diagram with the bone coloured banshees assaulting the front while the Harlequins go for double assaulting the enemy HQ and heavy weapon squad.
All in all this section of my army is tasked with the bulk of the killing.
Supporting Section:
The locking section is what I really want to talk about with this post, but first I will mention and get out of the way the supporting section. The supporting section is the simplest facet. This section is made up of supporting CC and ranged elements that assist the other portions of my army in their battlefield roles, or take care of special tasks they cannot efficiently do.
The first part of this would be things like supporting fire. Fire Prism’s, Vyper’s, Warwalker’s, Ranger’s, etc., these are some of the units that could contribute fire to units I am about to assault-units that have broken and are running away, which I don’t want to dedicate my CC units to chasing down where I would potentially be ruining the setup for my next assault-and shooting smaller opposing squads (such as HQ/heavy support units).
The second role of this section would be taken up by such squads as Fire Dragons, mini-councils, Rangers, Wraith constructs, or other units that may not normally go with my army but are taken to shore up some kind of deficiency in the list. If the core of my army is not made to take down vehicles, and my supporting section would be hard pressed to take down a Land Raider or Monolith and I am expecting one, then I may take Fire Dragons to fill this important role. I personally tend to pack a lot of units in my army that could deal with such a threat such as rending Harlequins, units with Haywire grenades, and the occasional other fusion gun, but sometimes when you play in a tournement atmosphere these type of ‘just in case’ support units show up. Pathfinders for that nasty C`tan that wins every year? Wraithguard squad to hold your table quarter from those damn X and X from army Y?
Another thing I find worth mentioning on the supporting fire section, is that in this kind of army, once you make your 24-36” rush towards the enemy and assault with your aspect warriors on the second turn, there doesn’t tend to be turning back. Because of this one must be very precise and a lot of this comes from expensive tooled up and resilient vehicles and after dropping their cargo the transports are, for the most part, relieved of this battlefield role and it would be terribly inefficient to be done with them at this point. Most opponents, however, overlook the empty Waveserpent, or at least are too occupied with your disgorged army hacking his squads to little bits to dedicate much fire to them. This means you will often have the chance to move your transports 12” or less to get a firing solution on the sides or back of enemy vehicles. I generally take my Waveserepents with a Scatterlaser and Shuriken Cannon, meaning I have seven strength 6 shots to poor into opposing armour. Between my empty Waveserpents and Falcon most enemy vehicles get dealt with without me ever having to dedicate part of my army’s core to anti-armour.
It is time to be onwards to the good stuff, though.
The Locking Section:
(I will try to make a posh Microsoft Paint™ illustration to show how all of this goes down after I finish writing, but I’ll try it just here for a start. It’s only 4am, I’ll have plenty of time later.)
The Biel-Tan army is a force of few, but elite warriors. It is easy for our attacks to be bogged down unless we strike first and maintain the initiative. Against Imperial Guard armies our CC units can quickly become bogged down as we find our Striking Scorpions are being counter-assaulted by 6 squads at once, or that after the first round our Howling Banshees are being whittled down bit by bit because they assaulted two Space Marine Tactical Squads at once and are not strong enough to achieve a definitive victory. This is where the locking section comes in. It helps maintain the initiative by being the metaphorical bully that holds your arms behind your back while the child of Khaine punches you in the stomach.
Now to be a bit more straight-forward (how unEldar-like of me). I first started using locking units when my main gaming partner, an Imperial Guard commander, started redeploying his army away from whichever flank I charged into. This would leave me to easily crush the flank I initially engaged but would force me to either re-embark or footslog all the way across the long table edge to his next formation. After this I started assaulting directly into the middle of his formation, or spread out a bit, but with this I didn’t maintain local superiority and each of my squads would get counter assaulted by one or two more squads. I usually won but it wasn’t very clean, to be sure. So as a remedy I took two jetbike squads and sent one into each of his flanks to assault one or more units. This made it so he could not re-deploy to the flanks and I had enough squads ‘locked down’ with my jetbikes that my core CC units were not being overwhelmed.
This seemed like a very solid and useful tactic, but the small jetbike squads I was using just wasn’t enough, especially if I ran up against Space Marines or something more individually powerful. While Space Marines are far more expensive than guardsmen, therefore meaning fewer units my locking units had to hold back, there is still more power available in the kill zone to hit back at me. So with this I started working on developing more effective locking units and combos.
The basics of a locking unit is a squad which A: has the mobility or potential to assault units I want out of the way at the same time as the core of my army engages and B: has the resilience to survive at least 2 rounds against the squad(s) it is engaging. The locking squad doesn’t necessarily need to take down what it’s fighting, though weakening it up before the core CC units engage it would be ideal, as by the point they come to the rescue they may be weak a few models.
With this in mind I started using a ‘lock pattern’ Dire Avenger squad in a Waveserpent. With their above average weapon skill, initiative, and the option of Defend and a Shimmershield for the Exarch, the squad is fairly durable against most opponents as long as they are not overstretched. Against tougher opponents like those with power weapons, or CC squads with multiple attacks, the Dire Avengers are suited to reducing their foes’ potential damage. Against weaker opponents they may manage to win or at least start weakening the squad(s) they have assaulted. This squad does very well, especially when shooting first so that they may more safely assault multiple squads. I like Dire Avengers for locking down things that are a bigger CC risk to my core units, perhaps Tyranid rippers, Space Marine Assault Squads, or even Monstrous Creatures, each of which could severely wound, or at least slow down, one of my advancing core units in some situations.
Another of my locking units, my favorite really, are my jetbikes. I bolstered their number to six from the smaller squads I started using in the beginning and added an Autarch. The jetbike models themselves are very mobile so can get where I need them to support in CC or perform locking duties, and with their T4 3+Sv they are good at surviving between combats and lasting in drawn out locking actions. Like the Dire Avengers, the jetbikes are able to toss some shuriken fire into a squad before they commit to close combat. The Autarch brings a lot to this unit. Firstly are the plasma grenades which allows this squad to go first and cause some damage and hopefully clear out some of the kill zone before an otherwise numerically superior force strikes back. Secondly the bulk of the kills from this unit will usually be coming from the Autarch, especially as it begins to take losses.
A lot of what this unit combo does for me, however, is in its supporting role where as jetbikes they are able to fly over the front lines of the opponent and any intervening close combats to fire on and assault important and vulnerable enemy units. Because of the Autarch’s shooting and CC potential this can often be an unexpected and game turning attack. Imperial Guard HQ squads, Eldar seers, heavy weapons squads, vehicles and other high-value high-impact units. With their mobility, massed strength four and 6 weaponry, and the Autarch’s options for a lance, fusion gun, and haywire grenades they are quite adept at anti-armour. One beautiful thing about this squad is it’s ability to separate. In the linked/below picture (however I manage to attach it) we see the Autarch separating from the bike squad before they carry on to start locking down a squad where they will not need the Autarch’s plasma grenades, and he swoops over the front line to attack a tank which is a potential threat to Eldar transports and other units. In my last 2,000 point game I had three laden transports within line of sight of an Imperial Guard Basilisk and Leman Russ, so I had my Autarch and jetbikes separate. The jetbikes went for the side and front armour of the Basilisk, and the Autarch fired on the side of the Leman Russ. I got lucky and managed to destroy them both. Afterwards the Autarch reformed with the jetbikes and then went after infantry squads on that flank.
So now let’s get into some more of the fun stuff. The locking section isn’t just for holding things in place and some, albeit potentially devastating, support action but can form a vital portion of my kills against opposing army’s. This is achieved by locking units working together with a hit and run unit. One of the most effective and easily thought of would be the Shinning Spears. This squad is straight deadly on the first turn, but tends to be hard to keep alive long enough to make them worth it, as even after the reduction they are an expensive squad. Using them by themselves usually just gets them killed, but here they can make a real difference. Add an Autarch to the squad and you have an extremely powerful unit, worthy to be the very hammer-fall of the Bahzhakhain rush, but to really shine (no pun intended) they need a locking unit to hold their victims in place for them so they can retain that immense power every assault phase until all the units the locking squad was holding are expended. In the picture below the Shinning spears would assault, withdraw, and then assault the other squad being locked down. If the jetbikes had locked down a third squad the Shinning Spears would continue assaulting and withdrawing until they were all eliminated, thus forming a self sufficient flank, which afterwards can assist other combats. Sometimes in this technique, until I have shooting units out of the way I may not choose to withdraw until it is my opponents turn to stay out of the shooting phase, but keep in mind this may be more dangerous than leaving every assault depending on what enemy units are engaged.
The other two choices for this position are Harlequins, and Warp Spiders. The Harlequins are strong enough to take on opponents by themselves but due to their vulnerability as detailed before it is good to have them working in concert with another squad, and with a locking unit potentially holding two to three enemy squads in combat, it is quick and safe for the small Harlequin squad to assault wipe and consolidate from one to the next (the same being true for Shinning Spears and Warp Spiders).
For this kind of list the Warp Spiders aren’t as fitting because of their lack of speed to keep up with the rest of the army, but this technique would work well with them elsewhere, especially with a kitted out Autarch in the squad.
Well that pretty much concludes the main mechanics behind my Bahzhakhain transport rush. Below is my posh illustration of a transport rush on an Imperial Guard force utilizing the above techniques. The entire army rushes forward at full speed using turbo boosts and star engines to approach ideal locations for assaulting on the second turn. If I hold back or don't get close enough the enemy is able to fall back and possibly redeploy to the sides to overwhelm my locking units, so it must be close, but not too close. If I tank shock into the enemy or get too deep they may wrap around me and go for back shots or block the exit, forcing me to move again or not be close enough for my CC squads to engage. Typically the jetbikes try to turbo boost behind some close terrain up a flank, but if not I just try to rely on target saturation and luck/unluck depending on who is rolling. Come second turn the Dire Avengers lock the right flanks, the Autarch and jetbikes separate with the jetbikes locking the left flank and the Autarch flies over this engagement to fire on an enemy vehicle. With the jetbikes now holding the left flank in place the Shinning Spears commence assault runs on the captive enemy. The Howling Banshees assault the center of the straddled enemy while the Harlequins go for the HQ squad lending leadership to the whole of the IG army, and a heavy weapon team that threatens the transports. The transports and support fire units (Fire Prism, and Vyper’s not pictured) take side/back shots on any live vehicles, and set themselves up to fire on any IG squads that run without being able to be pursued and attempt to cut off escape routes. The shown IG army is obviously under strength, but it fills the purpose of illustration.
Hopefully this has given insight into the workings of a CC intensive mechanized army; The Bahzhakhain. Below will be the picture of my diagram, and a sample list which implements the above tactics.
HQ:
130-Autarch-Jetbike-Mandiblasters-Power Sword-Fusion Gun
Elites:
162-Harlequins (6) 6xHarlequins Kiss-Shadowseer
187-Howling Banshees (10) Exarch-Executioner-War Shout
165-Wave Serpent-Scatter Laser-Shuriken Cannon-Soul Stones-Vectored/Star Engines
Troops:
132-Guardian Jetbikes (6)
152-Dire Avengers (10) Exarch-Defend-Powersword and Shimmershield
165-Wave Serpent-Scatter Laser-Shuriken Cannon-Soul Stones-Vectored/Star Engines
Fast Attack:
70-Vyper-Scatter laser-Shuriken Cannon
70-Vyper-Scatter laser-Shuriken Cannon
237-Shinning Spears (5) Exarch-Star Lance-Skilled Rider-Withdraw
Heavy Support:
220-Falcon-Scatter laser-Shuriken Cannon-Star/Vectored Engines-Holo Field-Soul Stone
160-Fire Prism-Holo Fields-Soul Stones
www.40konline.com/community/index.php?topic=145328.msg1758716#msg1758716
I've been playing Eldar for about 15 years now and there never was a day when people didn’t say; "What? you're taking that upgrade! BUT ITS SOOO EXPENSIVE!" Most of these people were not seeing the overall utility that this upgrade gave to not just the unit that took it, but the entire army. There is no army in which upgrades play such a major role for than the Eldar. This is true from grenades, to exarches and their abilities, to the legendary (a.k.a. infamous) Holo-Fields, which can change the entire role of a unit in the battle. The commander who buys every upgrade available in an attempt to make his units capable of approaching every situation will end up having half the units of a balanced army, and a third of a bare bones army. In this post I will speak of my own particular style and why I take such upgrade saturated units, and where I do not take these upgrades. Before I even begin I state rule one: You should never EVER take all upgrades just because you can, upgrades which do not contribute to the overall theme of your armies method, upgrades you don’t necessarily expect to actually use, or upgrades that you do not understand how to use correctly.
I also want to get this out now. There is a point when equipment comes in when building an army list, but no matter how badass an upgrade, or a single unit is, having a balanced army that can deal with expected enemy threats (such as anti-personnel needs, anti-tank, dealing with the enemies firepower and CC, etc) is number one. An army with one HQ two-five man troop squads and a Super Heavy is not balanced, and is not likely to win. Even such important upgrades as a Falcon’s Holo-Field’s, or that Farseer with Guide can be done without if you play intelligently with a balanced army. Make your army, then enhance it.
I am a Biel-Tan player to the core, and am fully mechanized. I find that the most important thing in 40k, and indeed in war, is maintaining the initiative. Eldar are able to this with disgusting speed and elite troops so as to be able to make precision attacks and attain local superiority with ease. While our vehicles and units are the base of all of this, for me the equipment seals the deal. My typical list is as follows:
HQ: 130 8%
125-Autarch-Jetbike-Mandiblasters-Scorpion Chain Sword-Fusion Gun
Elites: 512 32%
168-Harlequins (6)-5x Harlequins Kiss-Shadow Seer
189-Howling Bansees (10)-Exarch-Executioner-Acrobatic-War Shout
155-Wave Serpent-2xShuriken Cannons-SS-Vectored Engines-Star Engines
Troops: 560 35%
152-Dire Avengers (10)-Exarch-Twin Shuriken Catapults-Defend
155-Wave Serpent-2xShuriken Cannons-SS-Vectored Engines-Star Engines
132-Jetbikes (6)
121-Jetbikes (3)-Warlock-Destructor
Fast Attack: 60 4%
60-Vyper-2xShuriken Cannon
Heavy Support: 345 22%
185-Falcon-Scatter Laser-Shuriken Cannon-SS-Holo Fields-Star Engines
160-Fire Prism-SS-Holo Fields
-1607-
There are many fully valid philosophies on how to purchase upgrades when looking at an army or a unit as a whole. They all tend to be on a spectrum between taking no upgrades in an attempt to maximize the sheer number of units deployed, and taking as many upgrades as possible to field a ‘true grit’ elite force. Either end, as with all extremes, errs on folly. Taking too many upgrades will cause your force to be heavily outnumbered by even the smallest opposing army, which will loose you the initiative, because of army balance (not being able to take all the units and unit types you want and need, as stated above in the second paragraph), being able to be easily manipulated with so few units to his many, and other reasons. Taking too few upgrades can make units borderline useless; nothing but meat shields which are hard to wield and get in the way.
There are many aspects to upgrades, equipment, and extra options, one of them being opportunity cost. This is an economy term meaning basically what you could get instead of what you have. Where this comes in, in 40k is in decisions like should I take an extra Swooping Hawk, or give my Exarch a Sunrifle? Well you get an extra body with the additional standard hawk, but the Sunrifle does three times the firepower of a normal Lasblaster, at the Exarch’s higher ballistic skill, and you get the utility of causing pinning checks. In this particular instance it seems like from the information given that it would be best to get this upgrade because of the trade off benefits verses its costs. Where this conclusion may become wrong is when you make the choice of getting upgrades so often that every casualty you take dramatically reduces your ability to defeat the enemy (be it by having many tooled up exarch’s or characters, unused equipment taking up the place of the ablative wounds you need to protect what is really important, or having to sacrifice important squads when there could have been better alternatives, etc.).
As another way of putting this lets look at it this way. If I need to crush my opponent’s flank I know I need two intact squads on location to do it. If I take bare-bones squads and transports I know that I need at least four squads and corresponding transports to ensure that I will get the necessary forces where and when I need them due to incoming fire, local resistance, and my basic troop’s damage capabilities. If I take specific upgrades that will help me arrive, retain my squad numbers, and increase my killing efficiency, I will use more points but need less. In this same example I will only need three squads and vehicles to make sure I will have local superiority and the ability to crush this flank as opposed to four.
Some people prefer to take numerous basic squads instead of a few well-equipped units, such as the above. I personally take the route of fielding fewer units than many of my fellow Biel-Tan Brethren. The reason for this is that when you take several basic squads there are many situations in which you are depending on luck more so than I am. If you get lucky you will have more units than I have on the table but it is much easier for you to take a devastating hit than I will. Here is an example:
Say you take a Falcon and just add Spirit Stones to it, giving you a 140pt tank. I will take the same unit with Spirit Stones, but add Vectored Engines and Holo-Fields for an extra 55 points, putting me at 195. A lucky shot will still bring down my tank despite these expensive upgrades, but it statistically takes a high volume of fire (which it absorbs), or a severely unlikely shot, while a basic Falcon has a high chance of being destroyed in a given game if it is saturated with fire. Lets look at the opportunity cost here. You will have 55 points more than me to spend, but I will most likely have my tank on the table all game, while you may or may not complete the objectives you set out for it. In my mind this dependability is worth paying 4/3 the points.
Some upgrades do not make such a significant difference in the scope of your whole army, as the dependability of your transports might be. Below I will talk about ‘army themes’ which is my take on how to say if each upgrade is really worth its points, or if something else would better take its place.
Army Themes and Upgrade Choices:
Each army has it’s own particular method of beating the enemy. Some armies are massive! They use their numbers to gain resilience, and either out last the enemy while using CC or ranged power to slowly destroy them (some IG, Orks, etc). Some armies are inherently resilient but few in numbers, able to weather large amounts of damage while using their elite CC or ranged status to kill the enemy (Space Marines). My army uses incredible speed and a high degree of close combat prowess to draw out or zero in on groups of enemy units and with local superiority I destroy them. When taking upgrades and equipment they should generally be supporting the theme of your army (such as those listed above). The massed army will take some upgrades to kill the enemy, but will mostly use points on models. The second army will try to push and maintain its resilience, as well as maximizing its killing power. My army will take whatever is necessary to ensure speed, and attack power.
The method of my attack in a standard 1v1 annihilation battle is thus: On the first turn I am deployed in whatever way keeps my transports safe from enemy fire, and then it launches full speed either to a staging area (someplace in the middle, out of line of sight where it can more easily attack in the next turn), or into the enemy lines. My fast skimmer transports with the addition of Star Engines are typically able to make it all the way on the first turn. It also allows me to arrive at once instead of piecemeal, and at ideal locations instead of just 3” too far away or 6” to the right from where I wanted to be. With this speed the enemy has one turn to try to shoot at my transports before I disembark. My defensive upgrades (Spirit Stones, Holo-Fields, Vectored Engines) make it unlikely that in this one turn of shooting the enemy can shoot down more than one transport, and often times it will merely crash instead of killing the passengers.
In my last five or six games I have had four transports shot down, now. Only two of them were actually destroyed, and only one of them still having passengers on board. After the first turn, my units disembark, and overpower the flank, and then continue on. When a transport is shot down, enough of my army has made it through (typically a bare minimum of ¾ transports) to lock down the enemy, and keep them secure or kill them while reinforcements arrive (be this jetbike units, Quick Reaction Force transports waiting behind to fill gaps, or the squad from the transport that was shot down).
In light of this strategy many of my upgrades are seen as vital to the success of my attack. So we know that they follow my ‘theme’ of speed and local superiority. Points wise, these are affective upgrades; I still have enough manpower to destroy a flank, and if used correctly an entire army at once. Without the upgrades taken I would be playing a different type of army, one not capable of moving on the first turn, attacking on the second, and wiping on the third or forth. It would take more time, and more forces, but with these upgrades and their correct use it is very much possible. In other armies there are good and bad upgrade choices, such as adding all the above vehicle upgrades I did to a vehicle that isn’t needing that huge resilience or speed, such as a Fire Prism that will most likely spend the game in a secluded table corner shooting through narrow firing lanes at distant enemies, not needing to deploy greatly or taking much, of any, opposing fire.
This is not a full discussion on the topic of upgrades and equipment, but an in-depth look at an Eldar army, which attempts to use the available upgrades to a high degree of efficiency. The above army and strategy it uses functions, and functions excellently while using a large amount of upgrades. I write this, not only to help the community see another aspect of the Biel-Tan army, and how to better use and choose their upgrades, but to try to stop people from ignorantly telling others not to take this or that upgrade because it is ‘too’ expensive. When an upgrade is a fraction of the cost of the wielder, and increases its efficiency or performance by a large amount, or contributes significantly to the army as a whole it is worth it. There is a value to every upgrade that is based off of its opportunity cost, and greater use within the army. Look at these factors before writing off an item or an army. The upgrade may or may not fit into the army, but be aware of why it does or doesn’t. My army has 30% of its points cost in upgrades. This does not cripple it. In other armies it may not function with such upgrades, but the Eldar are capable of fielding such an equipment heavy elite force.
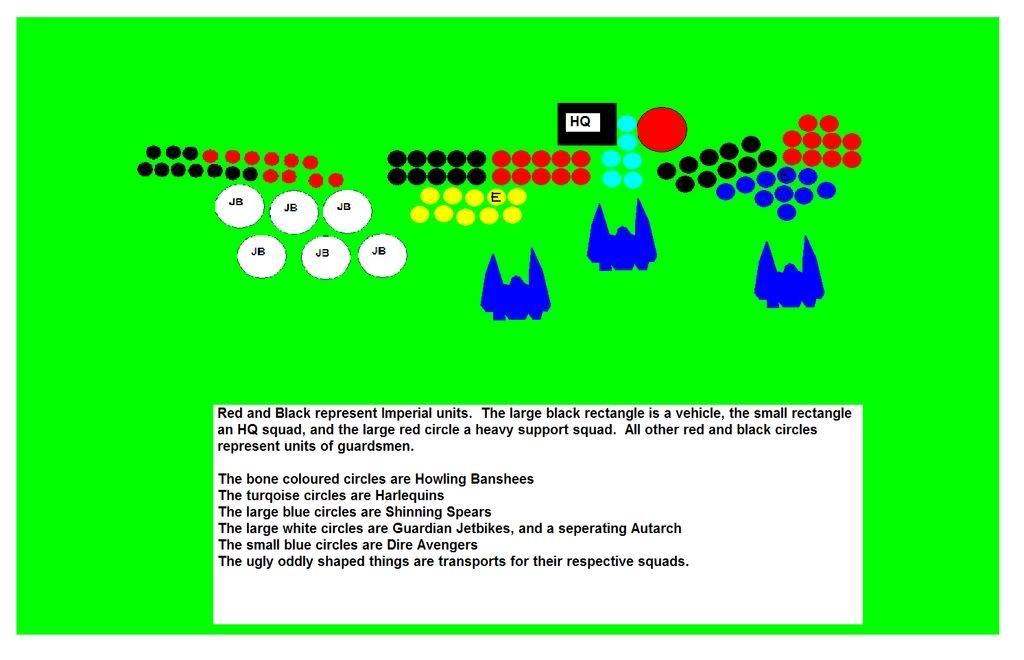
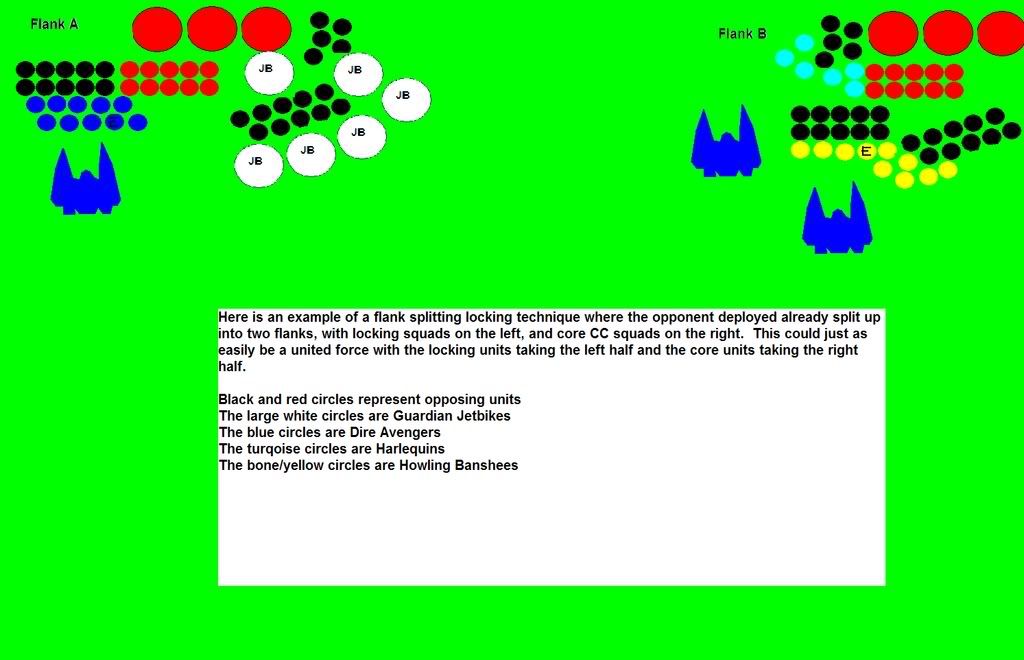


 I neglected to add the <Post saved for subject article>'s lawl. I hope in time to finish it, but that'll happen when I finally start using my bahzhakhain again against lenny or someone else (which I hope will broaden my experience beyond the usual IG, SM, and tyranids).