SgtBilko
Lieutenant
 The Emperor forgets...
Posts: 141
|
Post by SgtBilko on Sept 5, 2009 4:20:15 GMT -5
Hi, Traitor Guard btw I read about thin black wash (thanks), My tanks have a production line look about them and I want them to look real dirty, without looking like i just splodged them with paint. My board s concrete grey. Please instruct me on dirt, wear and tear, rust, leaks, graffiti, tank marks, puke, etc Thanks, Bilko. EDIT: I had a go and this is what I've got so far, it looks not bad in the pic, but IRL it still doesn't look war beaten enough. The prob is all the unbroken catachan green on the upper hull and tower, I can't think of a way to scruff it up. Camo stripes would help, but I don't own an airbrush and I'm not repainting all my other tanks to match. Well I could, but i really don't want to.    PS there are 24 3mm magnets in this tank and every thing that can come off does, even the aquilla plate behind the driver so I can swap it for the plasma variation. ALSO: Are anyof the GW/FW books on painting tanks any good? Please advise. |
|
Deleted
Deleted Member
Posts: 0
|
Post by Deleted on Sept 10, 2009 21:26:12 GMT -5
I believe that GW came out with a new book on how to paint armor. Also if you want to give it an oldish look, you can give it 3-4 layers of griffin-sepia wash with some weathering such as scratches using bolt-gun metal. I would also put some chaos symbols and spikes on it to make it look a little more evil. Have fun  |
|
|
|
Post by Aeon on Sept 10, 2009 21:48:51 GMT -5
If you want to make it look dirty, get some sand or earth flock, and glue it to the treads, and then up onto the side of the tank. Paint it multiple shades of brown (full coat in dark brown, then dry brush several shades of lighter).
For a final touch, add in very small bits of static grass here and there. It makes it look like the tank has actually rolled through the mud a lot and picked up lumps of earth on the treads and stuff.
|
|
Deleted
Deleted Member
Posts: 0
|
Post by Deleted on Sept 11, 2009 17:44:32 GMT -5
have a look at my thread in the pictgures section (my guardsmen: the fourth reich?) and if you look at my chimera, what ive used to create rust stains running down from rivets is tamiya red/brown and tamiya acrylic thinners to create a watery mixture, the pictures are pretty self explanatory on how i painted this on in just a downward motion, i also ran this mixture in the recessed areas. for other weathering that ive used to get dusty muck and also the build up of mud on the tracks and the lower parts of the tank, i use tamiya products, the tamiya weathering system kits that have 3 shades of powder blocks in them and also tamiya mud pen. theyra a godsend, however you need to seal all this when its done otherwise it will rub off.
|
|
|
|
Post by ReWolf on Sept 12, 2009 3:49:21 GMT -5
ALSO: Are anyof the GW/FW books on painting tanks any good? All GW hobby books are a waste of money - they're full of common knowledge, and are just repackaged WD and website articles. Forgeworld's Model Masterclass is a masterclass piece of work - I've bought it myself. Some advanced, awesome techniques, and excellent pics. Definitely worth picking up if you want to know weathering. The book details how to get your tanks up to FW standard, with paint chipping (not as simple as you might think), leaking oil effects, proper mud, chipping decals, and dust and grime accumulation. If you don't want to get it (though I recommend you do), I can relay a few tips here. |
|
|
|
Post by Happyorange on Sept 12, 2009 3:53:25 GMT -5
|
|
|
|
Post by ReWolf on Sept 12, 2009 4:38:34 GMT -5
Yeah, although if you can find MIG weathering powders cheaper I'd get those - I've heard very good things about them. |
|
|
|
Post by Ogryn Crazy! on Sept 13, 2009 14:12:45 GMT -5
To dirty a tank, Bury it in the garden for a week, then dig it up, job done!  |
|
|
|
Post by Laughing Man on Sept 13, 2009 18:17:07 GMT -5
Devlan Mud solves all your problems.
|
|
|
|
Post by chwinn on Sept 14, 2009 13:47:07 GMT -5
For my tanks, I use a brush to put glue (I use the white glue the kids use at school) on the areas I choose. Then I dip it in normal sand from the backyard. (I use sand for all my terrain bases,etc.) Then a good paint job and voilà! Anyway it does the trick for me: 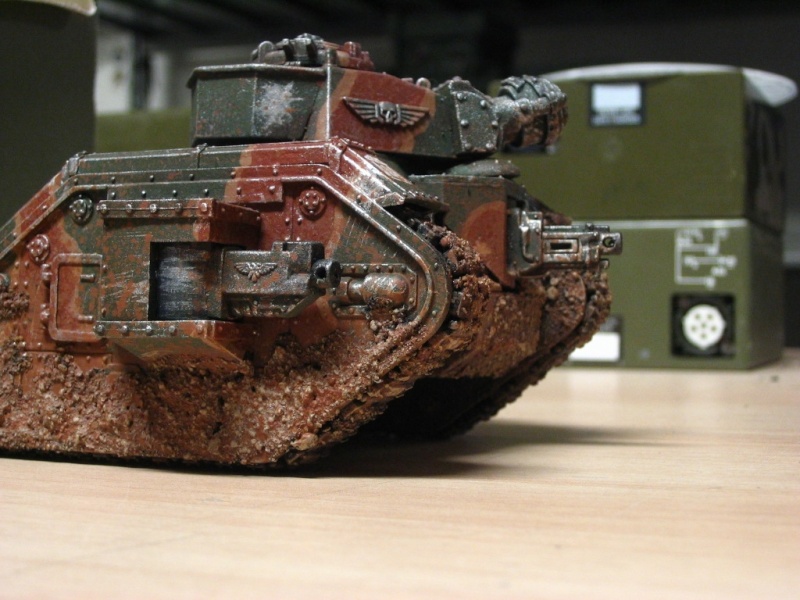   |
|
|
|
Post by Soap on Dec 8, 2009 13:27:25 GMT -5
I did something like that on my Baneblade (it will be the same with all my tanks eventually). I put a load of PVA glue on a mixing plate then mixed up some base sand (I got the GW sand) using a lolly stick. It was a lolly stick from a FAB Ice Lolly, but you can use a lolly stick from a lolly of your choice, although I recomend the FAB Ice lolly, but not so much in the winter. I then used the lolly stick to apply the mix to the area where required. Also, I used an old brush to work the sand mix into hard to get areas. I then left it all to dry over night then painted it the requiered colour. Ill post pictures when I get round to taking some. Hope that is use full to someone.
|
|
|
|
Post by hargus56 on Nov 15, 2010 17:16:45 GMT -5
|
|
adastra84
Guardsman
Time is an illusion, Lunchtime doubly so!
Posts: 65
|
Post by adastra84 on Nov 16, 2010 2:43:10 GMT -5
Have not used the powder myself, but my girlfriend (Tau) has used them and they work amazingly well for a dust, rust and soot that she's done.
planning on getting a set in the new year when i start on my sentinals and russ's
|
|
|
|
Post by treadiculous on Nov 17, 2010 8:55:33 GMT -5
To age a vehicle, take to it with a sharp point, rest the point on a surface with the knife directly above it (so an angle of 90 degrees),and rotate for a little while, you'll get a neat little hole, then take the knife to 45 degrees and cut away a little edge around the hole making an outer ring, then cut a couple of little notches / chips by cutting a V shape stemming from the centre of the hole and voila you have a bullet hole.
Use the V shape to add scratches in likely places, round the dozer blade, along the sides - especially the front edge leading back - and anywhere that might have come under attack from a sword or axe...
fill the notches and bullet holes with black, highlight with silver / grey.
to add mud effect, take an old sponge, cut it up to get various edges, from curved to angled to scruffy, dip in devlan mud wash or similar (depending on the landscape you fight over) and add to likely areas - along the bottom of the sides, on the tracks, on the bottom of the dozer blade etc. repeat this again with a little darker tone, and cover less surface area so you will biuld up a couple of tones.
Drybrushing can also really aid weathering / age, the trick is to go through a big range of very similar coulours...
debris.. get some wire, such as the mesh for car body work, or chicken / rabbit hutch wire, or the GW barbed wire, and wind a little round the edge of the dozer blade or across the front of one track section to look as though it got caught on something...
if you fight nids, get a spare arm with claws, cut the claws off about half way down and then put glue on them, then attach to the tank with scratch marks.. paint the other end of the arm all blood couloured (add green stuff torn ligaments if you want) and voila, one bug you squashed early... (you can do the same with ork axes / powerklaws etc) - it should look like the claws have sunk into the metal and ten the arm got ripped off -
|
|
|
|
Post by verminard on Dec 7, 2010 10:57:34 GMT -5
First off check out "Model Masterclass" from Forge World and some old school WW2 modeling books they have some AMAZING weathering techniques well worth the money spent (especially since GW sells Forgeworld books on the shelf now and Model Masterclass is pretty cheap in the grand scheme of Forgeworld books)
A couple great techniques for you at this point are
1) Pencil Graphite, ground up to a powder and rubbed on a Gun Barrel or around the edges of the turret to show paint ware and tear. Its almost impossible to mimic this in a paint but its so easy when you just use the pencil. Makes a great worn effect.
2)Oil Paint: Mainly Lampshade Black and Burnt Umber work really well. You can use these and a thinner to not only make amazing rain weathering effects, but if you let them sit right they can have the appearance of grease, which is a very convincing effect around engine parts. And after a little practice you will notice how you can apply the paint, then "feather" it very easily with the thinner on a brush.
3)weathering powder: MIG makes a great one, works wonders for engine exhaust stains and track mud when used with the setter that they sell.
4) Devlin Mud. Need I say more? Its amazing, I put it over my decals to make them a little more field worthy.
5) Paint chipping: First off, decide which part of the tank the crew would come in physical contact with most. For example, ladders, hatches, repair hatches and the like. After this is decided you want to think what your tank primer color would be. Not the actual primer color for your painting, but what the "imperial guard army" would be using. Usually a neutral tone, Grey or Browns work very well for this. After deciding this color paint it onto the areas the crew contacts, after lots of crew contact the paint will rub away and this should start to represent that. In very high traffic areas (corners and ladder rungs are my favorite spots) paint areas with a little bit of chainmail to represent the paint worn down to the bare metal of the tank.
Ill post more as I think of some, there are tons of great techniques out there.
|
|
|
|
Post by Pax Urbis Pax Imperi on Jan 30, 2011 23:20:48 GMT -5
If you are looking for a "water/mud" spray, take an old toothbrush, dip it in water and paint, and then rub your thumb across it. Gives a really nice splatter effect. Also, very messy!
|
|
|
|
Post by Trooper One-Nine-Seven-Four on Feb 19, 2011 18:55:36 GMT -5
If you are looking for a "water/mud" spray, take an old toothbrush, dip it in water and paint, and then rub your thumb across it. Gives a really nice splatter effect. Also, very messy! Yes, this works really well for splatter. Make sure you lay down lots of newspaper around your model before doing this if you don't want to ruin your floors (or do it outside). I've tried mixing paint with baking soda and applying it to my models with an old brush. It gives a dried on sort of mud effect, but I've noticed that the color starts to chip off, revealing the white baking soda in places, which will require touching up. I'm going to try adding some sand to my models next. |
|


 Be my mirror, my sword and shield, My missionaries in a foreign field
