Post by treadiculous on Feb 17, 2014 14:48:51 GMT -5
Hi.
Here's a Campaign I wrote years back, I found it recently in my book of 40k doodles...
Have a read if you've got a spare hour....
(I'm not sure how the formatting will turn out)
M:403460496.234.
Serial Sector: 34647
Planetry System: Gamma Beta 2423.
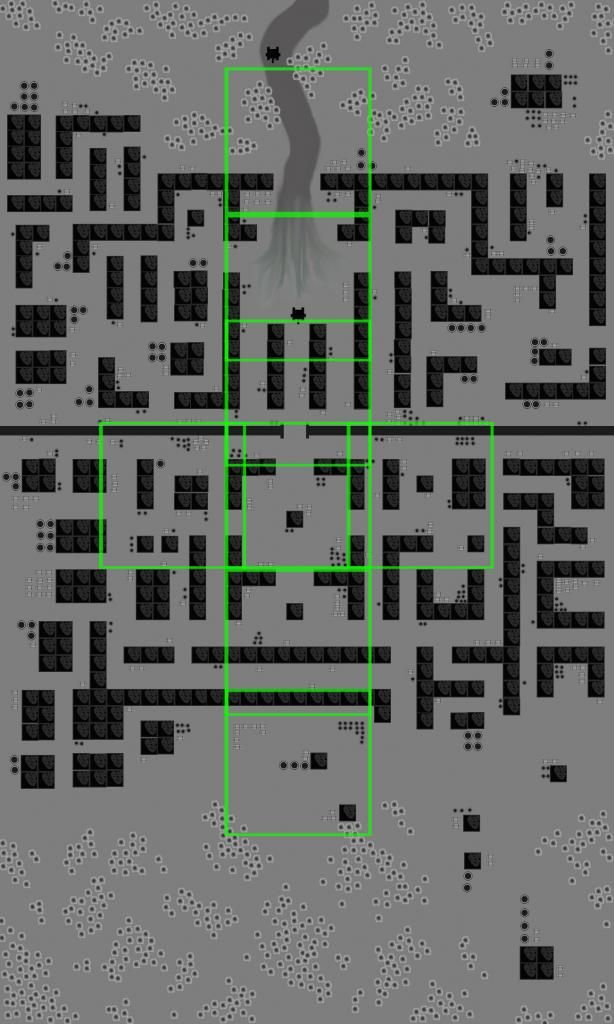
Population Centre 'Escalation' – Known Trading Station and Crossing of Magtro Disruption Flow
Tactical Note: Escalation is a very tightly packed urban environment, and does not suit the large wingspan of Imperial skimmers. Across most of the city it is unlikely that Valkyries or similar craft will be able to find safe places to position themselves due to the narrow streets and high buildings.
Units may be deployed via rappelling lines or grav chute insertion, aircraft and skimmers will fire at BS2 due to the difficulty navigating the tight streets, any skimmer or flyer which disembarks a unit may not fire in same turn. In the Cut the Supply Lines and the Pursue the Vanquished missions, these rules do not apply as they are outside the city.
The river is highly unstable Magtro, with a high electromagnetic charge and extreme heat, it will cause any jump troops, jet bikes, skimmers or any other object (except bullets, plasma, laser etc which pass over too quickly to be effected) to explode above the river. Teleporters can be used, as can warp drives or any other non linear means of movement.
Barrage units may support battles though will be less accurate, scattering full distance twice, in order to use these units they must be bought as allocated reserves though can be kept of map for duration of battle.
The War of Escalation:
Force Organisation and Reserves
Choose your entire force for the Campaign prior to determining which Army takes which role, this Army list is to be known as the Battle Group.
It will follow the following Force Allocation system
1. Command Minimum 10%
2. Troop Minimum 40%
3. Elite }
4. Fast } Minimum 10%
5. Heavy }
In each mission each player may choose from their Battle Group which elements to deploy.
From mission 3 onwards a choice will be made about where units are allocated.
Each mission will define how many points must be spent, additional points can be added if available to the player to a maximum of double the initial cost.
Reinforcements come from the Battle Group, as do any reserves arriving in support during a game. Units must be within proximity to be able to be used as Reserves.
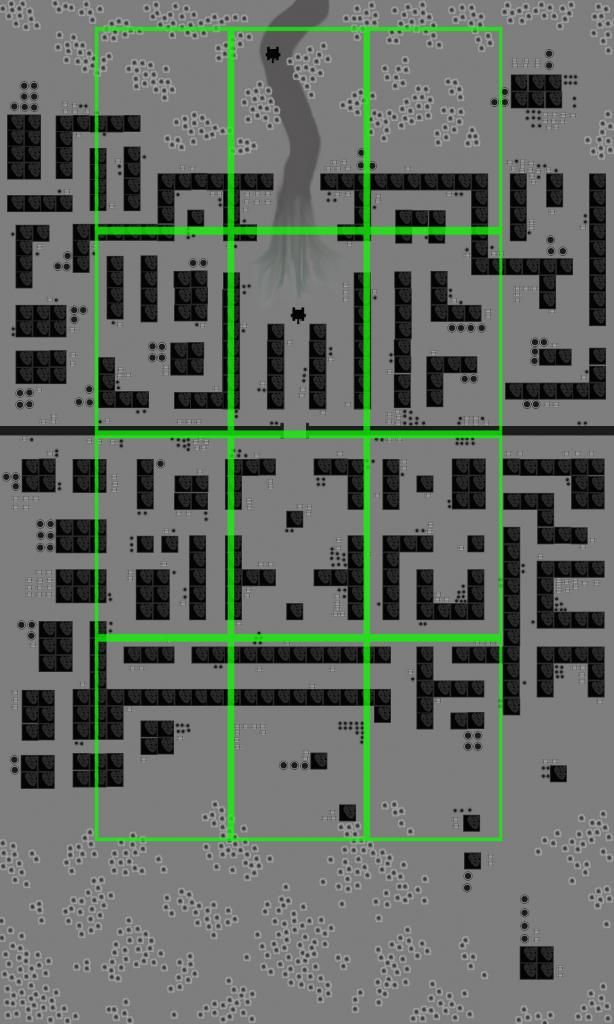
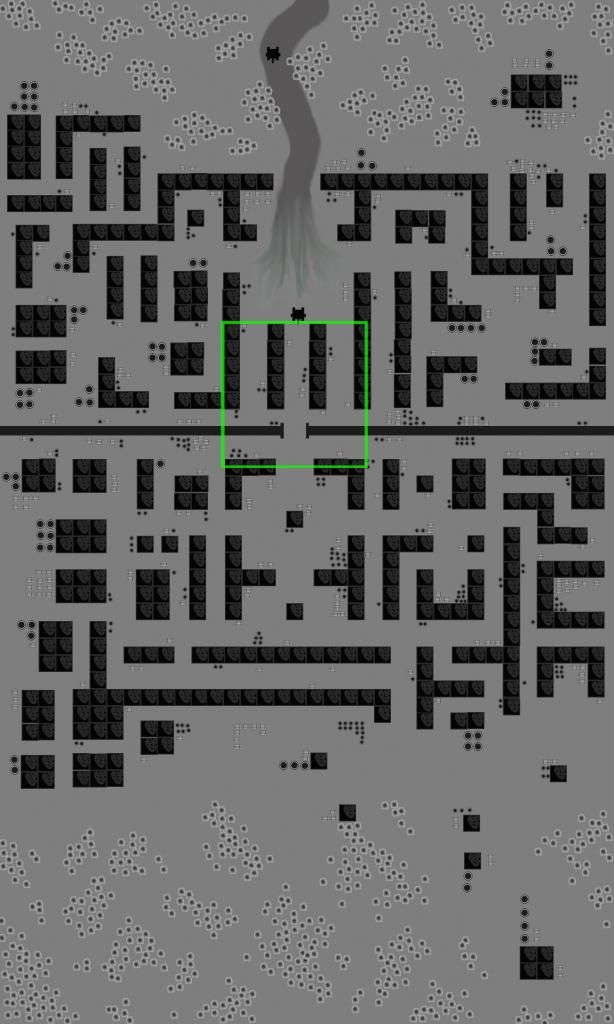
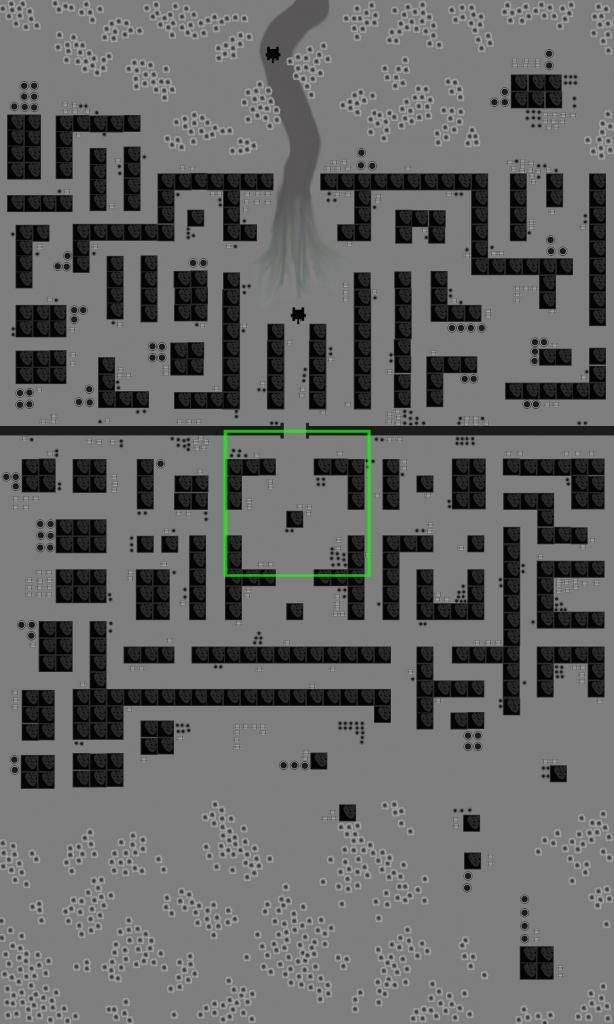
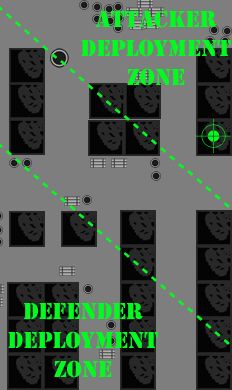
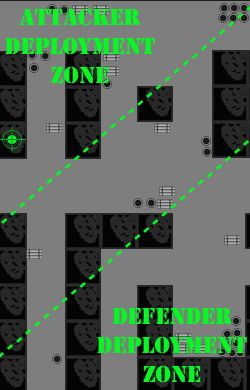
Proximity is defined as a table sized territory which joins the edge of the table in play on one side. Please look on the overview map.
Reserves in Missions which are simultaneous must be decided upon prior to the beginning of either game, with the allocation remaining fixed. Units may be allocated Undetermined.
Undetermined Reserves can be allocated to wait in the middle territory and respond when requested, though will require 3 successful reserves roll prior to their deployment.
Undetermined Reserves which are within a Fast Transport, or are Jump Infantry or Cavalry will only require 2 successful reserves rolls prior to deployment.
Reserves can arrive in a mission from turn 1 on a roll of 4+, this is never reduced as the turns continue. This roll may be influenced by special characters.
Units with Scouts may move after deployment as normal.
Units with Infiltrate may deploy forward of the DZ as normal
Outflanking by a unit is permissible under the following considerations:
1. If outflanking a territory that is over the river, the player must control the bridge.
2. They occupy the territory which links to the table edge they are entering from.
3. The territory is in dispute or unclaimed and they have 3 units on the current territory closer to the opposition than the point at which they intend to enter.
4. They were able to infiltrate or were part of a sneak patrol (see secret missions) in a territory which links to the territory in use. (Though must arrive from this edge).
5. They are either infantry, a walker or a vehicle with a modification which allows them to re-roll effects of dangerous terrain, and there are suitable entry points.
Special Characters
The addition of a Commander, or Communications Officer to any force will make the reserves roll 3+, if BOTH are on the table ten the roll is 2+ instead.
A Unit retreating from the board DOES NOT count as a lost unit, they may test to rally (4+ normally, 2+ if in proximity of HQ - Thereby a territory with no HQ beside a territory with an HQ will allow the HQ to influence events.)
Medical Orderlies and Repair Crew which were present during the battle have the following effects on Unit Casualties and Damaged Vehicles. The Repair Crew can repair vehicles during a battle if they can get in base contact with the model.
If your Medical Orderly is alive it will be important to make note of the numbers of survivors in each unit at the end of battles, these casualties may return to fight again.
It will also be important to place casualties who suffer wounds which cannot be healed through the 'Feel No Pain' universal special rule to one side (the grave yard / funeral pyre)
Units suffering casualties will have after battle effects:
1. If the Ordrely is unable to assist the casualty will survive on 6+
2. If the Orderly is able to assist they will be healed on 4+
3. Regardless of the effect all wargear will be lost, bar the standard troop wargear.
If your Repair Crew is alive, and within base contact:
1. Damaged Weapons may be repaired on a 2+ at the end of the battle or 3+ during it.
1. If the Repair Crew is able to reach an Immobilised vehicle it may be repaired on 3+
2. If the Repair Crew is able to reach a Wrecked vehicle it may be mobilised on 4+
Medical Orderly and Repair Crew placed in reserve and acting from proximity may only effect units on battlefield territories where the opposition has been completely removed from the territory.
Special Equipment
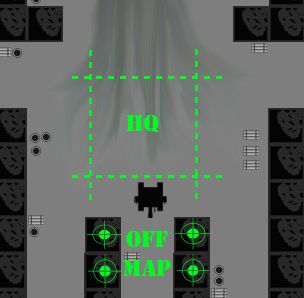
Attacker can call on off map artillery for the duration of the campaign. However if the Off Map artillery is disrupted by either mission Cut the Supply Line or Silence the Rear Support this bonus is lost.
Defender may use mines in mission 3 onwards, these are each a 1” x 3” area and cause D3 Blast S4 Ap5 hits. The defender gains 3+D3 for the duration of the campaign. To the defender must mark very clearly on a piece of paper during deployment where the mines are.
Special Missions
The Defender may elect to put a selection of units into a guerilla strike force for use in the Cut the Supply Line or Silence the Rear Support missions. This force must consist of units with the rule stealth, scout, infiltrate or deepstrike. Units without these rules may be deployed if they can be transported by a unit which has.
The Attacker may elect to dedicate a number of units (minimum 3) to securing the rear lines. These must be embarked in ground based transports. These will be available on a reserves roll of 2+
The War of Escalation
Missions
Achieving certain missions will allow players to 'buy' more units / wargear with, these will be added to the Grand Army.
Each force will have Primary Objective (as determined by mission rules) which will be understood by both players, though these may be different for each force.
Each force will also have a SECRET Secondary objective, determined by a 2D6 roll on the chart prior to force selection. If your Commander is alive + 1 to the roll, dead -1 to the roll.
1. Your HQ is lured into a trap, The opposition may choose your mission and theirs.
2. Your Force is lured into a trap, your opponent may choose your mission.
3. Your Opponent Discovers Your Mission – Roll Again and allow them to see result
4. Assassination (must take out at least one of the opponents characters)
5. Inflict Losses (roll again for % anti tank or % anti infantry)
6. Recover Artefact (from within 6” of enemy deployment zone of table)
7. Secure Significant Location (18” from DZ)
8. Hold Ground (within 9” of DZ, as long as possible)
9. Sneak Patrol (must reach opponents DZ without losses)
10. Infiltration (must remain hidden for duration of battle)
11. Detonate Strategic Structure (prior to opponent occupation of structure)
12. Hit And Run (unit must inflict casualties / damage on target and then leave table)
13. You may choose which Secret Mission you wish to have.
A force which achieves its Primary Objective will gain 500 points.
A force which achieves its Secondary Objective will gain 300 points.
Optionally a Player may decide to take additional Secret Missions, decided randomly as before, though if completed these will only provide 100 points each.
The Game Environment
The Cities of Death have been an inspiration for this campaign and the terrain should reflect the claustrophobic density of a ruined urban environment. The battlefields will be smaller than standard games using 4' x 4' tables or similar and the fighting will be concentrated amongst ruins and difficult terrain.
A number of battlefields will be fought over more than once. It will be worth recording damage and terrain changes so that the continuing destruction of the environment will be represented in the campaign.
The War of Escalation:
Veterancy
Scoring Veterancy: The first 2 are given after EACH battle, the others are awarded.
1. Claim Objective – If the Unit was holding an objective for more than 3 turns*
2. High Kill Ratio – If the Unit had a high Kill Ratio (approx twice their Points Cost)*
3. Crack Shot – Eliminating an Multiple Wound Character, or AV 12+ vehicle - explodes
4. Devastating Assault – If the unit achieved a Wipe Out in the same turn as they Assault
5. Against All Odds – If the Unit achieved / survived something truely remarkable
6. Death or Glory – If the Unit achieved a succesful Death or Glory attack on a vehicle
Allocation of Veterancy is to be decided by both players, with a Veteran unit determinned to be never more than 15 models. (Large Units will have to divide).
Any Vetrancy upgrade to wargear will only affect the standard equipment for which the squad is used, ie: a heavy weapon team / devastator squad will receive the bonus to the heavy weapons for which they were selected.
The Veterancy Table
Roll 2D6 for Each Unit gaining a Veterancy Award
2: Stat Increase for Unit - Chosen by controlling player.
3: Universal Special Rule - Chosen by controlling player. (FNP & EW: IC's only)
4: Gain New Item - 0 to 20 points.
5: Gain New Item - 0 to 10 points.
6: Squad Replenishment + Promotion - A basic unit member is upgraded to Sergeant / Nob*...
7: Squad Replenishment - The Unit is returned to Full Strength.
8: Squad replenishment + Promotion - ...*If Unit has 2 Sergeants / Nobs the squad may divide.
9: Upgrade Standard Kit - Either : Range +6”or AP -1.
10: Upgrade Standard Kit - Either : Strength+1, Attacks/Shots +1, Become Assault.
11: Free Stratagem - From Cityfight. (with possible additions at dicretion)
12: Choose from ANY + Replenishment - The Unit is returned to Full Strength.. and....
Spending Points within the Campaign
Reinforcements:
1. Arrive at Rearmost Territory
2. Can be bought from Codex with Force Organisation Limitations as listed above.
3. Reinforced Units loose any Veteran Skills or Wargear upgrades etc.
Replenishment;
1. Units gaining replenishments will not need to redeploy, as they are received instantly.
2. Units may not replenish with more than their original number.
3. Replenished Units do not loose any Veteran Skills or Wargear upgrades etc.
Merge Old Units:
1. Optional to Commanders.
2. May choose to combine units to get back to full strength.
3. Specailist wargear is kept by the merged units (eg a squad may have 2 heavy weapons)
4. Merged Units do not loose any Veteran Skills or Wargear upgrades etc.
Bulk Out Units:
1. Optional to Commanders.
2. New Reinforcements can be added to existing units at cost per individual.
3. Existing unit must rendevous with Reinforcements at rear territory.
Vehicle Upgrades:
1. If Engineer is alive, and within proximity then they may be added instantly
2. If the Engineer is dead, then they must rendevous at the rear territory.
3. If the Engineer is beyond proximity, they may choose to move to the closest asset.
The War of Escalation
Redeployment Between Games
Movements of a Battle Group
It will be important to move units from one battle field into the next as the game progresses.
Most of the Battle Group will be held in reserve and its proximity to other battlefields will effect the availability of reserves. (see previous rulings).
Movement is determined as follows:
Infantry, Walkers, Tanks may move one Battlefield
Bikes, Jump Infantry, may move two battlefields
Skimmers and Flyers are determined to be available across the entire map at all times.
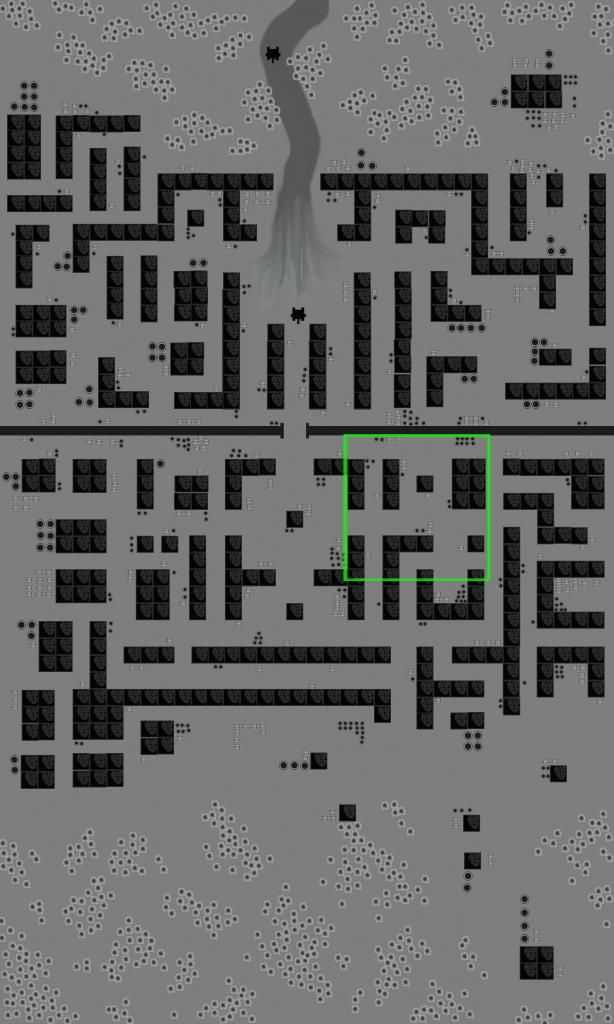
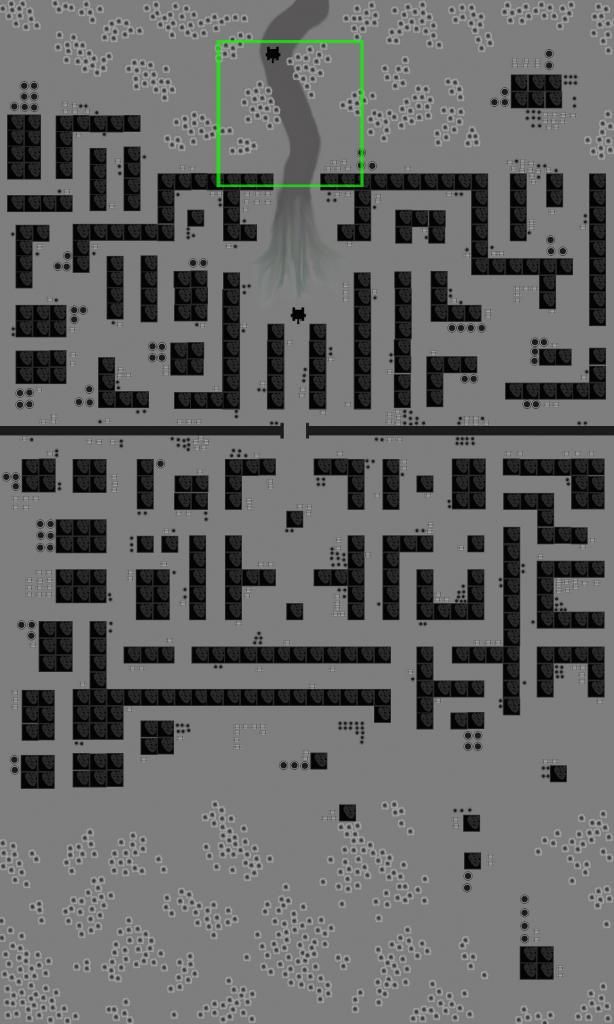
Reserves as bought by points earned through accomplishing missions will arrive at edge of city map, eg: Attackers will arrive at top of map used in Cut the Supply Line and Defenders will arrive at bottom of map used in Pursue the Vanquished
Important Note:
In every Mission the Defenders will get first turn.
The War of Escalation:
Missions
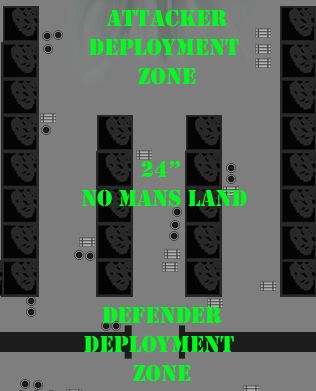
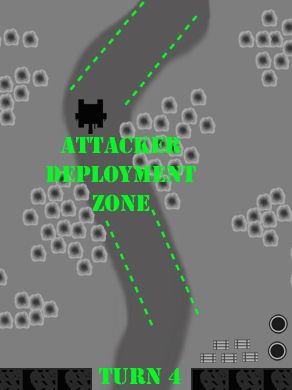
1) Ambush
500 points each side
500 points of allocated reserves available to attacker only
Undetermined Reinforcements are available
Attacker Objective : To cross the bridge in defender DZ
Attacker Gains:
Road (all non ruin terrain is considered road)
Reinforcements: the entirety of the attacker battle group can be called in from reserves on 2+
Defender Objective : To hold off attacker for as long as possible
Falling back and retreating units will assist in the next mission
Defender Gains:
Tank Traps x 2 May be moved 1” per 5 infantry per turn
Booby Traps x 2
Demolitions x 2
Flank: 2 units may outflank
Master Sniper: May infiltrate within 6” of enemy units. No cover save may be allowed.
Reinforcements: only infantry of the defender battle group can be called in from reserves on 5+
The War of Escalation:
Missions Continued
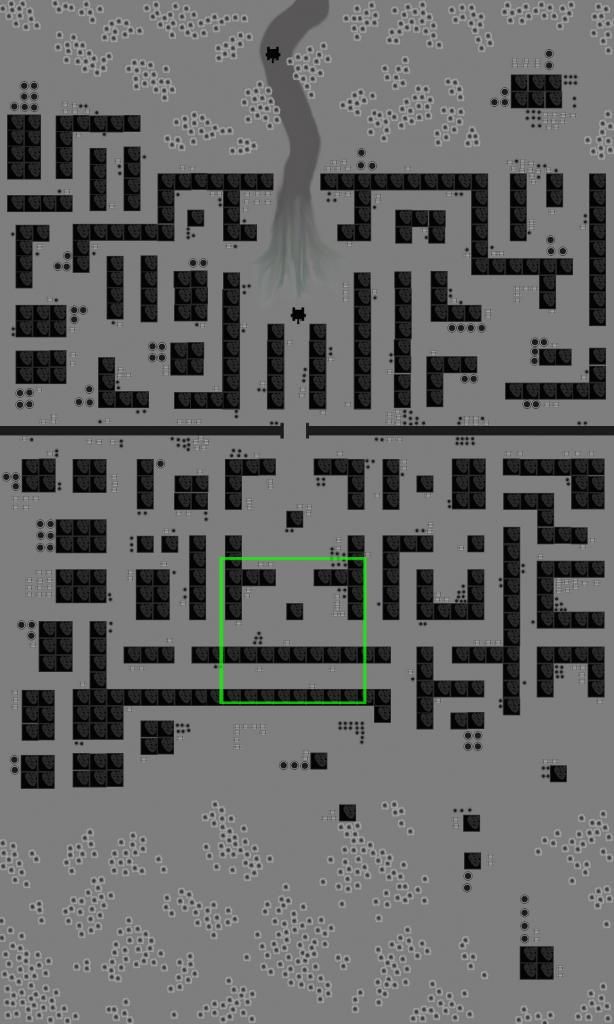
2) Into The Breach: aka Meat Grinder
500 points each side
500 points of allocated reserves available
Undetermined Reinforcements are available
Attacker Objective : To secure the centre of the square
The attacked must get as much of their force to the centre of the square as possible, this will count towards the next mission.
Attacker Gains:
Road (all terrain is considered road)
Off Map Support: 2 x S9 Ap 3Large Blast Ordnance, scatter twice. Available each turn.
Engineers x 1
Reinforcements: the entirety of the attacker battle group can be called in from reserves on 5+
Defender Objective : To hold off attacker for as long as possible
Defender Gains:
Deployment Zone is extended by 1” per 10 points of unwounded survivors from previous battle.
Key Building x 2: must be in deployment zone; this building will remain the same in later missions
Booby Traps x 2
Razor Wire x 2
Demolitions x 2
Reinforcements: the entirety of the defender battle group can be called in from reserves on 5+
The War of Escalation
Missions Continued
The following missions are played simultaneously, reserves must be allocated to one flank or the other.
3) Expand the Perimeter
and...
4) Secure the Flanks
These missions are played simultaneously, reserves must be allocated to one flank or the other or saved for the centre push.
500 points each side
500 points of allocated reserves available
Undetermined Reinforcements are available
Attacker Objective : To Push back Defender from Flank Territories
The defenders must be pushed back 12” from the forward edge of their deployment zone, if this succeeds the attacker gains an advantage in next mission
Attacker Gains:
Deployment Zone is extended by 1” per 10 points of unwounded survivors who reached objective
Key Building: must be in deployment zone; this building will remain the same in later missions
Road (all terrain is considered road)
Engineers x 1
Off Map Support: 2 x S9 Ap 3Large Blast Ordnance, scatter twice. Available each turn.
Reinforcements: the allocated reserves of the attacker battle group can be called in on 4+
Defender Objective : To repel attacker causing as much damage as possible
The defenders must be pushed back 12” from the forward edge of their deployment zone (before any additional distance earned in previous battle is added), if this succeeds the attacker gains an advantage in next mission
Defender Gains:
Key Building: must be in deployment zone; this building will remain the same in later missions
Booby Traps x 2
Razor Wire x 2
Demolitions x 2
Reinforcements: the allocated reserves of the defender battle group can be called in on 4+
The War of Escalation
Missions Continued
These missions are played simultaneously, reserves must be allocated to one flank or the other.
5) Cut The Supply Line (runs at the same time as The Forward Thrust)
The Special Mission Force Selection will designate points spent for this battle.
Undetermined Reinforcements are available to Attacker from turn 4
Attacker Objective : To defend the road from attack, to move Supplies into City.
If Attacker moves 6 units into the city they gain additional off map support.
If Attacker moves 5 units into city they keep same amount of off map support
If Attacker moves 4 units into city they lose one off map support per turn
If Attacker moves 3 units into city they lose reliable off map support, requiring a 3+
If Attacker moves 2 units into city they lose reliable off map support, requiring a 4+
If Attacker moves 1 units into city they lose reliable off map support, requiring a 5+
Attacker Gains:
Road (all road terrain is considered road)
Supplies; Each unit of supplies may add to undetermined reinforcements for free
Defence Force: Units arrive on 2+
Reinforcements: Arrive from the city on turn 4 on roll of 4+
Defender Objective : To prevent Supplies reaching City
Secondary Objective: To acquire a 'Trojan Horse'
To Steal a transport form the Enemy the transport must be wrecked or immobilised and any embarked unit slain. It can then be repaired on 4+ and must retreat from battle to either flank.
Defender Gains:
Repair Crew x 2
Road Block Vehicle x 1
Reinforcements: None
The War of Escalation
Missions Continued
6) The Forward Thrust (Runs at the same time as Cut the Supply Lines)
500 points each side
500 points of allocated reserves available
Undetermined Reinforcements are available
Attacker Objective : To Claim Key Buildings in Enemy Line
Attacker Gains:
For each perimeter / flank game won they gain 12” deployment on relevant flank
Road (all non ruin terrain is considered road)
Key Building x 2: Must be same as in Enter the Breach mission
Off Map Support: Dependant on result of previous mission
Engineers x 2
Reinforcements: the allocated reserves of the attacker battle group can be called in on 4+
Defender Objective : To hold Key Buildings in Deployment Zone
Defender Gains:
For each perimeter / flank game won they gain 12” deployment on relevant flank
Tank Traps x 1
Booby Traps x 2
Razor Wire x 1
Reinforcements: the allocated reserves of the defender battle group can be called in on 4+
The War of Escalation
Missions Continued
These missions are played simultaneously, reserves must be allocated to one flank or the other.
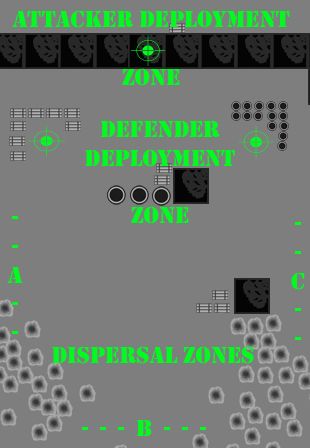
7) Pursuit of the Vanquished / Bait the oppressor (runs at the same time as Silence the Big Guns)

500 points each side
500 points of allocated reserves available
Undetermined Reinforcements are available
Attacker Objective : To Eliminate Defender and Secure Key Locations
Attacker Gains:
No Road
Key Building x 1: Will be same as in Forward thrust
Off Map Support: Dependant on result of previous mission
Engineers x
Reinforcements: the allocated reserves of the attacker battle group can be called in on 4+
Defender Objective : To Retreat and Leave Battlefield via Dispersal Routes
[Keep a note of which units left via which dispersal route.]
Defender Gains:
Timed Detonations: 6 x Large Blast S9 Ap3 Ordnance. Must be allocated to location and turn prior to start of battle. Must be clearly marked on piece of paper. These underground detonations create craters offering 5+ save and difficult terrain.
Key Buildings: Ammo + Fuel
Reinforcements: the allocated reserves of the defender battle group can be called in on 4+
The War of Escalation
Missions Continued
8) Silence the Big Guns (Runs at the same time as Pursuit of the Vanquished)

500 points each side
500 points of allocated reserves available to Attacker
Undetermined Reinforcements are available to Attacker
Attacker Objective : To Repel Attack
Attacker Gains:
Rear Line Security Group
Roads
Key Building x 4:
Barricades x 2: To be allocated to perimeter of HQ area.
Bunker: AV14 Bunker to be placed in centre of HQ area
Off Map Support: is unable to fire at short range / is already firing on other sectors
Reinforcements: the allocated reserves of the attacker battle group can be called in on 4+
Defender Objective : To Destroy Enemy Command with Guerilla Strike Force
Secondary Objective: To Destroy The Off Map Support Units
Defender Gains:
Guerilla Strike Force
Trojan Horse(s): these may be driven to any accessible location and detonated with a D6” blast radius at S9 Ap3 Ordnance.
They will be detected by models within 3” on a roll of 1 or by an HQ character on a roll of 1or 2.
If detected the unit may opt to detonate at any time or continue moving in its turn. If the vehicle is fired upon and either crew stunned / shaken or weapon destroyed result the munitions and crew are disabled.
Demolitions Charge: All infantry units may carry a demolitions charge, S8 Ap4
Reinforcements: None
The War of Escalation
Missions Continued
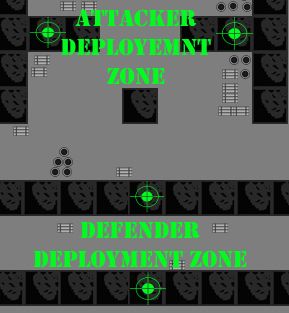
9) Storm the Square / The Last Stand

500 points each side (not including any of the special missions survivors)
500 points of allocated reserves available
Undetermined Reinforcements are available
Deployment of Reserves will be relative to victories of previous missions
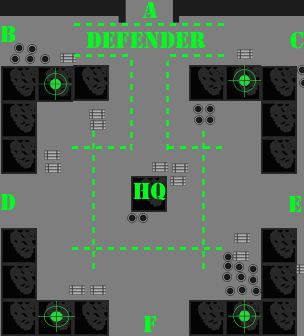
Defender Rear Line Security Group Deploy in Area marked Defender
Location A is Deployment for Guerilla Strike Force
Location B is Deployment for Attacker
Location c is Deployment for Attacker
Location D is Deployment for Winner of Mission 3
Location E is Deployment for Winner of Mission 4
Location F is Deployment for Winner of Mission 6
Attacker Objective : To Repel the Final Attack
Attacker Gains:
Rear Line Security Group
Roads
Key Building x 4: 2 of these will have been allocated roles earlier in campaign
Off Map Support: Dependant on previous mission
Reinforcements: the allocated reserves of the attacker battle group can be called in on 3+
Defender Objective : To Destroy Enemy Forward Command
Defender Gains:
Guerilla Strike Force (no longer has demolitions)
Reinforcements: the allocated reserves of the defender battle group can be called in on 3+
Here's a Campaign I wrote years back, I found it recently in my book of 40k doodles...
Have a read if you've got a spare hour....
(I'm not sure how the formatting will turn out)
M:403460496.234.
Serial Sector: 34647
Planetry System: Gamma Beta 2423.
Population Centre 'Escalation' – Known Trading Station and Crossing of Magtro Disruption Flow
Tactical Note: Escalation is a very tightly packed urban environment, and does not suit the large wingspan of Imperial skimmers. Across most of the city it is unlikely that Valkyries or similar craft will be able to find safe places to position themselves due to the narrow streets and high buildings.
Units may be deployed via rappelling lines or grav chute insertion, aircraft and skimmers will fire at BS2 due to the difficulty navigating the tight streets, any skimmer or flyer which disembarks a unit may not fire in same turn. In the Cut the Supply Lines and the Pursue the Vanquished missions, these rules do not apply as they are outside the city.
The river is highly unstable Magtro, with a high electromagnetic charge and extreme heat, it will cause any jump troops, jet bikes, skimmers or any other object (except bullets, plasma, laser etc which pass over too quickly to be effected) to explode above the river. Teleporters can be used, as can warp drives or any other non linear means of movement.
Barrage units may support battles though will be less accurate, scattering full distance twice, in order to use these units they must be bought as allocated reserves though can be kept of map for duration of battle.
The War of Escalation:
Force Organisation and Reserves
Choose your entire force for the Campaign prior to determining which Army takes which role, this Army list is to be known as the Battle Group.
It will follow the following Force Allocation system
1. Command Minimum 10%
2. Troop Minimum 40%
3. Elite }
4. Fast } Minimum 10%
5. Heavy }
In each mission each player may choose from their Battle Group which elements to deploy.
From mission 3 onwards a choice will be made about where units are allocated.
Each mission will define how many points must be spent, additional points can be added if available to the player to a maximum of double the initial cost.
Reinforcements come from the Battle Group, as do any reserves arriving in support during a game. Units must be within proximity to be able to be used as Reserves.
Proximity is defined as a table sized territory which joins the edge of the table in play on one side. Please look on the overview map.
Reserves in Missions which are simultaneous must be decided upon prior to the beginning of either game, with the allocation remaining fixed. Units may be allocated Undetermined.
Undetermined Reserves can be allocated to wait in the middle territory and respond when requested, though will require 3 successful reserves roll prior to their deployment.
Undetermined Reserves which are within a Fast Transport, or are Jump Infantry or Cavalry will only require 2 successful reserves rolls prior to deployment.
Reserves can arrive in a mission from turn 1 on a roll of 4+, this is never reduced as the turns continue. This roll may be influenced by special characters.
Units with Scouts may move after deployment as normal.
Units with Infiltrate may deploy forward of the DZ as normal
Outflanking by a unit is permissible under the following considerations:
1. If outflanking a territory that is over the river, the player must control the bridge.
2. They occupy the territory which links to the table edge they are entering from.
3. The territory is in dispute or unclaimed and they have 3 units on the current territory closer to the opposition than the point at which they intend to enter.
4. They were able to infiltrate or were part of a sneak patrol (see secret missions) in a territory which links to the territory in use. (Though must arrive from this edge).
5. They are either infantry, a walker or a vehicle with a modification which allows them to re-roll effects of dangerous terrain, and there are suitable entry points.
Special Characters
The addition of a Commander, or Communications Officer to any force will make the reserves roll 3+, if BOTH are on the table ten the roll is 2+ instead.
A Unit retreating from the board DOES NOT count as a lost unit, they may test to rally (4+ normally, 2+ if in proximity of HQ - Thereby a territory with no HQ beside a territory with an HQ will allow the HQ to influence events.)
Medical Orderlies and Repair Crew which were present during the battle have the following effects on Unit Casualties and Damaged Vehicles. The Repair Crew can repair vehicles during a battle if they can get in base contact with the model.
If your Medical Orderly is alive it will be important to make note of the numbers of survivors in each unit at the end of battles, these casualties may return to fight again.
It will also be important to place casualties who suffer wounds which cannot be healed through the 'Feel No Pain' universal special rule to one side (the grave yard / funeral pyre)
Units suffering casualties will have after battle effects:
1. If the Ordrely is unable to assist the casualty will survive on 6+
2. If the Orderly is able to assist they will be healed on 4+
3. Regardless of the effect all wargear will be lost, bar the standard troop wargear.
If your Repair Crew is alive, and within base contact:
1. Damaged Weapons may be repaired on a 2+ at the end of the battle or 3+ during it.
1. If the Repair Crew is able to reach an Immobilised vehicle it may be repaired on 3+
2. If the Repair Crew is able to reach a Wrecked vehicle it may be mobilised on 4+
Medical Orderly and Repair Crew placed in reserve and acting from proximity may only effect units on battlefield territories where the opposition has been completely removed from the territory.
Special Equipment
Attacker can call on off map artillery for the duration of the campaign. However if the Off Map artillery is disrupted by either mission Cut the Supply Line or Silence the Rear Support this bonus is lost.
Defender may use mines in mission 3 onwards, these are each a 1” x 3” area and cause D3 Blast S4 Ap5 hits. The defender gains 3+D3 for the duration of the campaign. To the defender must mark very clearly on a piece of paper during deployment where the mines are.
Special Missions
The Defender may elect to put a selection of units into a guerilla strike force for use in the Cut the Supply Line or Silence the Rear Support missions. This force must consist of units with the rule stealth, scout, infiltrate or deepstrike. Units without these rules may be deployed if they can be transported by a unit which has.
The Attacker may elect to dedicate a number of units (minimum 3) to securing the rear lines. These must be embarked in ground based transports. These will be available on a reserves roll of 2+
The War of Escalation
Missions
Achieving certain missions will allow players to 'buy' more units / wargear with, these will be added to the Grand Army.
Each force will have Primary Objective (as determined by mission rules) which will be understood by both players, though these may be different for each force.
Each force will also have a SECRET Secondary objective, determined by a 2D6 roll on the chart prior to force selection. If your Commander is alive + 1 to the roll, dead -1 to the roll.
1. Your HQ is lured into a trap, The opposition may choose your mission and theirs.
2. Your Force is lured into a trap, your opponent may choose your mission.
3. Your Opponent Discovers Your Mission – Roll Again and allow them to see result
4. Assassination (must take out at least one of the opponents characters)
5. Inflict Losses (roll again for % anti tank or % anti infantry)
6. Recover Artefact (from within 6” of enemy deployment zone of table)
7. Secure Significant Location (18” from DZ)
8. Hold Ground (within 9” of DZ, as long as possible)
9. Sneak Patrol (must reach opponents DZ without losses)
10. Infiltration (must remain hidden for duration of battle)
11. Detonate Strategic Structure (prior to opponent occupation of structure)
12. Hit And Run (unit must inflict casualties / damage on target and then leave table)
13. You may choose which Secret Mission you wish to have.
A force which achieves its Primary Objective will gain 500 points.
A force which achieves its Secondary Objective will gain 300 points.
Optionally a Player may decide to take additional Secret Missions, decided randomly as before, though if completed these will only provide 100 points each.
The Game Environment
The Cities of Death have been an inspiration for this campaign and the terrain should reflect the claustrophobic density of a ruined urban environment. The battlefields will be smaller than standard games using 4' x 4' tables or similar and the fighting will be concentrated amongst ruins and difficult terrain.
A number of battlefields will be fought over more than once. It will be worth recording damage and terrain changes so that the continuing destruction of the environment will be represented in the campaign.
The War of Escalation:
Veterancy
Scoring Veterancy: The first 2 are given after EACH battle, the others are awarded.
1. Claim Objective – If the Unit was holding an objective for more than 3 turns*
2. High Kill Ratio – If the Unit had a high Kill Ratio (approx twice their Points Cost)*
3. Crack Shot – Eliminating an Multiple Wound Character, or AV 12+ vehicle - explodes
4. Devastating Assault – If the unit achieved a Wipe Out in the same turn as they Assault
5. Against All Odds – If the Unit achieved / survived something truely remarkable
6. Death or Glory – If the Unit achieved a succesful Death or Glory attack on a vehicle
Allocation of Veterancy is to be decided by both players, with a Veteran unit determinned to be never more than 15 models. (Large Units will have to divide).
Any Vetrancy upgrade to wargear will only affect the standard equipment for which the squad is used, ie: a heavy weapon team / devastator squad will receive the bonus to the heavy weapons for which they were selected.
The Veterancy Table
Roll 2D6 for Each Unit gaining a Veterancy Award
2: Stat Increase for Unit - Chosen by controlling player.
3: Universal Special Rule - Chosen by controlling player. (FNP & EW: IC's only)
4: Gain New Item - 0 to 20 points.
5: Gain New Item - 0 to 10 points.
6: Squad Replenishment + Promotion - A basic unit member is upgraded to Sergeant / Nob*...
7: Squad Replenishment - The Unit is returned to Full Strength.
8: Squad replenishment + Promotion - ...*If Unit has 2 Sergeants / Nobs the squad may divide.
9: Upgrade Standard Kit - Either : Range +6”or AP -1.
10: Upgrade Standard Kit - Either : Strength+1, Attacks/Shots +1, Become Assault.
11: Free Stratagem - From Cityfight. (with possible additions at dicretion)
12: Choose from ANY + Replenishment - The Unit is returned to Full Strength.. and....
Spending Points within the Campaign
Reinforcements:
1. Arrive at Rearmost Territory
2. Can be bought from Codex with Force Organisation Limitations as listed above.
3. Reinforced Units loose any Veteran Skills or Wargear upgrades etc.
Replenishment;
1. Units gaining replenishments will not need to redeploy, as they are received instantly.
2. Units may not replenish with more than their original number.
3. Replenished Units do not loose any Veteran Skills or Wargear upgrades etc.
Merge Old Units:
1. Optional to Commanders.
2. May choose to combine units to get back to full strength.
3. Specailist wargear is kept by the merged units (eg a squad may have 2 heavy weapons)
4. Merged Units do not loose any Veteran Skills or Wargear upgrades etc.
Bulk Out Units:
1. Optional to Commanders.
2. New Reinforcements can be added to existing units at cost per individual.
3. Existing unit must rendevous with Reinforcements at rear territory.
Vehicle Upgrades:
1. If Engineer is alive, and within proximity then they may be added instantly
2. If the Engineer is dead, then they must rendevous at the rear territory.
3. If the Engineer is beyond proximity, they may choose to move to the closest asset.
The War of Escalation
Redeployment Between Games
Movements of a Battle Group
It will be important to move units from one battle field into the next as the game progresses.
Most of the Battle Group will be held in reserve and its proximity to other battlefields will effect the availability of reserves. (see previous rulings).
Movement is determined as follows:
Infantry, Walkers, Tanks may move one Battlefield
Bikes, Jump Infantry, may move two battlefields
Skimmers and Flyers are determined to be available across the entire map at all times.
Reserves as bought by points earned through accomplishing missions will arrive at edge of city map, eg: Attackers will arrive at top of map used in Cut the Supply Line and Defenders will arrive at bottom of map used in Pursue the Vanquished
Important Note:
In every Mission the Defenders will get first turn.
The War of Escalation:
Missions
1) Ambush
500 points each side
500 points of allocated reserves available to attacker only
Undetermined Reinforcements are available
Attacker Objective : To cross the bridge in defender DZ
Attacker Gains:
Road (all non ruin terrain is considered road)
Reinforcements: the entirety of the attacker battle group can be called in from reserves on 2+
Defender Objective : To hold off attacker for as long as possible
Falling back and retreating units will assist in the next mission
Defender Gains:
Tank Traps x 2 May be moved 1” per 5 infantry per turn
Booby Traps x 2
Demolitions x 2
Flank: 2 units may outflank
Master Sniper: May infiltrate within 6” of enemy units. No cover save may be allowed.
Reinforcements: only infantry of the defender battle group can be called in from reserves on 5+
The War of Escalation:
Missions Continued
2) Into The Breach: aka Meat Grinder
500 points each side
500 points of allocated reserves available
Undetermined Reinforcements are available
Attacker Objective : To secure the centre of the square
The attacked must get as much of their force to the centre of the square as possible, this will count towards the next mission.
Attacker Gains:
Road (all terrain is considered road)
Off Map Support: 2 x S9 Ap 3Large Blast Ordnance, scatter twice. Available each turn.
Engineers x 1
Reinforcements: the entirety of the attacker battle group can be called in from reserves on 5+
Defender Objective : To hold off attacker for as long as possible
Defender Gains:
Deployment Zone is extended by 1” per 10 points of unwounded survivors from previous battle.
Key Building x 2: must be in deployment zone; this building will remain the same in later missions
Booby Traps x 2
Razor Wire x 2
Demolitions x 2
Reinforcements: the entirety of the defender battle group can be called in from reserves on 5+
The War of Escalation
Missions Continued
The following missions are played simultaneously, reserves must be allocated to one flank or the other.
3) Expand the Perimeter
and...
4) Secure the Flanks
These missions are played simultaneously, reserves must be allocated to one flank or the other or saved for the centre push.
500 points each side
500 points of allocated reserves available
Undetermined Reinforcements are available
Attacker Objective : To Push back Defender from Flank Territories
The defenders must be pushed back 12” from the forward edge of their deployment zone, if this succeeds the attacker gains an advantage in next mission
Attacker Gains:
Deployment Zone is extended by 1” per 10 points of unwounded survivors who reached objective
Key Building: must be in deployment zone; this building will remain the same in later missions
Road (all terrain is considered road)
Engineers x 1
Off Map Support: 2 x S9 Ap 3Large Blast Ordnance, scatter twice. Available each turn.
Reinforcements: the allocated reserves of the attacker battle group can be called in on 4+
Defender Objective : To repel attacker causing as much damage as possible
The defenders must be pushed back 12” from the forward edge of their deployment zone (before any additional distance earned in previous battle is added), if this succeeds the attacker gains an advantage in next mission
Defender Gains:
Key Building: must be in deployment zone; this building will remain the same in later missions
Booby Traps x 2
Razor Wire x 2
Demolitions x 2
Reinforcements: the allocated reserves of the defender battle group can be called in on 4+
The War of Escalation
Missions Continued
These missions are played simultaneously, reserves must be allocated to one flank or the other.
5) Cut The Supply Line (runs at the same time as The Forward Thrust)
The Special Mission Force Selection will designate points spent for this battle.
Undetermined Reinforcements are available to Attacker from turn 4
Attacker Objective : To defend the road from attack, to move Supplies into City.
If Attacker moves 6 units into the city they gain additional off map support.
If Attacker moves 5 units into city they keep same amount of off map support
If Attacker moves 4 units into city they lose one off map support per turn
If Attacker moves 3 units into city they lose reliable off map support, requiring a 3+
If Attacker moves 2 units into city they lose reliable off map support, requiring a 4+
If Attacker moves 1 units into city they lose reliable off map support, requiring a 5+
Attacker Gains:
Road (all road terrain is considered road)
Supplies; Each unit of supplies may add to undetermined reinforcements for free
Defence Force: Units arrive on 2+
Reinforcements: Arrive from the city on turn 4 on roll of 4+
Defender Objective : To prevent Supplies reaching City
Secondary Objective: To acquire a 'Trojan Horse'
To Steal a transport form the Enemy the transport must be wrecked or immobilised and any embarked unit slain. It can then be repaired on 4+ and must retreat from battle to either flank.
Defender Gains:
Repair Crew x 2
Road Block Vehicle x 1
Reinforcements: None
The War of Escalation
Missions Continued
6) The Forward Thrust (Runs at the same time as Cut the Supply Lines)
500 points each side
500 points of allocated reserves available
Undetermined Reinforcements are available
Attacker Objective : To Claim Key Buildings in Enemy Line
Attacker Gains:
For each perimeter / flank game won they gain 12” deployment on relevant flank
Road (all non ruin terrain is considered road)
Key Building x 2: Must be same as in Enter the Breach mission
Off Map Support: Dependant on result of previous mission
Engineers x 2
Reinforcements: the allocated reserves of the attacker battle group can be called in on 4+
Defender Objective : To hold Key Buildings in Deployment Zone
Defender Gains:
For each perimeter / flank game won they gain 12” deployment on relevant flank
Tank Traps x 1
Booby Traps x 2
Razor Wire x 1
Reinforcements: the allocated reserves of the defender battle group can be called in on 4+
The War of Escalation
Missions Continued
These missions are played simultaneously, reserves must be allocated to one flank or the other.
7) Pursuit of the Vanquished / Bait the oppressor (runs at the same time as Silence the Big Guns)
500 points each side
500 points of allocated reserves available
Undetermined Reinforcements are available
Attacker Objective : To Eliminate Defender and Secure Key Locations
Attacker Gains:
No Road
Key Building x 1: Will be same as in Forward thrust
Off Map Support: Dependant on result of previous mission
Engineers x
Reinforcements: the allocated reserves of the attacker battle group can be called in on 4+
Defender Objective : To Retreat and Leave Battlefield via Dispersal Routes
[Keep a note of which units left via which dispersal route.]
Defender Gains:
Timed Detonations: 6 x Large Blast S9 Ap3 Ordnance. Must be allocated to location and turn prior to start of battle. Must be clearly marked on piece of paper. These underground detonations create craters offering 5+ save and difficult terrain.
Key Buildings: Ammo + Fuel
Reinforcements: the allocated reserves of the defender battle group can be called in on 4+
The War of Escalation
Missions Continued
8) Silence the Big Guns (Runs at the same time as Pursuit of the Vanquished)
500 points each side
500 points of allocated reserves available to Attacker
Undetermined Reinforcements are available to Attacker
Attacker Objective : To Repel Attack
Attacker Gains:
Rear Line Security Group
Roads
Key Building x 4:
Barricades x 2: To be allocated to perimeter of HQ area.
Bunker: AV14 Bunker to be placed in centre of HQ area
Off Map Support: is unable to fire at short range / is already firing on other sectors
Reinforcements: the allocated reserves of the attacker battle group can be called in on 4+
Defender Objective : To Destroy Enemy Command with Guerilla Strike Force
Secondary Objective: To Destroy The Off Map Support Units
Defender Gains:
Guerilla Strike Force
Trojan Horse(s): these may be driven to any accessible location and detonated with a D6” blast radius at S9 Ap3 Ordnance.
They will be detected by models within 3” on a roll of 1 or by an HQ character on a roll of 1or 2.
If detected the unit may opt to detonate at any time or continue moving in its turn. If the vehicle is fired upon and either crew stunned / shaken or weapon destroyed result the munitions and crew are disabled.
Demolitions Charge: All infantry units may carry a demolitions charge, S8 Ap4
Reinforcements: None
The War of Escalation
Missions Continued
9) Storm the Square / The Last Stand
500 points each side (not including any of the special missions survivors)
500 points of allocated reserves available
Undetermined Reinforcements are available
Deployment of Reserves will be relative to victories of previous missions
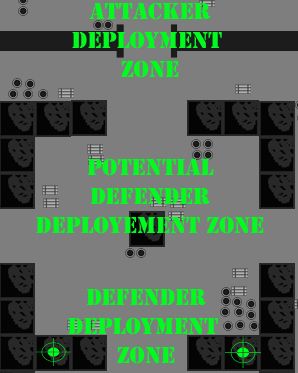
Defender Rear Line Security Group Deploy in Area marked Defender
Location A is Deployment for Guerilla Strike Force
Location B is Deployment for Attacker
Location c is Deployment for Attacker
Location D is Deployment for Winner of Mission 3
Location E is Deployment for Winner of Mission 4
Location F is Deployment for Winner of Mission 6
Attacker Objective : To Repel the Final Attack
Attacker Gains:
Rear Line Security Group
Roads
Key Building x 4: 2 of these will have been allocated roles earlier in campaign
Off Map Support: Dependant on previous mission
Reinforcements: the allocated reserves of the attacker battle group can be called in on 3+
Defender Objective : To Destroy Enemy Forward Command
Defender Gains:
Guerilla Strike Force (no longer has demolitions)
Reinforcements: the allocated reserves of the defender battle group can be called in on 3+