Post by Turtleboy(AWOL) on Aug 2, 2007 5:26:23 GMT -5
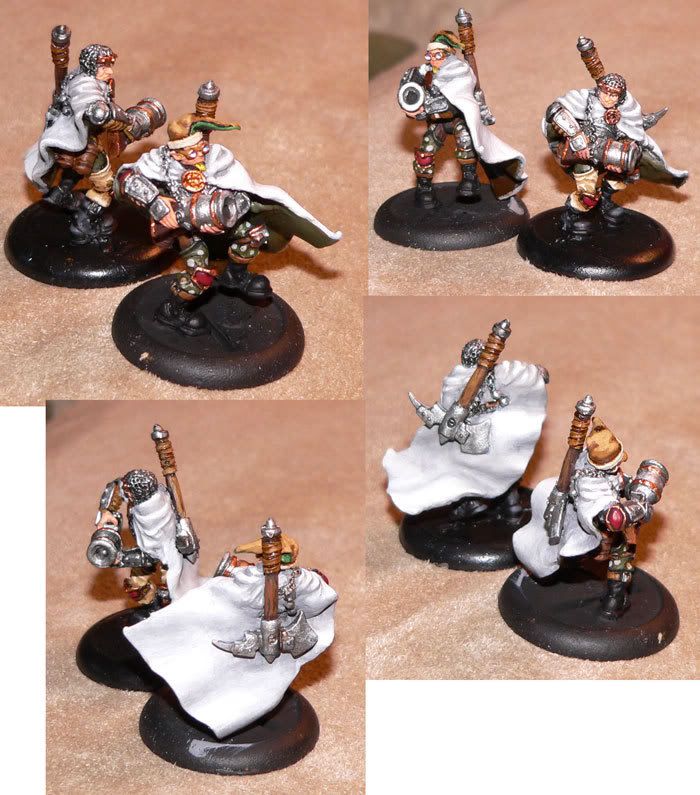
here's a tutorial on how I made these cloaks:

some folks were asking me about it so I figured I'd do their questions some justice and write up a quick 'how to' incase anyone else was interested
onward!
for me, it's all about tools. having the right tools makes it possible. I have greenstuff AND brownstuff that I combine to make a puddy that's pliable but that will also set in the not TOO distant future.
step1: take a piece of plasticard, set it on the desk, apply cooking oil or vaseline to the face up side.
step2: make your puddy. I use 2 parts greenstuff to 1 part brownstuff and that works pretty well. I could go for a little more brownstuff but that's entirely up to preference. (greenstuff gives you pliability, brownstuff gives you rigidity in your puddy)
step3: make a ball of puddy with no creases, set it down on the oil/vaseline coated plasticard (or other perfectly flat surface that you're ok with cutting on with an exacto knife) and squash it flat (be sure to oil up whatever impliment you're using to squash the ball flat or it'll stick to the squashing tool). proceed to roll the pancake of greenstuff out to cloak level thin-ness with a roller of some sort (I just use one of the greenstuff tubes, which, like everything else so far, needs to be oiled up too).
this is an important step here: LET THE PUDDY SIT FOR 30MIN. this will get it on its way to hardening and allow you to work with it and it'll keep its form better. you could let it sit for 45min if you wanted too - there'd be no harm in that.
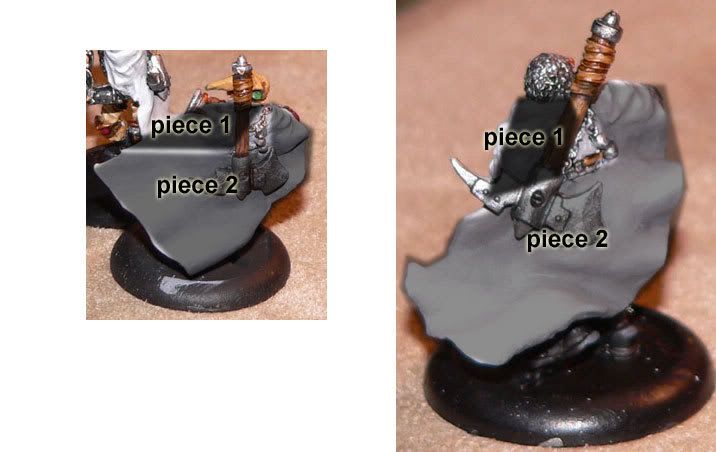
here's where it gets tricky. some cloaks need to be done in pieces, others can be done with one cloak piece. it's really situational - if you have details on the models back that need to appear as if they're on the outside of the cloak then you're looking at a multi-piece cloak. here's a pic of how I work my cloaks on my devil dogs:

ok now you've got your cloak width pancake of puddy, take your exacto knife and (having dipped it in water so it doesn't snag on the puddy) cut out the first piece for the cloak.
take a lint free cloth and clean the oil off the puddy so it'll adhere to the model. this is an important step
try not to get your fingerprints on the puddy, but know that they can be smoothed off with little problem in the early stages of things.
press the puddy into place where it'll hold on the model so it establishes a join.
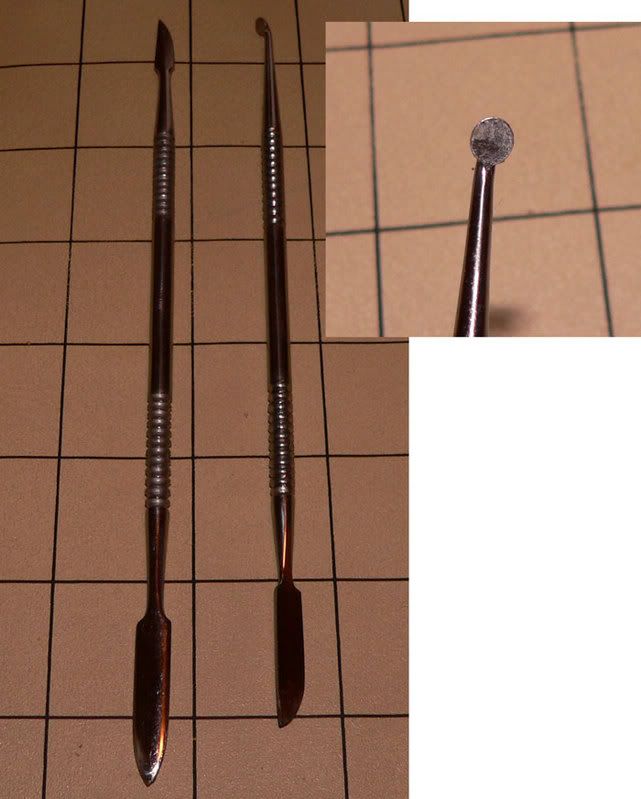
now it's all about sculpting tools. these are mine:

these are 2 of the 3 tools you get from gale force 9's 'basic sculpting tool kit' the 3rd tool is a pokey bit used for making chainmail and the like. I haven't had any reason to do that yet, though that gives me some ideas just mentioning it!
note the tool that's head is blown up. this is an invaluable tool in making the billowing cloak curves. you want to use this and another tool that's got that curving type head (the other tool just happens to have a slightly less pronounced curving head (curving leaning towards a circular 'fat' feel vs. flat and knifelike tool heads)).
now, on to making curvy cloak billows!
tip: as you go, make sure you smooth off any fingerprints you get on the puddy because this is one of the worst ways to give away home-made sculpting add-ons
once you've laid in the large portion of your cloak and want to now add some curves to it, you'll want to do the following (using only curvey 'fat' roundish headed tools like the one blown up in the pic above):
take one tool and slide it under the cloak to support the cloak so as you create the curve the cloak doesn't collapse. slide this tool in where you want the cloaks curve to arch out at.
use the other tool to gently press down on one side of the area where you've got the cloak supported
go to the other side and gently press down on the other side of the supported area
work this back and forth until you've got a nice curve established.
the fact that you've used brownstuff in making your puddy mix and let it sit for 30-45min before working with it will now pay off and the billow will hold nicely!
rinse and repeat till you've got a great looking cloak.
once you're done, you'll need to hold your model at odd angles till the puddy fully sets and strengthens to the point where you can sit it down and not lose the finer points of the sculpts form (drooping is bad!).
once the sculpt has set and is nice and solid, I like to do one final step. back to 'it's all about your tools' but hey, for me, it is! I use gale force 9's glue, it's really something and is quite a unique asset for modelling. it runs but has superglue properties for establishing a quick bond (though it takes a very little bit of time to set, unlike true superglue), however the absolute best thing about gale force 9's hobby glue is that there is a little spray bottle that they sell with it that when you spray down the glue it INSTANTLY completely sets. this allows you to let glue run into a crack then freeze it in place at just the right moment and neat things like that.
this last step has alot to do with what I just mentioned. when joining 2 pieces of cloak, there's often a seam left - I take gale force 9 glue and put a nice big drop of it on the seam then turn the model so the glue runs up and down the seam then spray it into an instant set. bingo no more seam. while it looks like the seam still exists (because the glue is clear) when you paint or prime over it, you'll see that the glue has sealed the seam up. I like to do this to all the imperfections I've created on the cloak as I've gone (sometimes the cloak will get pressed against a models knee and there'll be a knee imprint on the inside of the cloak - 1 drop of glue then a squirt from the bottle and there's no more imprint. it's totally goodstuff.
the alternative to closing these seams and imperfections for those who don't have access to gale force 9's glue is to take some brownstuff (you may want it for touching up the lining of the cloak which you may have to do anyway - brownstuff is good because you can make hard corners with it and it'll blend into the edge of the cloak better where that hard edge from you cutting the cloak pattern out still exists). fill in the seams and imperfections in your cloak with brownstuff and use some of the more circular sculpting tools to smooth it all out so it blends nicely into the rest of the cloak. NOTE: do this ONLY after the sculpt has reallyreally set well or you may find yourself making work by having to re-pose the cloak!
good luck!

some folks were asking me about it so I figured I'd do their questions some justice and write up a quick 'how to' incase anyone else was interested

onward!
for me, it's all about tools. having the right tools makes it possible. I have greenstuff AND brownstuff that I combine to make a puddy that's pliable but that will also set in the not TOO distant future.
step1: take a piece of plasticard, set it on the desk, apply cooking oil or vaseline to the face up side.
step2: make your puddy. I use 2 parts greenstuff to 1 part brownstuff and that works pretty well. I could go for a little more brownstuff but that's entirely up to preference. (greenstuff gives you pliability, brownstuff gives you rigidity in your puddy)
step3: make a ball of puddy with no creases, set it down on the oil/vaseline coated plasticard (or other perfectly flat surface that you're ok with cutting on with an exacto knife) and squash it flat (be sure to oil up whatever impliment you're using to squash the ball flat or it'll stick to the squashing tool). proceed to roll the pancake of greenstuff out to cloak level thin-ness with a roller of some sort (I just use one of the greenstuff tubes, which, like everything else so far, needs to be oiled up too).
this is an important step here: LET THE PUDDY SIT FOR 30MIN. this will get it on its way to hardening and allow you to work with it and it'll keep its form better. you could let it sit for 45min if you wanted too - there'd be no harm in that.
here's where it gets tricky. some cloaks need to be done in pieces, others can be done with one cloak piece. it's really situational - if you have details on the models back that need to appear as if they're on the outside of the cloak then you're looking at a multi-piece cloak. here's a pic of how I work my cloaks on my devil dogs:

ok now you've got your cloak width pancake of puddy, take your exacto knife and (having dipped it in water so it doesn't snag on the puddy) cut out the first piece for the cloak.
take a lint free cloth and clean the oil off the puddy so it'll adhere to the model. this is an important step
try not to get your fingerprints on the puddy, but know that they can be smoothed off with little problem in the early stages of things.
press the puddy into place where it'll hold on the model so it establishes a join.
now it's all about sculpting tools. these are mine:

these are 2 of the 3 tools you get from gale force 9's 'basic sculpting tool kit' the 3rd tool is a pokey bit used for making chainmail and the like. I haven't had any reason to do that yet, though that gives me some ideas just mentioning it!
note the tool that's head is blown up. this is an invaluable tool in making the billowing cloak curves. you want to use this and another tool that's got that curving type head (the other tool just happens to have a slightly less pronounced curving head (curving leaning towards a circular 'fat' feel vs. flat and knifelike tool heads)).
now, on to making curvy cloak billows!
tip: as you go, make sure you smooth off any fingerprints you get on the puddy because this is one of the worst ways to give away home-made sculpting add-ons
once you've laid in the large portion of your cloak and want to now add some curves to it, you'll want to do the following (using only curvey 'fat' roundish headed tools like the one blown up in the pic above):
take one tool and slide it under the cloak to support the cloak so as you create the curve the cloak doesn't collapse. slide this tool in where you want the cloaks curve to arch out at.
use the other tool to gently press down on one side of the area where you've got the cloak supported
go to the other side and gently press down on the other side of the supported area
work this back and forth until you've got a nice curve established.
the fact that you've used brownstuff in making your puddy mix and let it sit for 30-45min before working with it will now pay off and the billow will hold nicely!
rinse and repeat till you've got a great looking cloak.
once you're done, you'll need to hold your model at odd angles till the puddy fully sets and strengthens to the point where you can sit it down and not lose the finer points of the sculpts form (drooping is bad!).
once the sculpt has set and is nice and solid, I like to do one final step. back to 'it's all about your tools' but hey, for me, it is! I use gale force 9's glue, it's really something and is quite a unique asset for modelling. it runs but has superglue properties for establishing a quick bond (though it takes a very little bit of time to set, unlike true superglue), however the absolute best thing about gale force 9's hobby glue is that there is a little spray bottle that they sell with it that when you spray down the glue it INSTANTLY completely sets. this allows you to let glue run into a crack then freeze it in place at just the right moment and neat things like that.
this last step has alot to do with what I just mentioned. when joining 2 pieces of cloak, there's often a seam left - I take gale force 9 glue and put a nice big drop of it on the seam then turn the model so the glue runs up and down the seam then spray it into an instant set. bingo no more seam. while it looks like the seam still exists (because the glue is clear) when you paint or prime over it, you'll see that the glue has sealed the seam up. I like to do this to all the imperfections I've created on the cloak as I've gone (sometimes the cloak will get pressed against a models knee and there'll be a knee imprint on the inside of the cloak - 1 drop of glue then a squirt from the bottle and there's no more imprint. it's totally goodstuff.
the alternative to closing these seams and imperfections for those who don't have access to gale force 9's glue is to take some brownstuff (you may want it for touching up the lining of the cloak which you may have to do anyway - brownstuff is good because you can make hard corners with it and it'll blend into the edge of the cloak better where that hard edge from you cutting the cloak pattern out still exists). fill in the seams and imperfections in your cloak with brownstuff and use some of the more circular sculpting tools to smooth it all out so it blends nicely into the rest of the cloak. NOTE: do this ONLY after the sculpt has reallyreally set well or you may find yourself making work by having to re-pose the cloak!
good luck!


