|
|
Post by Gabriel Lupus on Dec 4, 2010 13:27:23 GMT -5
Right Folks,
So, in addition to the gaming board I made, I've decided I'm going to add another 2'x4' section which is going to be the edge of a city. This will enable me to add in another groovy little addition to the board, and also the city terrain can be removed so I can just have a 6'x4' table. Not planning on doing this anywhere near as fast as the board was done (that would be madness...) mainly because of the cash restraints (it's going to be quite densely populated with high rising buildings).
The unexpected boon of this was it finally gave me a decent enough reason to buy the "Honoured Imperium" set (the one with the smashed Aquila - which is huge! - and the Marine Statue). But this got me thinking about what colours/material the statue would be made of...
So, mine will be worked on shortly, but what about everyone/anyone else? Have you bought/painted the Honoured Imperium set? If you have, lets have some pictures for general inspiration!
|
|
|
|
Post by magg on Dec 4, 2010 13:39:47 GMT -5
I have not bought the Honoured Imperium, yet, but if you are looking for some inspiration, you should check out the GW-Homepage. There are three examples: Tarnished Metal, Basalt and Sandstone. Just take a look right >here<Hope this helps -Magg |
|
adastra84
Guardsman
 Time is an illusion, Lunchtime doubly so!
Posts: 65
|
Post by adastra84 on Dec 4, 2010 13:51:25 GMT -5
|
|
|
|
Post by Gabriel Lupus on Dec 4, 2010 14:29:19 GMT -5
Magg - yeah seen that in the WD I think it was. I've been having a look at those for ideas, but I'm pretty much settled on a plan... not to say that's definite... but getting there  Adastra - pure win indeed! But I don't think I've quite got the patience for all that detail... we'll see... |
|
|
|
Post by Trooper One-Nine-Seven-Four on Dec 4, 2010 15:07:06 GMT -5
I'm thinking about painting my "Space Marine gotta pee, gotta pee, gotta pee..." statue in a corroded metal scheme.
|
|
|
|
Post by Gabriel Lupus on Dec 4, 2010 18:21:38 GMT -5
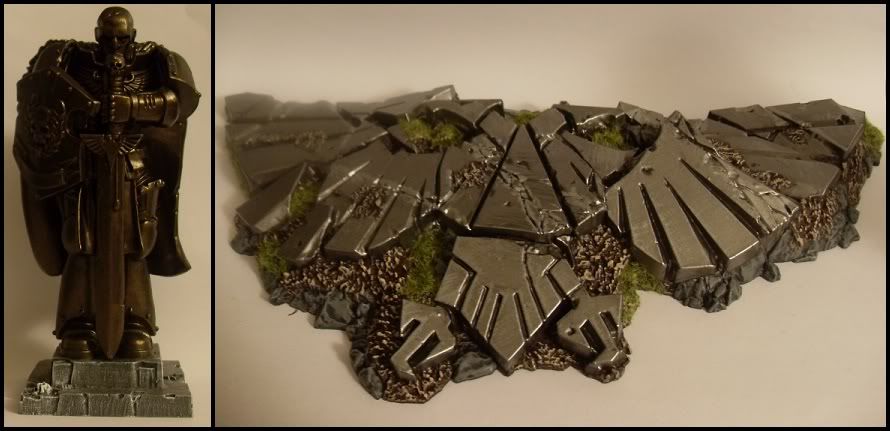
Well, finally deciding on the colour scheme, I couldn't resist painting it - so it's done now... Decided to go with a dark bronze look, and stone steps for the plinth. I'll get pictures up sometime tomorrow - and I encourage others who've painted the set to upload their pictures too  |
|
|
|
Post by jayadan on Dec 4, 2010 19:26:28 GMT -5
|
|
jeep
Lieutenant
 
Posts: 112
|
Post by jeep on Dec 4, 2010 23:04:13 GMT -5
The honored imperium set rubble matches the shrine of the aquila pretty close, I have been scheming on how to work the fortress of redemption or two into a table center piece for a future apoc game.
|
|
|
|
Post by jayadan on Dec 5, 2010 12:20:19 GMT -5
|
|
adastra84
Guardsman
 Time is an illusion, Lunchtime doubly so!
Posts: 65
|
Post by adastra84 on Dec 5, 2010 14:49:10 GMT -5
Reason i posted just the image link was cuz i forgot where i'd seen it. google image search FTW. |
|
|
|
Post by Gabriel Lupus on Dec 6, 2010 14:20:44 GMT -5
As mentioned, I decided on the colours I was going to use and, though I don't claim these to be innovative, or amazing example of what can be done with the set, I'm pretty happy with them.  The Statue of the Marine is supposed to look like it's a solid bronze statue - I may add some verdigris effects at a later date, but it's fine for now. The Eagle is supposed to be a huge metallic device that has been shattered and sheared during fighting. |
|
|
|
Post by Trooper One-Nine-Seven-Four on Dec 6, 2010 14:36:54 GMT -5
That's the look on the Space Marine statue that I'm aiming for as well, but with the verdigris effect. What paints did you use on it? I'm guessing Tin Bitz?
|
|
|
|
Post by Gabriel Lupus on Dec 6, 2010 15:16:03 GMT -5
Tin Bitz probably would have been a heck of a lot easier... but no...
Black undercoat, then an all over painting (not drybrushing) of 1:1 mix of Burnished Gold and Chaos Black. Once that's dry, 2:3 mix of Burnished Gold and Chaos Black as a highlight - not quite drybrushing, but that kind of technique (i.e. don't wipe all the paint off as you would for drybrushing - just some). And that's it. As for Verdigris, either use very watered down green painted into the appropriate areas and let it dry - or use the weathering powders.
|
|
|
|
Post by magg on Dec 6, 2010 17:41:29 GMT -5
Nice pieces mate! For the verdigris effect I recommend watered down Jade Green, because it looks more natural in my opinion. I am aiming for the effect I achieved on my great cannon. If I only could remember the exact combination …  I think that have written it down somewhere  Nice work! -Magg |
|
|
|
Post by 3ff3ct on Dec 9, 2010 11:52:29 GMT -5
I use 50/50 hawk turqouise and bleached bone, works a treat. Water it down and run it into the crevases.
|
|
|
|
Post by Gabriel Lupus on Dec 19, 2010 10:56:40 GMT -5
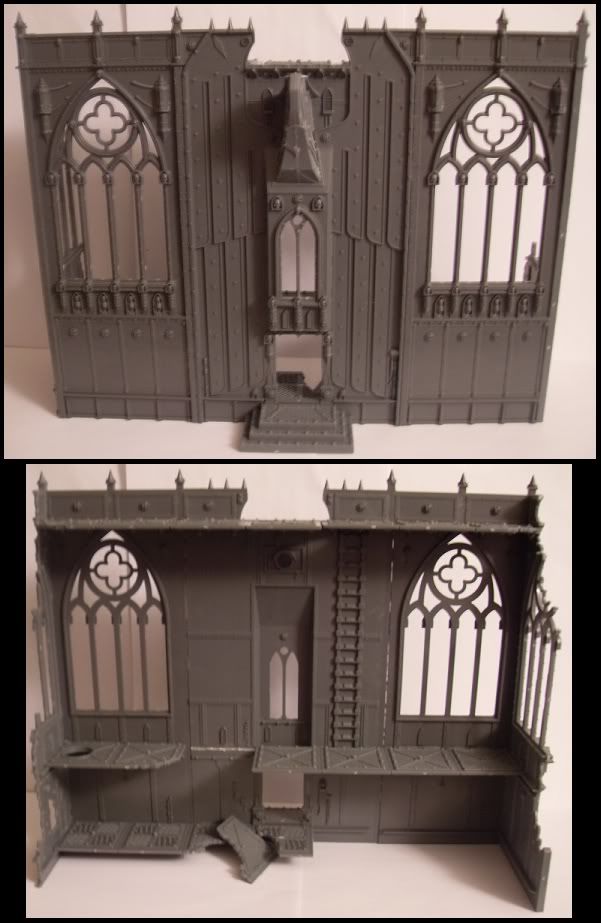
Granted not part of the Honoured Imperium set, but it seemed this was an appropriate place to post this little additional, I decided to treat myself to the "Shrine of the Aquila" building for my birthday.
It's a real bugger to put together!
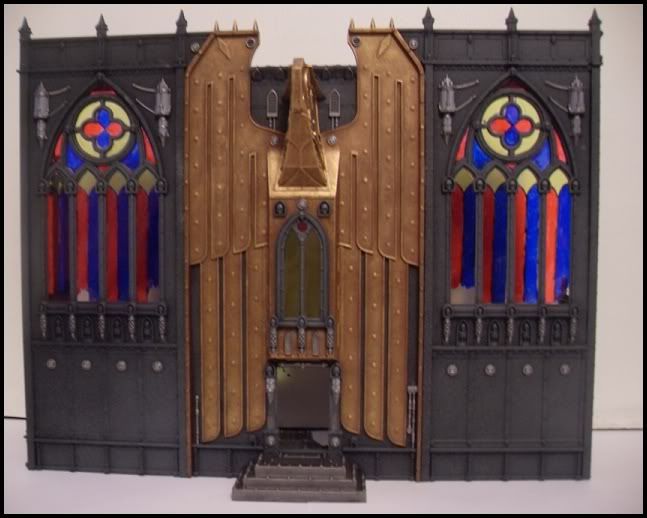
The end result though is really quite satisfying and a surprisingly large building. I have some basic ideas on how I'm going to be painting it (needs to be appropriate for a "Church" style building but also fit in with the theme of the rest of the buildings I'm getting soon), and my wife has shown me some really groovy bits from a local Dolls House shop - so I'll be going to the extra step of putting stained glass windows into the finished model! Pictures and details to come...
|
|
|
|
Post by magg on Dec 19, 2010 12:44:24 GMT -5
What is the problem by assembling this kit? When I look at the content of the kit on the GW-Homepage, it looks to be pretty straight forward.
I am very curious how you will built the glass windows and maybe some interior, too?
-Magg
|
|
|
|
Post by Gabriel Lupus on Dec 19, 2010 18:23:50 GMT -5
The main problem with the kit is that there are no "joining" or "clip-connections" between the seperate entities. It's basically like still one long flat peice of plastic to another equally long flat peice of plastic - no ridge bits to interlock, no "slot together joins", no way to balance the peices while they dry (even if you include a corner - the parts are too heavy to want to stay together). Basically you have to hold the bits carefully and still while the glue starts to go off (and when your hands shake as bad as mine, that's a real problem :/ Once you get the basic hang of it (and have the first couple of bits together) things get easier, but starting off was a little more difficult than I expected... As for the glass windows... well, I'll leave that for now so it can be even more impressive wbhen completed  (and then I'll explain how it's done... suffice to say for now that it's quite an ingeniusly simple method...) In the mean time, here's a quick look at the assembled Shrine of the Aquila:  |
|
|
|
Post by Dedrier on Dec 19, 2010 20:22:46 GMT -5
How are you going to fill the gaps? Sculpting putty?
Nice job on the set up. It will look really great when everything is painted up. The stained glass windows are going to look great!
|
|
|
|
Post by magg on Dec 20, 2010 18:00:10 GMT -5
Ah … that is really a little faux pas, but the model still looks nice and its size really makes it very impressive. As for the glass windows... well, I'll leave that for now so it can be even more impressive wbhen completed  (and then I'll explain how it's done... suffice to say for now that it's quite an ingeniusly simple method...) Oh no! Cliffhanger! Hurry up, we want pictures  -Magg |
|
|
|
Post by Gabriel Lupus on Dec 20, 2010 18:53:19 GMT -5
The gaps will hopefully be filled with a little random putty/smoothing technique I worked out... but that was all due to the awkwardness of the model... it actually became slightly out of line horizontally as well at the corner on that side. Luckily it's not that noticeable, and when it is noticeable, it looks "realistics" like the ruined building has subsided (phew  ) Oh no! Cliffhanger! Hurry up, we want pictures  -Magg[/quote] Ha, sorry about the cliffhanger... parts and supplies will (hopefully) be aquired in the next couple of days, then I'll have it painted a few days after that - so we're looking at after xmas I'm afraid... |
|
|
|
Post by magg on Dec 21, 2010 16:41:37 GMT -5
Do not worry  I have heard the sentence that good things need time … I only have to internalize it, though *drums impatiently with his fingers* ;D Take your time mate and enjoy Christmas with your family. Cheers! -Magg |
|
|
|
Post by vegna on Dec 21, 2010 19:40:22 GMT -5
I used to have simlar problems with airfix planes, wings too large and would pop up from each other if you left them to dry. Get some tweezers that lock. mine its just a biit of metal in the middle to slide up to keep closed. For buildings I'd use them on both sides, then lay them flat on 2 boxes with a small gap to stop any glue joining them to the boxes. Would keep them in line unless you used two different sized boxes :/ lol
|
|
|
|
Post by Gabriel Lupus on Jan 27, 2011 11:54:16 GMT -5
Apologies for the long delay in updating this, but I had problems laying my hands on some of the equipment... Never mind, here's the progress on the Shrine:  Stained glass goodness... Just needs basing now... |
|
|
|
Post by Dedrier on Jan 27, 2011 16:13:42 GMT -5
That is great! Basing and weathering, the only two things that it needs!
|
|