

Post by Pax Urbis Pax Imperi on Aug 13, 2011 0:58:49 GMT -5
Purity seals are pretty cool ways that an Imperial soldier, be it a Space Marine, Imperial Guard or Sister of Battle can show their faith and devotion to the Emperor, or bless one of their vehicles or weapons. But the only way to get Purity Seals is to order a bunch from a bitz store, right?
I've started to make mine out of real wax and thin plasticard sheets.
Not only is it cheap, but easy as well. Plus you have the added bonus of realistic wax seals, rather than painted and plastic ones. Here is a tutorial on how I go about making real wax purity seals.
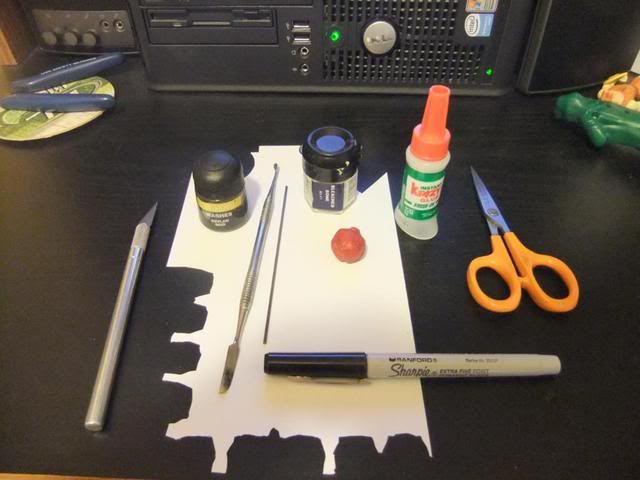
Here is what you will need:
Step One
Eat the cheese, and roll up the wax coating into a ball. If you have already done that, then pull a tiny ball off of the wax. Set it aside.

Step Two
Cut out the size of the parchment you wish for your seal or seals out of thin plasticard. Using the exacto or hobby knife, cut out thin notches on the sides.
Step Three
Paint the plasticard with the Bleached Bone paint on both sides. This is in case some of it is showing after you put it on your model. No need to go back and maybe make a mistake and paint your model by accident!
Step Four
Glue your parchment to where you want to put the purity seal. Try to place it in a dramatic place. For added effect, put two parchments at opposing angles to add visual levels for the model.
Step Five
Using the sharpie or black marker, draw squiggly lines on the parchment to represent words. Be creative as you wish here. It may be easier to do this step before you glue to the figure, but after you paint the parchment.
Step Six
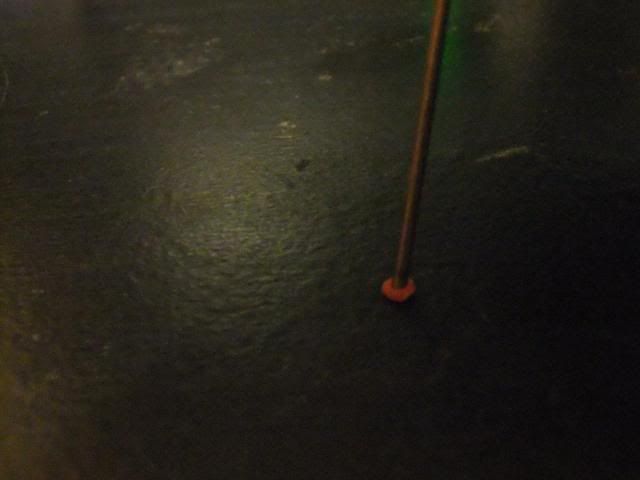
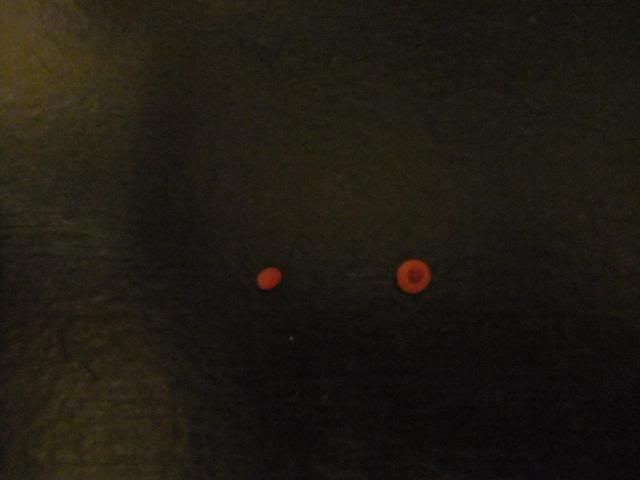
Place a tiny drop of superglue where you want the tiny ball of wax to go on the purity seal. Put the ball of wax on the glue, and flatten with your shaping tool. Press the brass rod into the flatten ball, and create the indentation of the seal.
Here are two pictures of what to do, and what it should look like. (For teaching purposes. these two pictures are not on the model.)
Step Seven Brush the superglue over the wax indentation. Allow to dry. This will protect the wax, and make it harder, allowing it to keep its shape.
Step Eight
Using the Devlan Mud wash, wash the entire purity seal, both wax and parchment. Allow to dry. This "ages" the parchment, and creates shadows both inside and outside the seal.
I personally add purity seals to models that have shown incredible courage and valor on the field of battle as a way of setting them apart from the rest of my army.
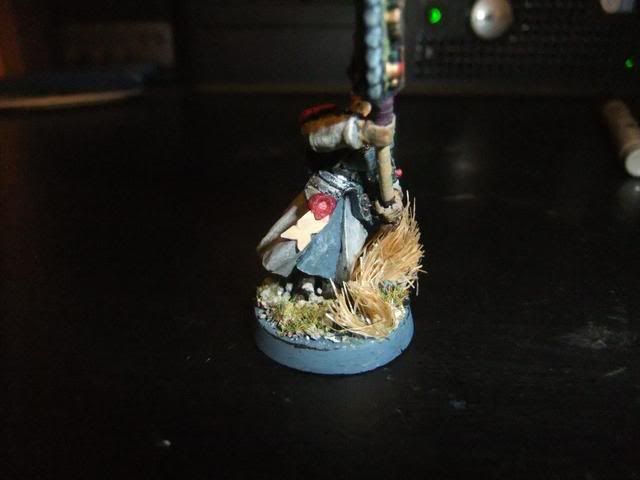
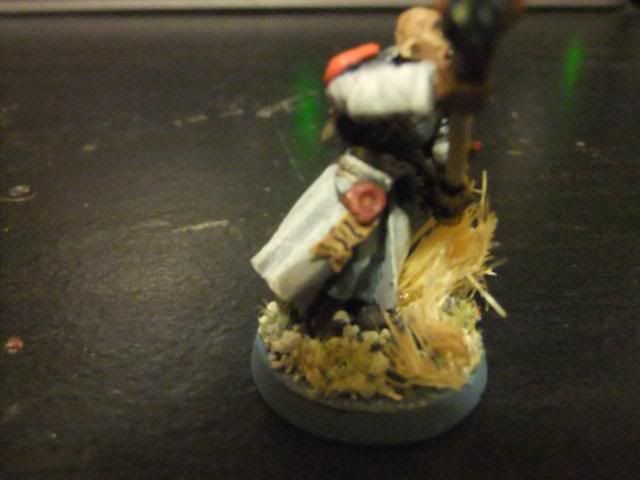 Final Result!
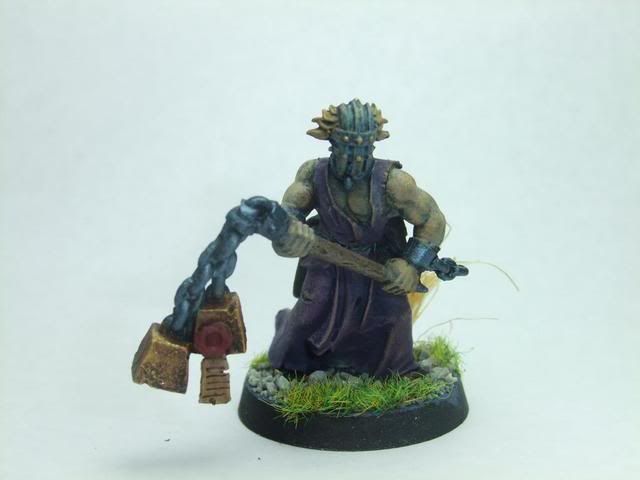 Another example
Note: As far as I know, the wax may melt if it gets hot enough. As I live in a temperate environment, this has not been an issue for me. By adding the superglue to the wax seal it seems to form a shell around it that protects it from minor effects.
I've started to make mine out of real wax and thin plasticard sheets.
Not only is it cheap, but easy as well. Plus you have the added bonus of realistic wax seals, rather than painted and plastic ones. Here is a tutorial on how I go about making real wax purity seals.
Here is what you will need:
- Thin plasticard sheets that can be cut and shaped easily
- Sharp scissors
- A hobby Knife
- Superglue, preferably one with an brush on applicator
- A shaping tool
- Wax. I used the wax coatings from a Mini Babybel piece of cheese that you can get from a grocery store. They don't melt at room temperature, and can be easily manipulated. Plus the cheese is delicious!
- A thin brass rod, available from a hardware store. But something thin, and round at the end will do.
- A sharpie black marker with a thin tip, or one with a 0.5" tip
- Paint, I used Citadel Bleached Bone, but similar parchment color will do.
- Devlan Mud wash, or something similar. This will "age" your parchment, and provide shadows inside the wax.
Step One
Eat the cheese, and roll up the wax coating into a ball. If you have already done that, then pull a tiny ball off of the wax. Set it aside.
Step Two
Cut out the size of the parchment you wish for your seal or seals out of thin plasticard. Using the exacto or hobby knife, cut out thin notches on the sides.
Step Three
Paint the plasticard with the Bleached Bone paint on both sides. This is in case some of it is showing after you put it on your model. No need to go back and maybe make a mistake and paint your model by accident!
Step Four
Glue your parchment to where you want to put the purity seal. Try to place it in a dramatic place. For added effect, put two parchments at opposing angles to add visual levels for the model.
Step Five
Using the sharpie or black marker, draw squiggly lines on the parchment to represent words. Be creative as you wish here. It may be easier to do this step before you glue to the figure, but after you paint the parchment.
Step Six
Place a tiny drop of superglue where you want the tiny ball of wax to go on the purity seal. Put the ball of wax on the glue, and flatten with your shaping tool. Press the brass rod into the flatten ball, and create the indentation of the seal.
Here are two pictures of what to do, and what it should look like. (For teaching purposes. these two pictures are not on the model.)
Step Seven Brush the superglue over the wax indentation. Allow to dry. This will protect the wax, and make it harder, allowing it to keep its shape.
Step Eight
Using the Devlan Mud wash, wash the entire purity seal, both wax and parchment. Allow to dry. This "ages" the parchment, and creates shadows both inside and outside the seal.
I personally add purity seals to models that have shown incredible courage and valor on the field of battle as a way of setting them apart from the rest of my army.
Final Result!Another exampleNote: As far as I know, the wax may melt if it gets hot enough. As I live in a temperate environment, this has not been an issue for me. By adding the superglue to the wax seal it seems to form a shell around it that protects it from minor effects.
 Be my mirror, my sword and shield, My missionaries in a foreign field


