|
|
Post by Pax Urbis Pax Imperi on Dec 28, 2011 2:35:05 GMT -5
I am in the process of making two Hydras for my army to use in a local GT in Feb. I just wish there was an actual Hydra available through GW .... Anyway, I used a chimera chassis, the wheeled conversion kit from Chapter House Studios, and the Flak Cannon Platform from Bitspudlo.com. Personally, I am not happy with the quality of the castings from either company. Lots of bubbles with Bitspudlo, and some casting issues. And the Chapter House Studios kit doesn't quite line up with the chimera; close, but not quite, and it left gaps. Also, it had bubbles as well, just not as many. Anyway, I used the thickest piece of plasticard for the 'base", and cut a hole for the Flak Cannon to drop down into. Then I made sure to magnetize the gun, in case its destroyed and for ease in storage. 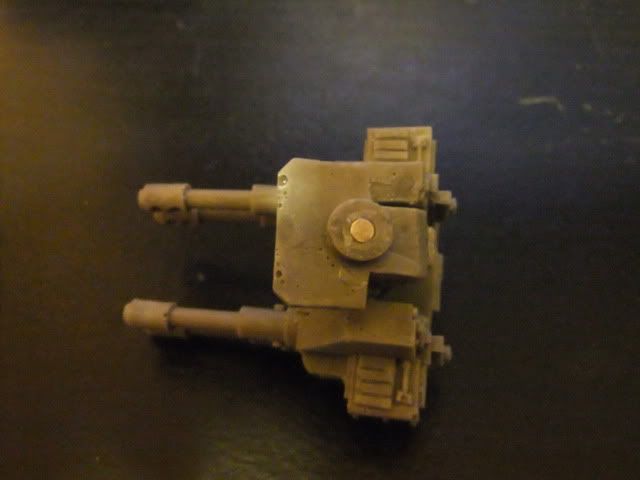 Here are two shots of what it may look like built. 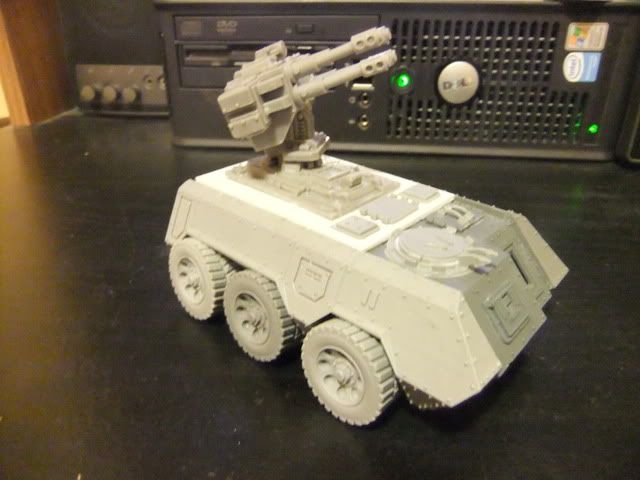 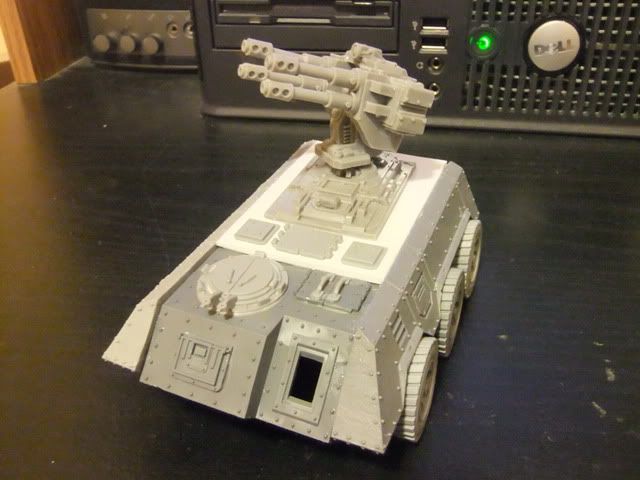 I have some work yet: making a back (or back door, not sure which), adding heavy bolters to the front, adding more details, and clearing the tires of flash and miscasting. This is going to be temporary for me anyway... after I use it in my tournaments, I am giving them to a friend and starting anew with Secret Weapon Miniature's 6X6 chassis and the Sturm-Koeing turret from Dust Tactics. I just wish those models had been released months ago! |
|
|
|
Post by Paradill on Dec 28, 2011 3:32:01 GMT -5
One of the better hydra conversions that I've seen, shame about the casts mate.
Paradill
|
|
|
|
Post by 3ff3ct on Dec 28, 2011 10:01:37 GMT -5
Seconded, its very nice. My only problem is with the length of the barrels, although that is just nit picking  You have a lucky friend anyway to get such great cast-offs! ;D |
|
|
|
Post by Pax Urbis Pax Imperi on Dec 28, 2011 13:23:04 GMT -5
Thanks for the comments, gents! Actually, when the top of the chimera is put on, it would cover that gap you see on the top. But the issue is that were the apex is on the front are some gaps that will need to be covered. @ 3ff3ct Yeah, he got me a Green Bay Packers Aaron Rodgers Packer jersey, from the last Superbowl, with the Captain's "C". I thought I should pay him back with something he could use, since he plays Guard too. Some work was done last night after I posted pictures... Detail work done: - Added hooks so that the gun can be swapped out if damaged, similar to the one on a Leman Russ turret. - Added a smoke launcher - Added a back for detail work to be added. - Added details to the back, like vents, a window, and some other do-dads. Detail work TO BE done: - Add a spotlight - Add headlights? - Add a back door? Remove window and add to Door then. - Add hinges to back door if made. - Add the Heavy Bolter when it arrives - Cover gaps with brownstuff. - Add more rivits (great.  ) - Paint, Decal. |
|
martin74
Conscript
where ever you go, there you are
Posts: 43
|
Post by martin74 on Dec 28, 2011 13:29:09 GMT -5
I have done the same thing, just, a little bit different. I seem to have issues posting pics to this sight, however, I have a short blog on the progress and changes I have made to my Hydra. Here is the link: www.dakkadakka.com/dakkaforum/posts/list/417550.pageAnyway, the chapter house kit was a pain to work with, alot of sanding and using a file to just get it to fit. |
|
|
|
Post by Pax Urbis Pax Imperi on Dec 29, 2011 2:09:58 GMT -5
Yeah, I thought about using the Aegis turret for my Hydra as well, but I didn't like how it jutted out on top. Your solution minimizes the profile, and makes it look a ton better. Thanks, I appreciate the comment. Did some more work on the model tonight. I did not get as far as I wanted too on the twin, but this Hydra is all but complete. Just need to install the heavy bolter on the front, and we are ready to go. 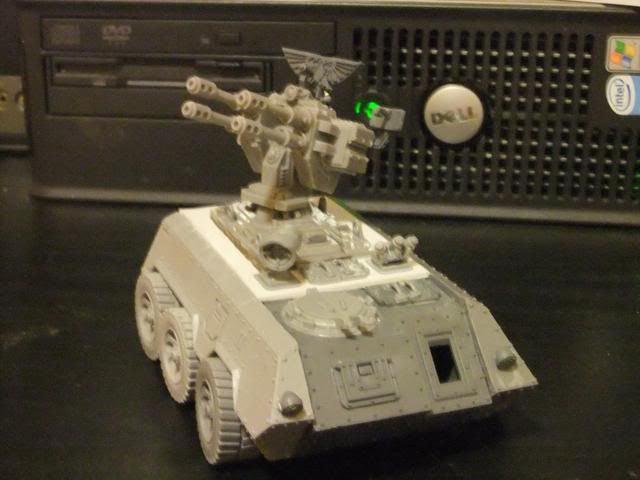 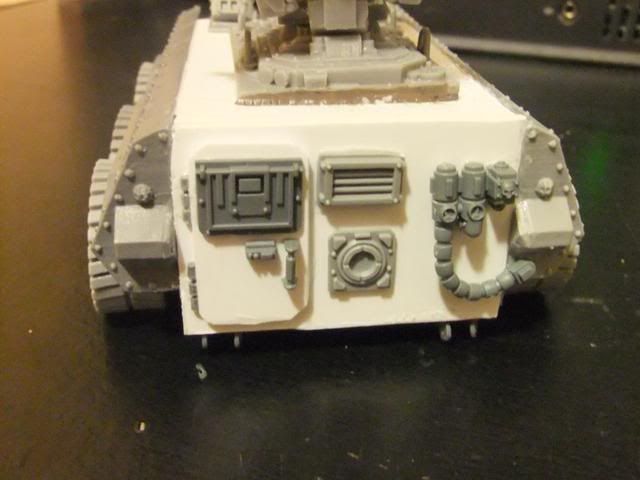 Did some detail work: - Added headlights, from Vox Caster speakers - Added a Smoke Launcher - Added handles to the doors next to the smoke launcher - Made a search light. This was crafted from the really old elongated search lights with the fancy spikes on the tops. (They would make great spotlights for a chaos army at some point) - Added turret hooks to the Flak Cannon base - Added two Radar dishes to the Flak cannon  - Added a back half - Added a door to the back half. The window is from the front of the Chimera where a driver would look out. The door handle is from an auto cannon ammo case, and the "door lock" is part of the rebreather. - Added an air filter to the back - Added a .... er... fancy... engine .... regulator.... part to the back. So far so good. I want to get the other done to this level before I start to throw paint on it. |
|
martin74
Conscript
where ever you go, there you are
Posts: 43
|
Post by martin74 on Dec 30, 2011 12:22:36 GMT -5
Nice attachments to the back panel. Looks good. Keep it up. Cant wait to see it painted.
|
|
|
|
Post by Pax Urbis Pax Imperi on Dec 31, 2011 2:55:27 GMT -5
Thanks, mate! Both should be painted in a week or two. Here are pics of the two Hydras, with wheels removed (they were held on with bluetac anyway...). Just waiting on the parts before painting. 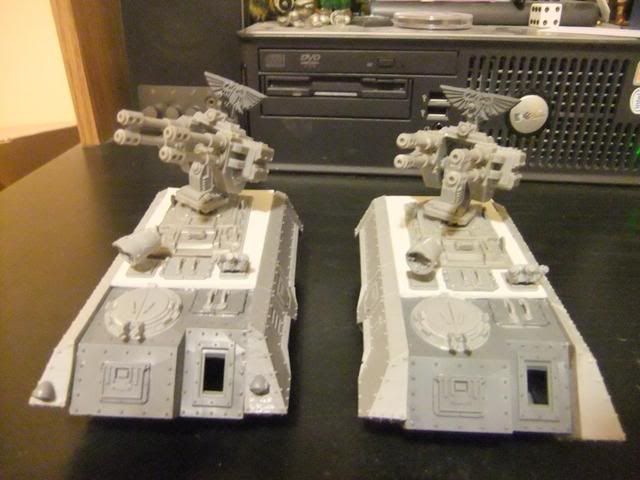 Sharp eyes will note that only one has headlights. I noticed it too, AFTER the picture was taken. So, that has been corrected. I also had to remove the smaller radar, as it fell off when the turret was dropped. As I only had the one, I just didn't reattach it. Overall, I am quite pleased with the build. It went easier than I imagined it would. I am looking forward to painting these bad boys. |
|
|
|
Post by Jackal-0311 on Jan 2, 2012 23:44:25 GMT -5
Kickass!
|
|
danesk
Captain
   Tread softly, and keep the finger on the trigger
Posts: 207
|
Post by danesk on Jan 3, 2012 12:51:40 GMT -5
That work is truly inspiring! Well done!
|
|
|
|
Post by Pax Urbis Pax Imperi on Jan 5, 2012 18:52:41 GMT -5
Thanks for the compliments!
Well, here is a new wrinkle.... the wheels of the Hydras don't want to superglue in place. I don't know if its because the area is primed and painted, or what. I'm giving serious thought to pinning the damn things in place.
|
|
martin74
Conscript
where ever you go, there you are
Posts: 43
|
Post by martin74 on Jan 5, 2012 23:00:38 GMT -5
I had to glue and then use a clamp to get them to stay, and, so far, they have. I did one wheel on each side, same axle, and then used a clamp to put pressure and hold.
|
|
|
|
Post by Pax Urbis Pax Imperi on Jan 6, 2012 13:19:25 GMT -5
I think I will try some Loctite epoxy and see how that works.
|
|
|
|
Post by 3ff3ct on Jan 7, 2012 15:24:24 GMT -5
^ that stuff sticks everything ;D My car mirror is held on with that at the moment (damn scouse chavs down the kicked it off before I moved house....) Make sure you leave it 24hrs though, as otherwise if it comes apart it'll be very hard to put back together  |
|
|
|
Post by Pax Urbis Pax Imperi on Jan 9, 2012 1:44:29 GMT -5
Yeah, you are right 3ff3ct! I had some issues with using superglue to get the wheels to stay on. As in, the issue was they refused to stay on. I was annoyed beyond belief, until a friend of mine suggested using epoxy glue. I used Devon 5 Min Epoxy Gel, worked like a charm. Except.... I was in a hurry, and some of the wheels did not stay exactly... straight. Oh well, good enough for government work! Here are some pics with the wheels now glued on, and some paint thrown its way as well. Wheels painted black and dry brushed with Shadow Grey before gluing, of course. The tank itself was dry brushed with Reaper's Stonewall Grey, and the tips of the barrels painted the Vallejo Olive Green to tie in with the rest of my army. This is my no means the final project, just pictures to show progress. They did, however, do fabulous in a recent tournament. Side shot showing with the wheels on.... 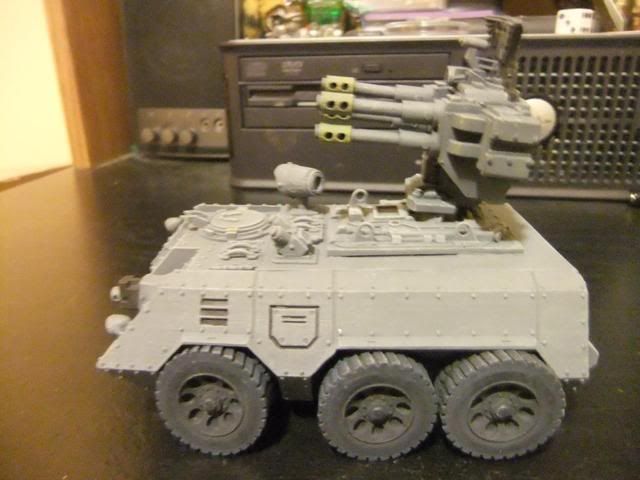 Another shot from straight on front... 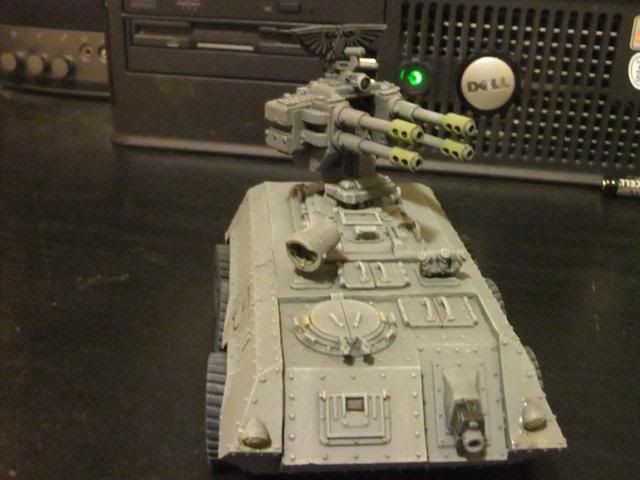 And finally, the pair together... 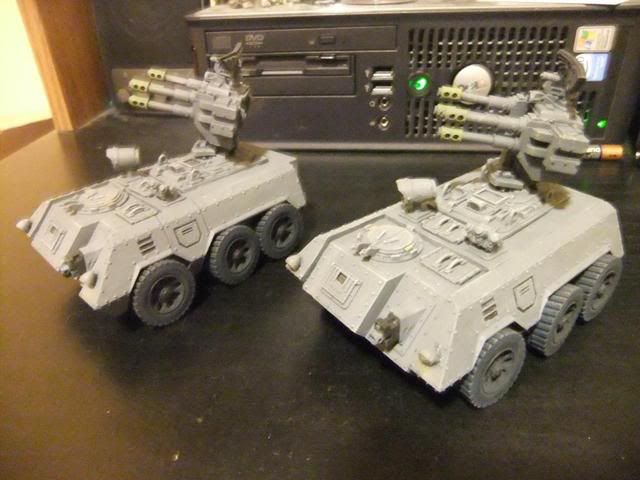 |
|
|
|
Post by Pax Urbis Pax Imperi on Jan 10, 2012 3:21:54 GMT -5
The Hydra project is now finished, and I am happy with the end result. There wasn't really a spot to paint identifier stripes on the front corner like on other Chimera chassis', so I moved it over to where the door/window was. I painted it white and red to go with my army's background (see the first page of my blog for that), and since the window was shield like, I gave it a "hydra head" from a Space marine decal sheet. The squad marking is on the right side, a blue wing on a yellow background. Right side... 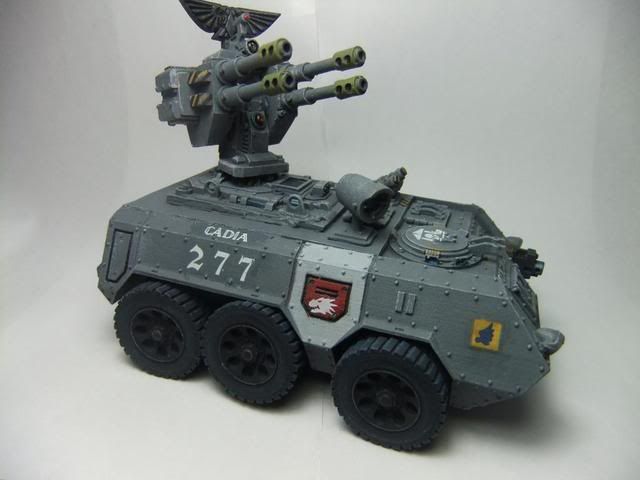 Front... I added warning lables to the front of the smoke launcher, and on the smoke grenades. I like that look, so I will go back and add that to my other tanks that have smoke launchers. 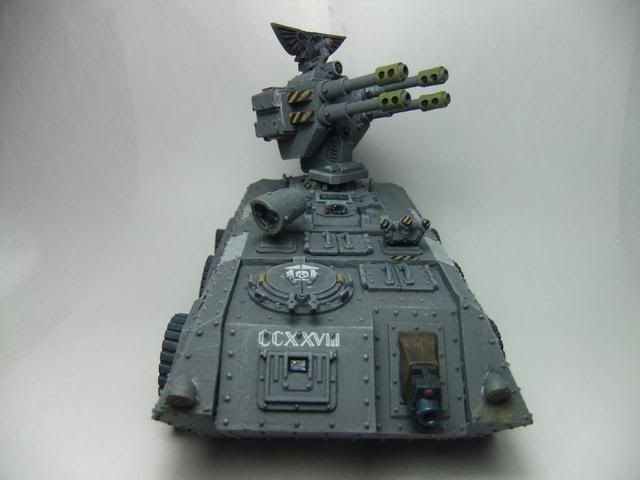 Left side... 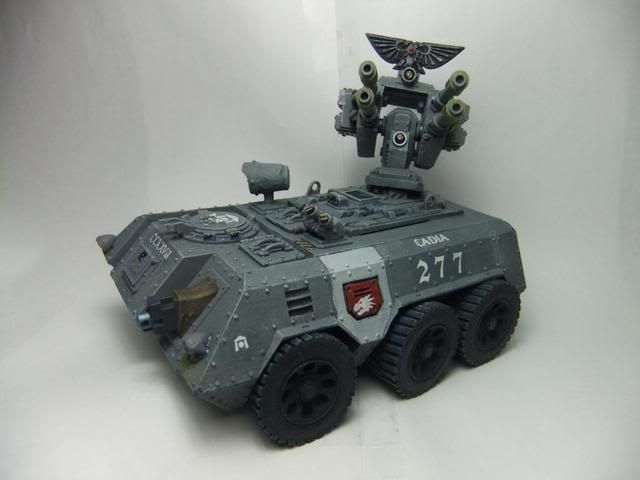 The back... 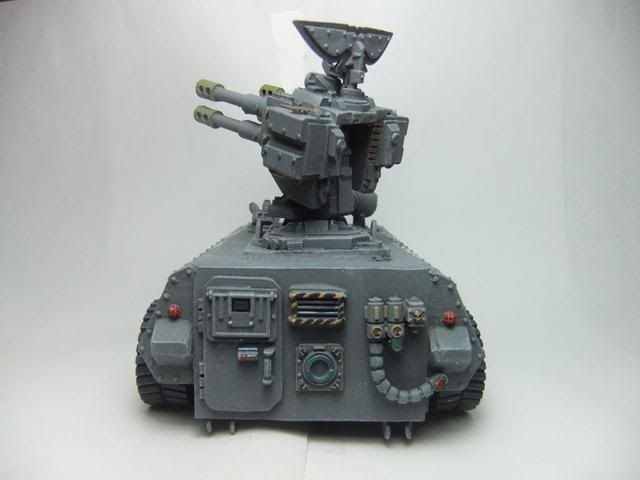 Close up to the turret. Note the warning markings under the turret and on the guns. 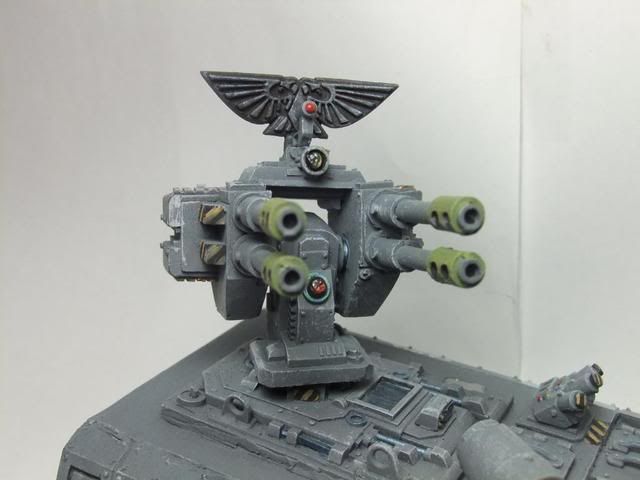 And finally, the two Hydras together. 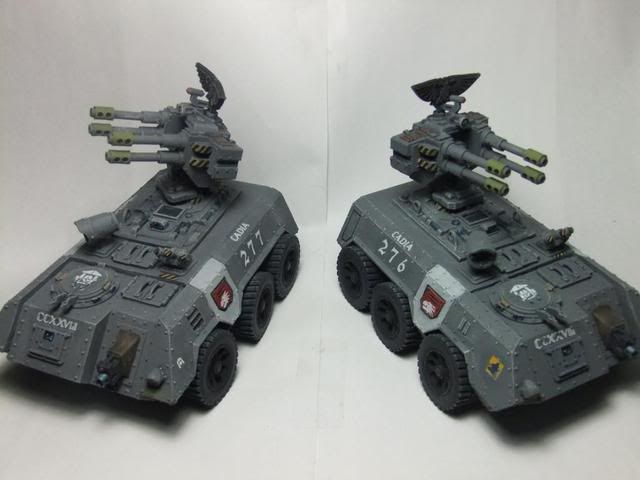 Pros on the build: I feel more confident in building models without all of the parts. I worked out the problems in the build, and did my best to adapt to them. I used epoxy glue for the first time. They look damn cool. Cons on the build: My first real taste of resin tanks. I don't like how superglue doesn't stick to the resin, even after washing it. Parts keep popping off. I don't like the bubbles and mistcasts I got, there seems to be no quality control. Anyway, thanks for reading, and looking. PLEASE feel free to comment, critique, and add suggestions. I may end up keeping these after all. ~ Pax |
|
|
|
Post by Shostak(AWOL) on Jan 10, 2012 3:28:25 GMT -5
Look pretty darn awesome sir!
Excellent work, I'm just disappointed that I didn't pay this thread more attention before.
|
|