|
|
Post by treadiculous on May 14, 2012 13:20:51 GMT -5
I have been looking through Google Images and have noticed that not many real tanks have visable tank markings, un-like the Imperial Guard tank which have numerous insignia, numbers, lettering and bright bands to indicate which unit they belong to.
I assume that one of the reasons for this is that pictures of real tanks are taken from the front - where a good un-broken camo scheme is most important.
I note that on some there are small marking which follow the trends of Imperial Guard tanks (lettering, numbering, symbols etc) but they are few and far between.
My reasoning for this thread is:
1) to discuss the merits of marking tanks.
2) to find out what other painters have done regarding the balance between camoflague and identification.
3) to inquire as to whether the etched brass numbers from forge world are any good (I don't like transfers much as they tend to get worn off by fingers over the years).
I have recently painted numbers onto the rear-most section of the turrets on all my Russ and Chimera so that in an up-coming apocalypse game I can quickly identify which tank is which... but they look quite rubbish because they are hand painted by me... and this takes away from the illusion of scale as the brush strokes are far to big to have been painted by a guardsman.
Comments welcomed!
-- Edit --
I guess this also links to Tank Names.. what system do people use to write long words neatly.. I recall someone mentioning a tool or process that wasn't transfers.. maybe a sort of pencil / pen / template?
|
|
|
|
Post by optimat on May 14, 2012 13:40:17 GMT -5
Haven't got much time right now but will edit this post later with a few more ideas, but just for looking I did manage to catch this 'map' of insignia. It seems to match as I also googled for some real military tank marking transfers and similar patterns and shapes were common. I suppose this image matches what is considered Cadian. Check this out to as a guide to Abrams designation. This PDF really clearly lays out WWII American tank designation but is more focused on a number/letter designation as part of a... serial number type thing. |
|
|
|
Post by RedCuffs on May 14, 2012 19:36:02 GMT -5
I use a Colour/Letter and two numbers to designate all my units.
The colour is known as the "Unit Marker".
For Fast Attack there would be a blue Unit Marker somewhere.
On valks it's a chevron on the rear cabin and another tail plane.
On my Venators I've made what is meant to be a fabric, tie down panel. Blue again.
The letter is known as the "Callsign indicator" and for fast attack it is "B".
The First number is 1, 2 or 3. depending on which FOC the vehicle has taken up.
the second number Is also 1, 2 or 3 depending on how many vehicles are in the squadron for that FOC.
Heavy FOC units have a red colour "Unit Marker" panel and a callsign indicator of "R".
So imagine I had three squadrons of Leman Russ', with three Leman Russ tanks in each squadron. Their callsigns will be :
1st squadron - R11, R12, R13.
2nd squadron - R21, R22, R23.
3rd squadron - R31, R32, R33.
My callsigns are usually on sides, top, rear, or any combo of those.
The colour panel isn't necessarilly with the callsign but it is usually (depending on vehicle type) toward the rear and top of the vehicle for Friendly Forces to IFF (Identification Friend or Foe).
I have adapted the British military system so that any guard unit, Vehicle or infantry, can have its own Callsign and coloured Unit Marker.
If you or anyone is interested I'll post the system up on a thread.
|
|
|
|
Post by macknight on May 14, 2012 20:01:12 GMT -5
transfers are best if used right:
1)brush on GW gloss varnish after shaking the bottle a little where you want the decals,
2)wait for the varnish to dry, then apply the decals following the instructions behind each sheet, remember to use brush to get all the bubble possibly underneath the decals
3)brush on another coat of GW gloss varnish to seal it, wait for it to dry
4)brush on a matte clear acrylic(found at local hobby lobby) over thye sealed decal areas to negate the gloss
5)spray matte varnish over the whole model
the result is as if the decal is part of the vehicle, you won't see the sheen from decals being applied inappropriately; I use to apply decals on my bret knights and it would break off during play, finally I did some research and found a good way to do it proper.
|
|
|
|
Post by Trooper One-Nine-Seven-Four on May 14, 2012 20:08:58 GMT -5
transfers are best if used right: 1)brush on GW gloss varnish after shaking the bottle a little where you want the decals, 2)wait for the varnish to dry, then apply the decals following the instructions behind each sheet, remember to use brush to get all the bubble possibly underneath the decals 3)brush on another coat of GW gloss varnish to seal it, wait for it to dry 4)brush on a matte clear acrylic(found at local hobby lobby) over thye sealed decal areas to negate the gloss 5)spray matte varnish over the whole model the result is as if the decal is part of the vehicle, you won't see the sheen from decals being applied inappropriately; I use to apply decals on my bret knights and it would break off during play, finally I did some research and found a good way to do it proper. Actually, it's even better if you get a decal setting solution set to get the decal substrate to melt onto the model, which results in the decal looking like it's been painted on.  |
|
|
|
Post by RedCuffs on May 14, 2012 20:34:35 GMT -5
I once, many years ago, set about a bottle of vodka with a Hussar. Can't remember which regiment but they were nicknamed "The Cherry Pickers".
Anyway, the reason, he told me, that WW1 and ealrly WW2 tanks had their meticulous camouflage destroyed by part of the side of the tank painted in two or more vibrant, contrasting colours was this.
During armoured assaults (especially over no-mans-land in WW1) the formation of the tanks was imperative to their being able to provide and receive mutual support from their neighbouring tank.
Imagine many tanks advancing line abreast or "Extended Line".
The easy-to-see markings would help each tank remain in as straight a line as possible in relation to the other tanks in the line.
If one tank were to break formation and advance more rapidly than it's neighbour it would become vulnerable as it would not benefit from the mutual support that same neighbour was meant to provide.
Also bear in mind that visability is exceptionally poor in battle.
I assume the early British WW2 tanks of the Desert Campaign adopted the same system for the same reason. large open space, few landmarks if any, etc.
I imagine IG tank regiments have been painted with these Hi-Vis stripes for the same reason.
|
|
|
|
Post by treadiculous on May 15, 2012 4:17:20 GMT -5
I noticed that in the PDF supplied by Optimat (much thankings!), tank crews working in combat areas often covered the insignia with grease / mud to add to the camoflague. It also describes how veteran tank crews painted out the insignia.
So far I have labelled the back of the turret with a 2 didgit code, the first number is the company that the tank is part of, the second number is the tanks postition within the company... as my companies have been taking casualties for years, and are operatin over a large front with little time to pause for repair and re-painting the numbers often do not include a comand tank designation, nor do they flow in consecutive order: ie, 25,26,28.
- Redcuffs: thanks for the info on the hi-vis striping, I guess in some situations it is better to see clearly than be hidden!
- Trooper: Where does the substrate solution fit into the process listed by Mackknight? (alo much liking you tank names!).
- Macknight: I do really like the look of the transfers on your machines, numbers and letters add an extra something to the look. I think its the suggestion of a greater environment in which the tank exists.
|
|
|
|
Post by RedCuffs on May 15, 2012 11:53:13 GMT -5
Just in case you're in the mood for another little "Tank Markings Gem". During the Cold War there was a NATO garrison in W. Berlin who I'm sure you know were completely surrounded by The Soviet led Warsaw Pact . The British Army (and I'm sure the French and Americans too) had a contingent of Main Battle Tanks located there. Apart from having the "Block" urban camouflage scheme the British vehicles had no markings at all because this would have let the Russians and their mates know exactly how many MBT's the Brits had. One guy I knew who was once in the "Berlin Brigade" told me that they didn't even display their number plates if there was a chance of them being seen by the enemy. So sometimes no markings/insignia at all is best and not just for reasons of camouflage? www.emlra.org/articles/berlin_brigade.htm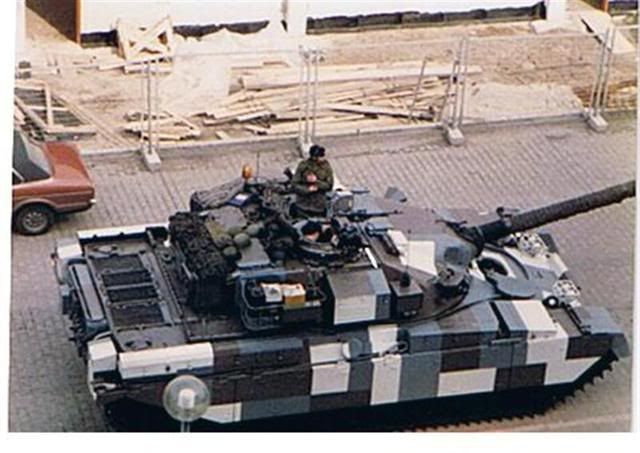 |
|
|
|
Post by optimat on May 15, 2012 16:56:09 GMT -5
With Extra to Redcuff, I always thought (but have no evidence, so may be wrong) that the bright striping was designed to break up the tank from a distance so that, when in formation as you describe, the enemy would see a wall of brown/light blue/background (which on the horizon line would also be blue from the sky) and not really be able to make out the tank hull and those few seconds of confusion would be all a tank formation would need to take the initiative and get some shots down range.
Re-reading your post that might be what you were getting at but I've just misunderstood...
|
|
|
|
Post by Trooper One-Nine-Seven-Four on May 15, 2012 21:11:16 GMT -5
- Trooper: Where does the substrate solution fit into the process listed by Mackknight? (alo much liking you tank names!). Thanks! The decal setting solutions work as follows: 1. Apply gloss varnish to the area to receive the decal and let it cure--this provides a smooth surface that will enhance the binding of the decal to the model. 2. Brush the varnished area with the decal setting solution (Micro Set). 3. Apply the decal to the prepared area while the setting solution is still wet, and position the decal until you're happy with how it looks. 4. Carefully brush the decal with the decal softening solution (Micro Sol)--it make take several applications to get the substrate completely dissolved, and you must be careful with the brush as it could cause the marking to tear, as the marking will be soft. 5. Once the decal looks "painted on" allow it to dry, and then apply another coat of gloss varnish, followed up by matte varnish. |
|
|
|
Post by RedCuffs on May 16, 2012 6:43:05 GMT -5
optimat, this is the type of thing I was refering to. 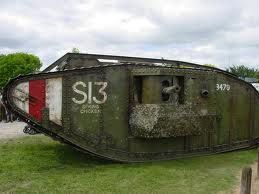 WW2 Soviet tanks had Huge white stripes like this painted on the sides and top purely for IFF purposes for friendly tanks and aircraft. 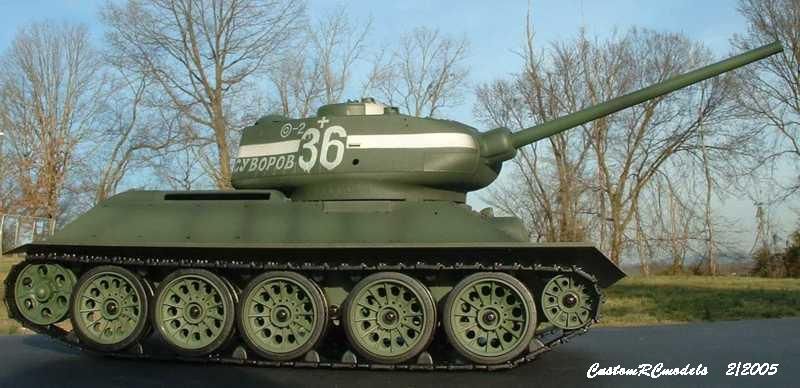
|
|
|
|
Post by optimat on May 16, 2012 11:30:31 GMT -5
Oh I see. I was referring to the bright blue shaped camo on some desert camo schemes, the bright blue from the front I would imagine being there for the reasons I posted. I decided to use the transfers in my own way (although probably not original) and mix and match a few things. As I only have 2 leman russ in my army there are designations for both. Each tank goes along horizontally, with each row being the other tank:  First off, I will be using the fist holding the red lightning bolt as my armoured company badge. The large white number (the desert yellow there just representing the tank colour scheme) is the tank number in the squadron of the same type of tank (As I have 2 differing type of Leman Russ). The geometric shapes represent these squadrons - hence them being different. The C represents command tank. The barcode is supposed to be the unit number and year of manufacture. The blue/white number is the weight class as per the PDF I referenced. Chimeras and Sentinels are 1, Leman Russ and Artillery is 2, super heavies would be 3. |
|
|
|
Post by jenburdoo on May 16, 2012 12:56:28 GMT -5
During World War II, a lot of the more obvious markings were for visibility from the air. During the last year of the war, the Allies held air superiority, and highly visible stars were painted on the hulls and turrets to avoid friendly-fire incidents (for the same reason that aircraft after D-Day wore invasion stripes). Those on the side of the tank were typically painted out, since they provided an aiming point for enemy antitank crews. But the ones on the top were typically left on.
US Marine tanks in the Pacific even painted the tops of their turrets in bright colors for better visibility. So under certain circumstances, bright markings can be useful.
|
|
|
|
Post by Adam Selene on May 17, 2012 2:14:30 GMT -5
This is the Imperium, were tanks have perfectly horizontal front armour and men walk into firefights wearing cardboard, we don't need any of your logic here!
That being said I paint my tanks in the following way:
Front armour: Bold names to scare the enemy or just camo (never unit markings)
Side armour: names, numbers and camo.
Rear armour: numbers (never names)
Also my "camo" is just two similar shades of grey, and kinda nuts.
|
|