|
|
Post by Major Downer on Apr 4, 2011 11:46:16 GMT -5
Hello Yeti's Yell, How long has it taken you to collect and paint all of you Guard? I keep looking at your work every day, I adore your work  Have you thought about doing some super heavy tanks because i think they would look so sexy in your army? I have PM you something you may or may not be interested in sir  Major Downer |
|
|
|
Post by Yeti's Yell on Apr 4, 2011 19:03:45 GMT -5
Hello Yeti's Yell, How long has it taken you to collect and paint all of you Guard? I keep looking at your work every day, I adore your work  Have you thought about doing some super heavy tanks because i think they would look so sexy in your army? I have PM you something you may or may not be interested in sir  Major Downer Major, It has been a steady 10 years buying up Valhallans here and there and a lot of stripping paintjobs along the way. I had some painted and done in another scheme a long time ago but I guess I never really felt the thrill of infantry blobs until recently, hence this project. Super heavies? Oh man, I've had my heart set on a baneblade for a loooong time. Maybe when I hit 100 guardsmen I'll get one to do up. I agree it'd be sweet to have (and paint and model.) And I am interested! I PM'd you back. Thanks for the compliments and thank you for your offer, Major. We have some pretty damn generous and amazing people on these boards, folks! Best, Yeti |
|
|
|
Post by Yeti's Yell on Apr 4, 2011 22:10:00 GMT -5
My Peeps, Here is a tutorial for how I mag mount Leman Russ sponsons, ripped fresh from my blog, It is long but rather than point to the full version on my blog I figured I'd repost it here in its entirity too, so people can leave comments here (most people don't seem to like commenting on my blog for some reason.) ;D 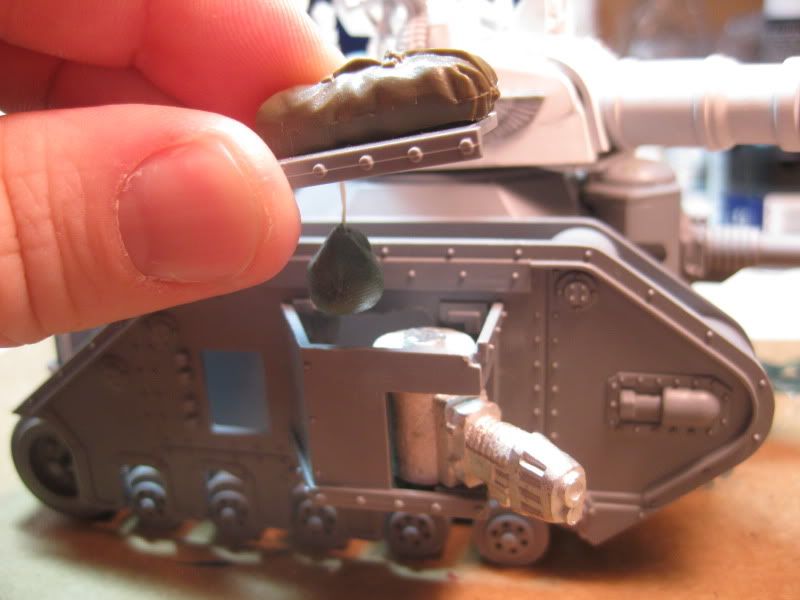 Oh yeah, check out the floating-bogey style! Ok, a buddy asked me recently to describe how I started mag-mounting my weapons on my new Leman Russ’ sponsons. I haven’t seen anyone else do this, so if they have done it this way, my apologies, didn’t mean to rip you off and not give credit. I basically wanted a fast, forgiving way to mag mount sponson weapons so this is what I improvised quickly one night. it worked well enough that I wished I had thought of it earlier for my previous Lemans. Note: I'm using the previous Leman Russ kit. to my knowledge, the following still applies to the new kit. Materials needed: 1. Leman Russ kit 2. Pin vice with small drill bit 3. Xacto 4. Unwaxed dental floss 5. Small hobby magnets 6. Krazy Glue 7. Vehicle stowage (i.e. GW stowage or Tamiya) 8. Greenstuff and basic greenstuff experience (tools, handling skills) 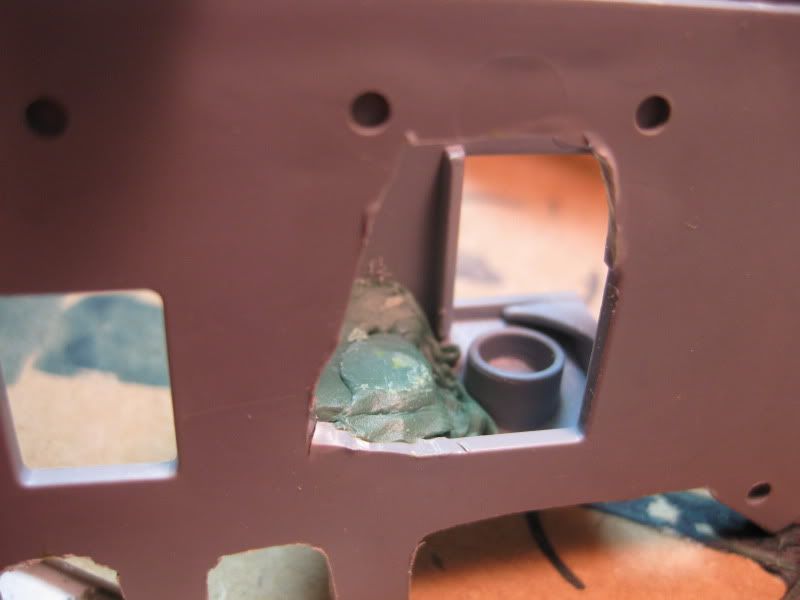 View from inside the Leman Russ side panel, looking through the hole I cut, into the bottom of the sponson. Note the hole for the weapon post and mag sunk in greenstuff behind it. 1. I cut a large hole through the Leman hull, smaller than the footprint of the sponson tabs on the hull (see pic below.) This hole is necessary so when you change weapons, the thick weapon post has a way to rock in and then sit level in the bottom hole. You’ll see what I mean as you start assembly. I took the lid of the sponson and scored some cris-crosses along the top with the xacto, from about the middle going forward. This is a texture anchor for some greenstuff later. This will need to be covered by stowage or whatever you want so don’t over do it. A small strip the width of a pencil and the length of a sharpened tip about center should do it. Assemble the sides of the sponson and glue to hull as normal, DO NOT ATTACH OR GLUE THE SPONSON LID. 2. I filled and leveled the bottom inside of a sponson with green stuff. Then I counter sunk a magnet into that greenstuff “bed” and skim coated over it so the mag is embedded and still level (see pic below.) The mag will need to be essentially directly to the rear of the hole for the bottom post of the weapon that goes in the sponson. You’ll want the magnet very close to the surface of the greenstuff, even visible through it. If it dries too thin, just give it a coat of crazy glue afterwards and let dry. Remember to orient your magnets properly before glue and greenstuff! 3. In the meantime I took a long length of unwaxed dental floss and glued an end of the floss to either the top or bottom of the other magnet. When that has dried, I wrapped the magnet a few times in floss and then glued it again, orienting the floss so that it is glued in the center of the magnet and leading straight up and away from the center. This is tricky and will result in glued fingers if you rush the steps and forget to let everything dry. Treat what you created with care until you can get to the next step. 4. After that glue is dry, I made a small, “tear-drop” shaped cone of greenstuff around the magnet on the floss, including its sides and up the floss a few mm. Remember to keep your fingers wet for that part. The idea here is to embed the knot of wrapped floss and protect the floss that hangs the magnet. I put that to the side and let harden. As that hardened I tapped a small hole into the sponson lid, roughly over where the magnet is in the bottom of the sponson. Just eyeball it, it doesn’t have to be laser-precise.  5. After all green stuff had dried, I dangled that tear drop magnet hanging from the floss through the sponson lid, and let it grab the mag in the bottom of the sponson. I trim the tear drop as necessary, making sure the weapon in its sponson mount can traverse without being impeded by the tear drop. Shave very little here, the magnet can move laterally if it really needs to, you want that magnet staying in the greenstuff. 6. Once that was good I put the sponson top onto the sponson and fit it together, making sure the weapon (in this case, heavy plasma cannon) is fully seated in both bearing holes and traverses normally. It does. The floss was still poking out of the sponson lid at his point. 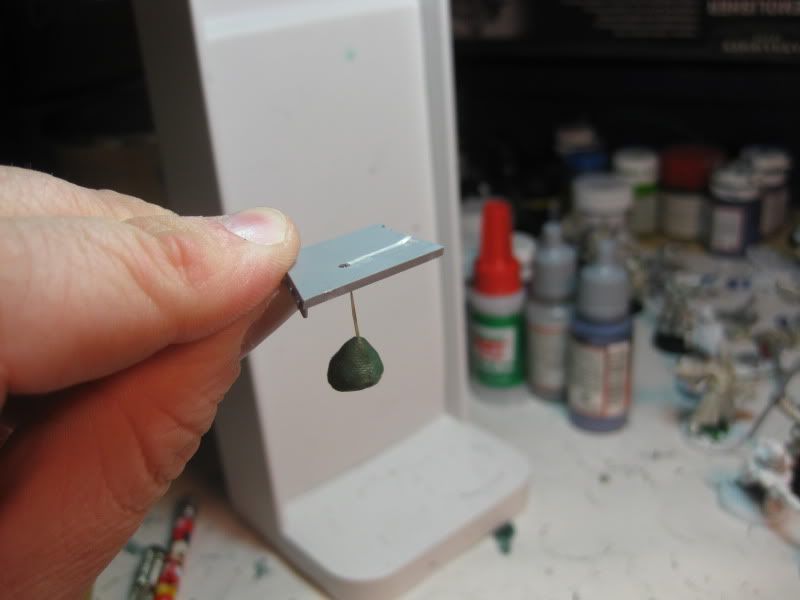 7. Holding down gently on the top of the sponson lid, I lead the floss across the top of that criss-crossing on top of the lid from earlier, starting from the hole, just a few mm’s towards the front. You should take up the slack of the floss inside the sponson and make it tight without breaking the magnet bonds. Glue it with crazy glue right to the sponson top. Leave it together while the glue and floss dries before you try pulling it apart. After that is dry, trim off the extra floss with xacto and reinforce with a small blob of green stuff on the that texture to lock it all down. At this point I used that greenstuff to anchor a piece of Tamiya stowage to hide the hold, floss and greenstuff. 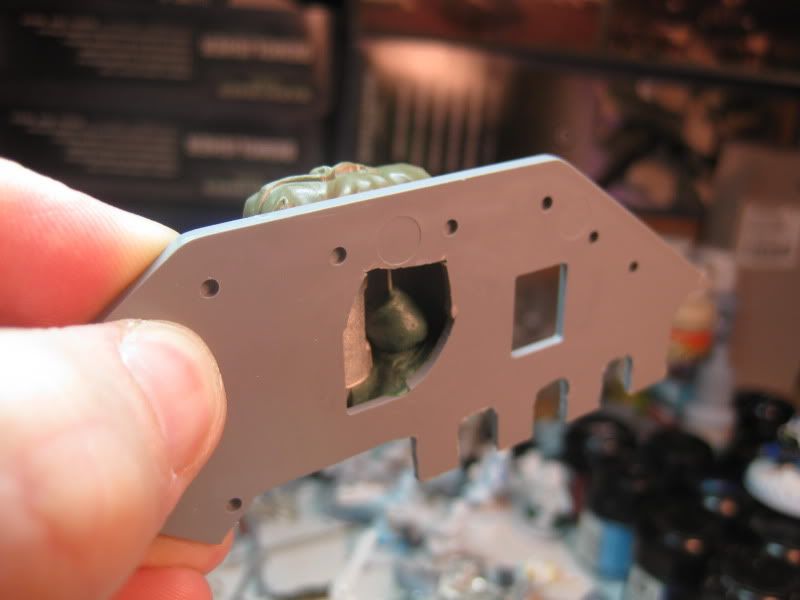 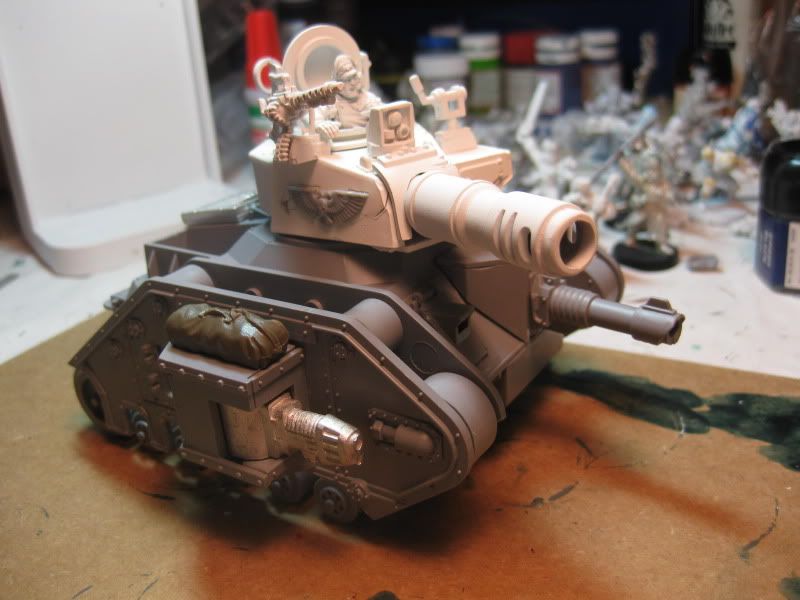 Mr. Pask likes flexability. And pigment. One out of two ain't bad. That’s it! All-in-all, minus dry-time, it took less than 20 minutes to mag both sponsons. I also mag-mounted the front sponson but that was done the more traditional way (more later.) I dry-fitted all Demolisher weapons and sprue weapons and they all sit tight while popping out easily. If you have ways of improving on this or run into issues trying it out, lemme know here or at Sarcophagi sarcophagi.blogspot.com/ Best, Yeti |
|
|
|
Post by Yeti's Yell on Apr 6, 2011 20:38:38 GMT -5
Not being rude but... Magnets? Not following you Prilla my man ... what is your question? |
|
|
|
Post by Dedrier on Apr 6, 2011 21:31:14 GMT -5
Not a fan, seems like a waste of precious green stuff. You should have tried a simpler method, for example drill holes in the back of the weapon glue a magnet in, then do the same to the rotating sponson. Your method just seems like it would be a pain in the ass to do for more than one or two tanks. Now you have two comments!  |
|
|
|
Post by Yeti's Yell on Apr 6, 2011 21:47:24 GMT -5
Not a fan, seems like a waste of precious green stuff. You should have tried a simpler method, for example drill holes in the back of the weapon glue a magnet in, then do the same to the rotating sponson. Your method just seems like it would be a pain in the ass to do for more than one or two tanks. Now you have two comments!  Your right and I'm not following you either  All the sponson weapons I have are either one piece plastic with posts already attached or solid metal with post attached. What parts would I be cutting exactly? Are you saying I glue closed a sponson with just a magged post inside and then cut all my weapons to mag into that one mag post? |
|
|
|
Post by Dedrier on Apr 6, 2011 23:59:50 GMT -5
|
|
|
|
Post by Ymmot (M.I.A) on Apr 7, 2011 1:07:30 GMT -5
The old Leman Russ kit Yeti's Yell is using makes that sort of conversion a lot more difficult...
Anyway...everything looks good to me.
Keep those updates coming!
|
|
|
|
Post by Yeti's Yell on Apr 7, 2011 8:29:19 GMT -5
Dedrier, I follow you now. Thanks for posting the link, you are the man. That will be handy if I ever bother to buy the new kit. And thanks for the feedback! Here's the deal though, and Ymmot is onto it, I have a bunch of the older kits, as mentioned earlier in my write up. The sponson weapons in the last generation kit are each either plastic or metal, each with the post already attached to as a cast. I guess the newer kits are more modular. Those last generation kits (of which I still have a few to build still) are not modular. See pic below. 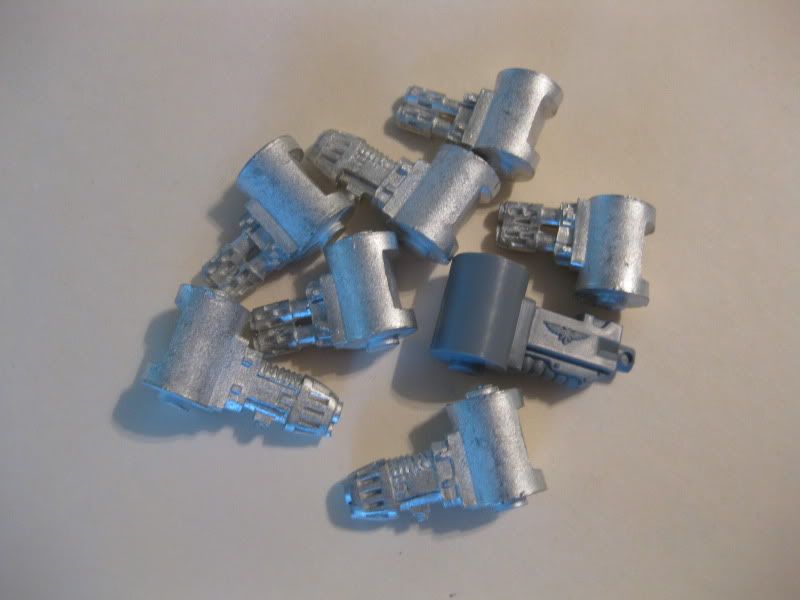 It would obviously require a lot of sawing of the metal weapons from their metal posts (which would be a huge pain in the ass) and many, many more magnets than I used here, as well as more time to mag mount my kits in the way that tutorial you posted proposes. As-is, my method takes 20 minutes a tank with hardly any cutting at all (just the holes in the hull, really.) As for the greenstuff use, I suppose it looks like I used more than I actually did. Funny thing is, I use greenstuff less for sculpting and more for building, like filling the gaps in base slots where tabs of minis go in, joints, pins, etc. I think it is money well-spent if it makes study projects with small time investment! Best, Yeti |
|
|
|
Post by Yeti's Yell on Apr 18, 2011 8:13:45 GMT -5
It has been a busy start of the school term and slow again on the model front. Work/school/life balance is a bit better though and I’m steadily working on things here and there, which is cool. Last night I pulled out the Valhallan IG to verify that what I’m working on right now is smart, given my goals. I set out the completed IG, tallied it up and saw that I’m just 3 guys short of a completely painted Infantry Platoon. That’s pretty exciting as I’ve never had that before in uh... 20+ years of painting. Also, I pulled out all the Mordheim buildings I own, repairing tears and gluing breaks here and there, since I'll be playing in a Mordheim/Coreheim league at my game club (see my Undead Warband sarcophagi.blogspot.com/2011/04/undeaded-or-return-to-mordheim.html.) What are you guys working on this Spring and how is your progress? |
|
|
|
Post by Trooper One-Nine-Seven-Four on Apr 18, 2011 18:38:59 GMT -5
I love Hachetback! ;D
I've been working on Imperial Navy assets for my Catachans. Hope to have pics of my finished Vendetta up shortly (the glue holding the canopies in place is drying as I type). I'm hoping to get my Thunderbolt done and mounted on a base soon, and have a Vulture kit on the way from FW which I'm going to equip with TL Punishers, and name the crew after two aviators I have known who have passed away.
I've also been working on more heavy weapons, and just started converting up carapace armored vets, because my flak armored vets have been dying horribly every time they get out of their transports (whether willingly or forced out). I'm hoping they will be more survivable, and am essentially using the same techniques that I used to make my Stormies, but with Catachan heads, rather than the Cadian respirator heads. I've also been working on Ogryns...
|
|
|
|
Post by Yeti's Yell on Apr 18, 2011 18:56:08 GMT -5
I am insanely jealous Trooper. I've been dying for a Thunderbolt for such a long time... it just looks so much more formidable than the Lightning... and Double Eagle by Dan Abnett was a good read too.
Nice touch on the Vulture and double-so with the naming in homage to fallen servicemembers.
Can't wait to see the Vendetta and man, if I had all the ogryns you did, I'd take holiday just to bang them all out.
|
|
|
|
Post by Trooper One-Nine-Seven-Four on Apr 18, 2011 20:49:04 GMT -5
Thanks, Yeti! I've had my Thunderbolt for quite some time. Unfortunately, it was languishing half painted because the scheme that I was originally going to paint it had me going "meh" when I looked at it. It wasn't until I got the color scheme for my Vendetta applied that I realized that my 'Bolt would look good in those colors, and it got me inspired to finish painting it up.  The Ogryns are going to take me a while. I love how they look when I get a mini finished, but the process of painting them is almost painful... Some day, though, I will have slogged through them, and I will be very happy.  Anyway, I am looking forward to seeing more of your work!  |
|
|
|
Post by Yeti's Yell on Apr 21, 2011 8:10:08 GMT -5
Thanks, Yeti! I've had my Thunderbolt for quite some time. I heard rumor that a plastic Thunderbolt is coming out soon. Has anybody else heard that? I hope that is true. I’d like to own 3. 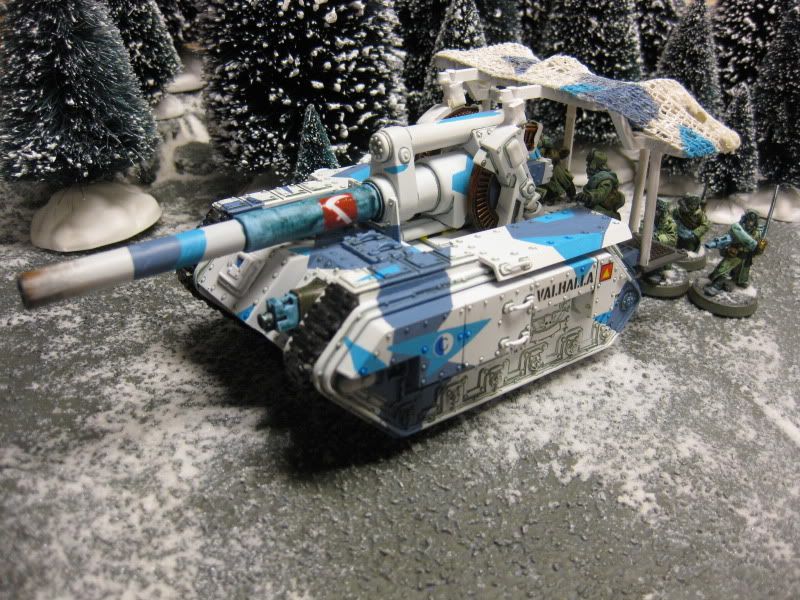 Anyway, fast post. I repainted parts of the Basilisk, updated some colors and added some decals. Note the scratch built canopy. Not sure I’m crazy about it anymore so I might remove it at some point soon. This Basilisk is an open-country arty piece and so the canopy makes sense for crew (plus I want to put one on my salamander.) Also, the Earthshaker slides in and out of the hull. I’m working on the Medusa platform right now. 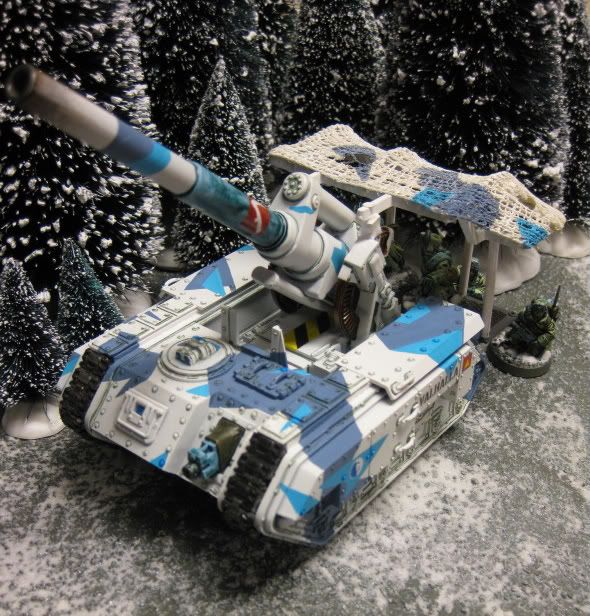 |
|
|
|
Post by Walrus on Apr 21, 2011 9:40:16 GMT -5
That's some brilliant muzzle burn there yeti... Good stuff.
|
|
|
|
Post by Trooper One-Nine-Seven-Four on Apr 21, 2011 10:16:04 GMT -5
Awesome looking Basilisk, Yeti! I like the canopy, and the lack of the gun shield. Makes for a really unique looking model.  |
|
|
|
Post by Major Downer on Apr 21, 2011 11:34:59 GMT -5
OH WOW! that Basillisk looks bloody awesome! Really clean looking and im loving the canopy, kinda like what they would have done during the war, its a nice touch  Major Downer |
|
|
|
Post by Shostak(AWOL) on Apr 21, 2011 12:27:57 GMT -5
The Basilisk looks great and the canopy adds a lovely realistic touch to it; it also makes the vehicle really unique.
|
|
|
|
Post by Paxole on Apr 21, 2011 18:37:24 GMT -5
Really nice army, I personally don't like the canopy that much but it does make the basilisk very unique. Maybe redo it and make a less rectangular one,it could have netting draped unevenly down the sides or something?
|
|
|
|
Post by Yeti's Yell on Apr 30, 2011 15:04:47 GMT -5
Howdy peeps. Hope everybody is having a great weekend. Just wanted to share a WIP of my Eversor Assassin. 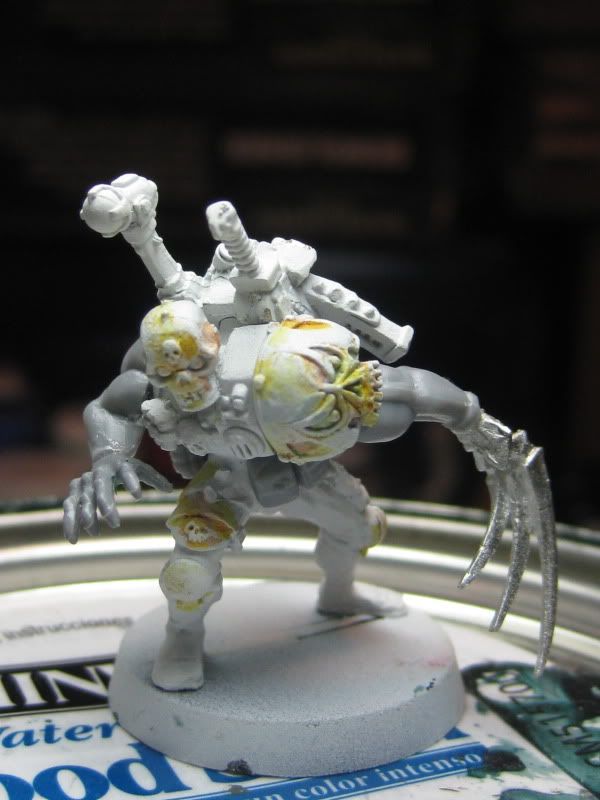 You can see a parts list on my blog (below) but it should be evident what's-what. The only thing I'm not sure about is the length of the arm with razor claw... it might be too long given where the biscep is. Thoughts? 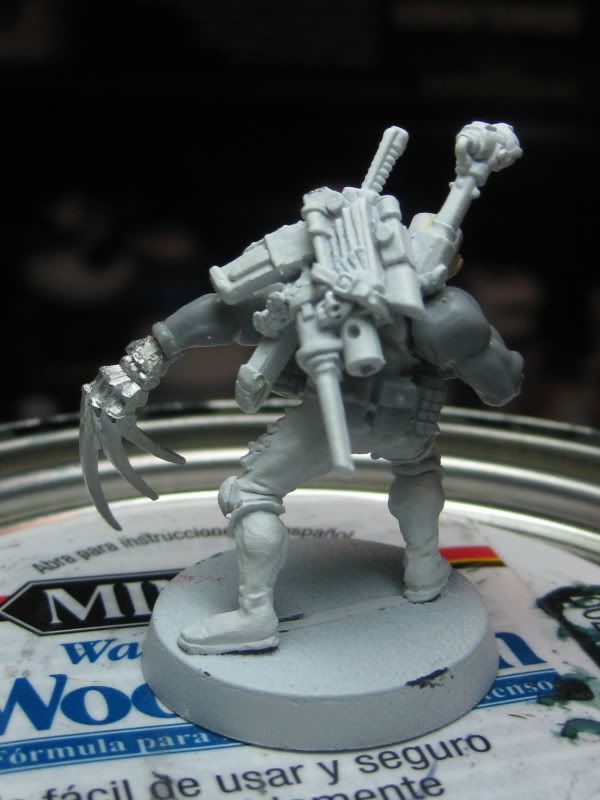 |
|
|
|
Post by Walrus on Apr 30, 2011 23:17:01 GMT -5
Hmm, it looks a little unwieldy, but then it kind of adds an 'altered' feel, something that should translate well with the psychotic killer that is the Eversor.
|
|
|
|
Post by 3ff3ct on May 1, 2011 11:59:11 GMT -5
^ seconded. He doesnt look right, which I think is right for this guy due to his unnatural creation. The claw is just plain scary!
Love the bassie a few posts up too, I missed it the first time!
|
|
|
|
Post by Gabriel Lupus on May 2, 2011 12:46:44 GMT -5
I'd cut down the "clawed" arm a little - just remove a little of the Bicep (looks kind of like his shoulder is double the length it should be).
Very nice start though!
|
|
|
|
Post by Yeti's Yell on May 2, 2011 15:13:17 GMT -5
Thanks for the feedback fellas. I admit that I sorta like the long arm look but I am going to cut it down. I should have it primed and base colored by the start next week.
Pulling the claw in only makes it easier to keep the model from breaking as he is handled anyhow!
|
|
|
|
Post by Yeti's Yell on May 6, 2011 9:20:20 GMT -5
Okay, I trimmed Ever's arm down, looks better now I think. It's a tricky balance of length and relationship between the wrist and long blades to manage. Before:  After: 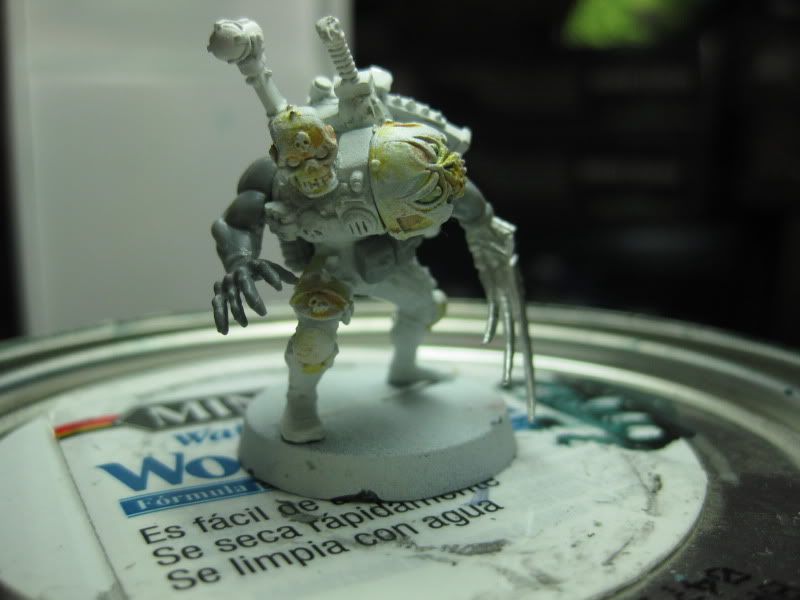 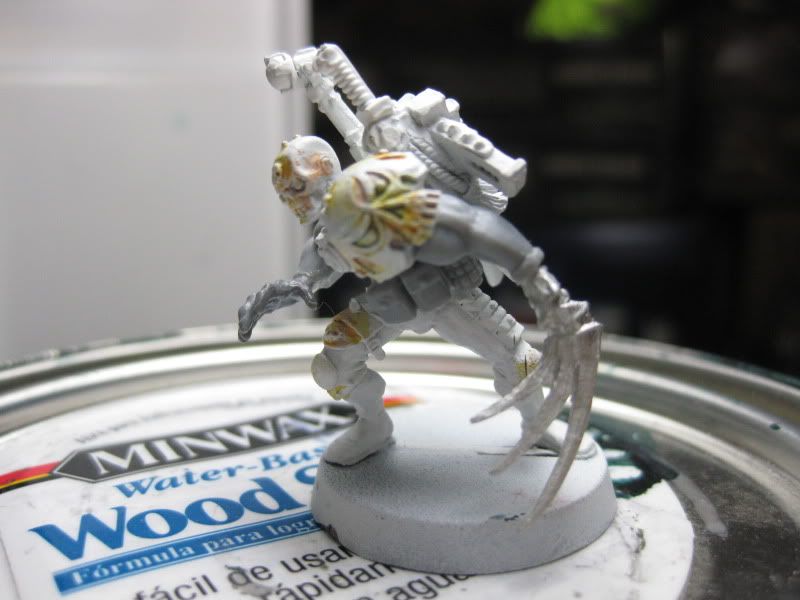 That being sorted for now, not sure I'm loving the pose. His right arm may need to be back instead of forward, perhaps... |
|