|
|
Post by KRIEGEIRK on Mar 1, 2012 7:53:18 GMT -5
I felt the need to start this thread for those who are interested in building a diorama or even if it is just used to get ideas for scenery, but have no idea where to start. I hope people can use this thread to post and share ideas or what they have done for their own diorama's and scenery to help out a novice diorama/scenery builder. As I am getting ready to build my very first diorama, I feel that I can update this as I make progress. Listing of materials, methods and techniques, where you bought bits, and from what companies, good reference websites, pictures of diorama's, etc will help greatly.
With my spring break coming up next week, I have decided to dedicate that week to fully working on the diorama many of you have read about. I have finally come up with an idea that I am happy with, and will begin working on it Saturday as I will have most of the materials aquired and ready by then.
Which leads me to my point, I recently bought a set of ruins to use on the diorama and was wondering what you all use to make floors to give them detail and a 40kish look. The set comes with flooring for the second floor, but no floor for the first floor. As I do not want the first floor to be dirt and mud. Any ideas and suggestions would be greatly appreciated!
Again I hope you all find this thread helpful as it grows, and your input and ideas are always appreciated as well!
|
|
|
|
Post by 3ff3ct on Mar 1, 2012 12:04:34 GMT -5
I've used the warhammer movement trays in the past, they make great tile floors. if you want a more industrial feel, check plate plasticard is the way forward!
|
|
|
|
Post by treadiculous on Mar 1, 2012 19:49:49 GMT -5
I have given myself blisters from chopping up old sprue with the intention of making rubble scenery.
To be honest, it looks pretty crap unless it's cut up really small, and even then still looks a bit shonky. I plan to mix in some cat litter to help the rubble / ruins effect.
I am doing this as I have plenty of walls and corner sections of buildings but none of the debris which would decorate the area of destruction. Nor do any of my buildings have a ground floor, but my gaming table is the same dark grey so it sort of hides this issue.
There are a load of independant companies that make floor tiles for dungeon and dragon type gaming, so they may help.. or make a small mold that can be used repeatitivly and use plaster (fragile but looks good and is very cheap), or similar casting product.
Also check for old lino off cuts at a carpet store, sometimes they have fake slate effect or similar stone effect, whcih can look good (I'm holding out for some nice blue river lino at my nearest store!).
|
|
|
|
Post by KRIEGEIRK on Mar 1, 2012 22:10:49 GMT -5
I like the ideas! Thanks guys! Like I said I should be starting this starting saturday and hope to get a bunch of pictures documenting my progress.
|
|
|
|
Post by vegna on Mar 2, 2012 8:38:17 GMT -5
I'm currently drawing up plans to make a small wooden pillbox fortification. Using bits of dowl, get a floor tile, glue 4 pieces about 1 or 2 cm taller then a model place in a square in equal distances, then use dowl to make small walls to longer then the distance between the pillars, repeat that step 3 times and then add 1 or 2 bits of dowl at the top leaving a small gap between the lower ones so you have a firing slit. To make the roof get 4 bits of dowl slightly longer then the sides, stick them togeter to form a squad and then cover with bowl going accross. this means it can sit on top of the 4 pillars and give a removeable roof.
Then texture the outside how you like, rubble, green stuff etc. a tip I would say is to build up the mass quickly maybe use clipped down sprus to build a back bone and then coat the outside of that with green stuff. makes it cheaper and light.
|
|
|
|
Post by KRIEGEIRK on Mar 2, 2012 11:18:02 GMT -5
This is a thread for everyone and any one to post how they go about creating and building their scenery and diorama's. Once you get started, vegna, post some pics including WIPs and finished products. The more detail you go into the better idea people can get when they go to try their own.  |
|
|
|
Post by dcrabb on Mar 2, 2012 16:44:30 GMT -5
I'm currently drawing up plans to make a small wooden pillbox fortification. . Hey Vegna you might want to check these out for easy, yet authentic looking pill boxes. I got them at Michael's a hobby/craft store here in the US. They cost about $3 but you can find them on sale. 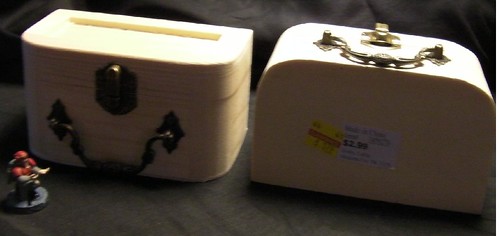 SANY0179 SANY0179 by Doug Crabb, on Flickr Take a hobby knife and sandpaper to them and you can make these: 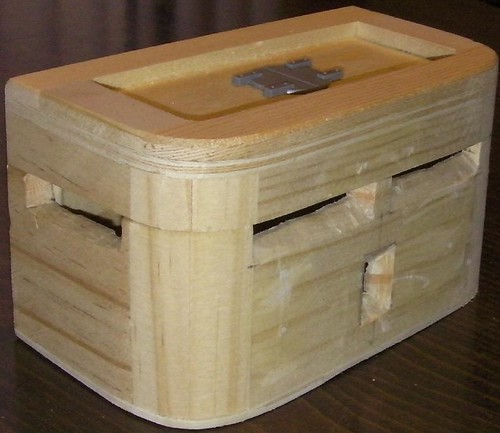 SANY0188 SANY0188 by Doug Crabb, on Flickr  IMGP2876 IMGP2876 by Doug Crabb, on Flickr  IMGP2878 IMGP2878 by Doug Crabb, on Flickr |
|
|
|
Post by vegna on Mar 2, 2012 17:25:08 GMT -5
real nice effect there dcrabb, but atm I'm working on a DKoK unit so needs to be more trenchy, but really nice bunker! great addition to the board and love this thread. Also a key point I want to make for this save scraps materials! I broke a phone I had for yeahs, smashed it up now I have tech parts, could make a computer or an objective. a polestyrene case on a new gadget? or even a cake can make a bunker, building, ruin or anything! look at it and think what you could do with it  |
|
|
|
Post by KRIEGEIRK on Mar 3, 2012 1:08:31 GMT -5
Thank you dcrabb for your addition to the thread! I hope more people start taking interest!
|
|
balashivo
Conscript
12,000 Pts and growing
Posts: 30
|
Post by balashivo on Mar 3, 2012 7:19:57 GMT -5
Which leads me to my point, I recently bought a set of ruins to use on the diorama and was wondering what you all use to make floors to give them detail and a 40kish look. The set comes with flooring for the second floor, but no floor for the first floor. As I do not want the first floor to be dirt and mud. Any ideas and suggestions would be greatly appreciated! Again I hope you all find this thread helpful as it grows, and your input and ideas are always appreciated as well! Here is what I use on some of My COD ground floors www3.towerhobbies.com/cgi-bin/wti0001p?&W=001535683&I=LXF840&P=K |
|
|
|
Post by KRIEGEIRK on Mar 5, 2012 0:49:17 GMT -5
Building a Winter Themed DioramaSo the weekend is nearly over, and as promised I have an update on my progress! It has been a busy weekend, but I got a lot accomplished and am quite pleased with my results so far. The best way in my opinion to start any project is to come up with a design using pen and paper. I drew out my idea while in Statistics class... whoops... After this stage, I knew what I wanted and gathered materials. First up I needed a base. I used a 1'x1' section of styrofoam that was laying around my garage. I then needed a good set of ruins. Luckily, Pegasus Hobbies has a magnificent set of Gothic style buildings and ruins that are very affordable and glue is not required for most of their Gothic style buildings. My ruins snapped together, which is great because they can be taken apart and added to other Pegasus products to make huge buildings and different designs for different scenarios in your gaming. Did I mention they are very affordable (Erm... GW... cough...) and their "small" building sets are actually HUGE! when compared to what you get in a box from GW. Two corner ruins are included in each box and I paid only 20 USD.  Once the extra plastic from the sprue was cleaned off, I fit the ruins together to get a feel for the size of them and how they will look on the base.  They were then undercoated with Chaos Black spray. While I waited for them to dry, I decided to take the time to start cutting more foam and fitting stuff together for the rest of my design. I came up with a concrete wall, raised platform with a staircase. I also removed chunks from the foam to give it some battle damage like the wall has taken rounds from a tank or AC. These bits were glued to the base and allowed to dry.  After this was completed my ruins were more than ready for paint. The ruins were drybrushed with Adeptus Battle Grey, and then highlighted and verly lightly drybrushed with Astronomican Grey. The recesses, bullet holes, and cracks in the masonry were left black to show the detail in the sculpt.  After the ruins were dry I then set them up on the base to trace out a rough sketch of the bottom floor for the battered building.  After this was complete, I used a DIY household wall filler to create a muddy looking spread. Making sure to give the spread a textured look I used a sponge to raise and lower the areas covered in the filler. I also added rocks that I just grabbed from outside and placed them in a "natural" looking pattern to give the diorama a different texture from the mud adding some depth.  Since the filler takes quite some time to dry thoroughly, I used this time to doctor up the styrofoam for paint (since spray paints eat through bare styrofoam) WARNING: Spray painting bare styrofoam will cause a chemical reaction releasing some nast vapors mixed with the already nasty vapors of the spray paint! So this step is very very important. Spreading a thick layer of Elmer's All Purpose Glue over the entire piece of scenery was necessary being sure to give a nice even spread. I added the glue in even increments to be sure I had enough to cover the whole piece and to be sure it was spread evenly to creat a nice smooth layer.  Using an old brush you don't paint with anymore works perfectly for the task of spreading the glue evenly to make a barrier between foam and paint.  Before the filler is completely dry, I took my LRBT and pressed tank tracks into the filler to show the detail of the tracks being run through mud. The diorama was let to sit and dry for another hour. Once everything is dry, the base is ready for it's undercoat. I again used Chaos Black spray. Once the undercoat was dry, I turned my attention to the mud effect. I use a mix of drybrushing several shades of color to get the mud effect that I use for my figure bases as well. I use a dry brush of Adeptus Battle Grey, a drybrush of Scorched Brown, a lite drybrush of Bestial Brown, and then a very very light drybrush of Snakebite Leather to really highlight some of the raised areas. The tank tracks however were just drybrushed Scorched Brown to accentuate the effect of fresh wet mud that a heavy piece of machinery has been running through. The stones were drybrushed Adeptus Battle Grey and Astronomicon Grey. Once the mud colored paints have dried I take a bone dry brush and vigorously brush over the whole base several times to blend in some of the colors a little more to give a nice natural look to the ground.    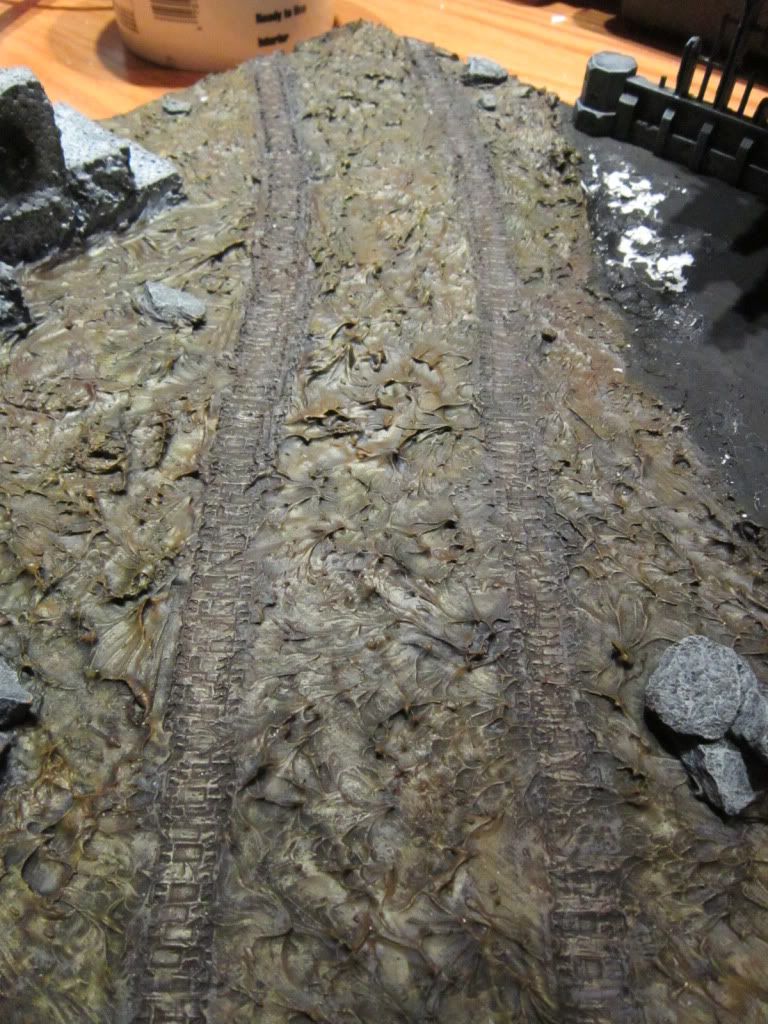 Once blending is completed, I turned my attention to combining what colors I have on me to get a decent looking concrete color. After using a spare piece of foam I came up with a mix of drybrush, stipling, and blending that turned out fairly well (I think at least). I used a drybrush of Adeptus Battle Grey, drybrush of Codex Grey, stiple of Astronomicon Grey, then blended it in to the other greys. I finalized the mix with a very light stiple of Skull white and then blended in any spots that looked too thick.  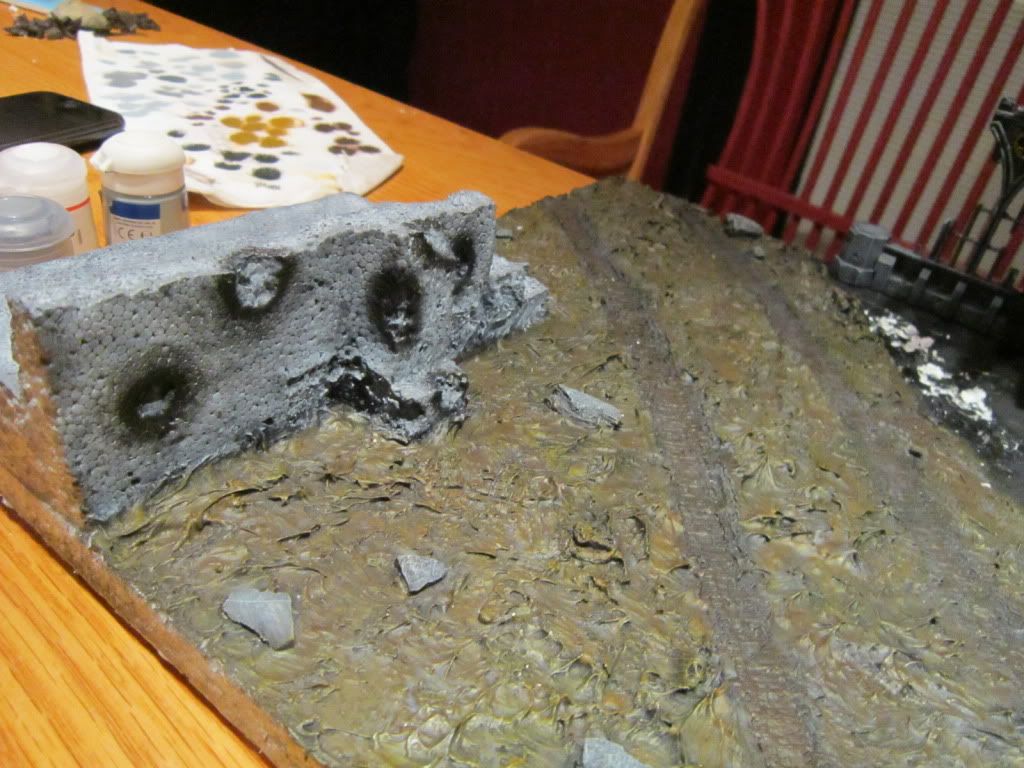 Battle damage was painted with Adeptus Battle Grey and then lightly hightlighted with Astronomicon Grey to bring out detail. The scorch marks were created using a mix and blend of Chaos Black and Scorched Brown (I need to work on this technique a bit more!). This is just about where I have left off for the night. I believe I am roughly 3/4 of the way finished, as I have some more stuff to do like the first floor of the ruins, add rubble to the first floor, and I also have another idea for the concrete wall and walkway as well that I would like to try out. I have to also add scorch marks to the ruins where artillery and tank shells look like they have plowed through the masonry. I also have snow to add as well. I am hoping I will be 90-95% finished with this tomorrow! Alright so I have finished my very first diorama (well almost finished, just need to do some minor details). The last step to my project was to add snow to match my army's theme. This was done by apply thin layers of PVA glue (which I just used Elmer's All purpose glue watered down). Then sprinkled the snow in even layers. Once the glue had dried, I then sealed the snow down with hairspray (yes hairspray, got the idea from the Model Masterclass book). It is quite an effective sealant and very cheap. Dries clear with no glossy layers.    and some with my figures to get an idea of scale. 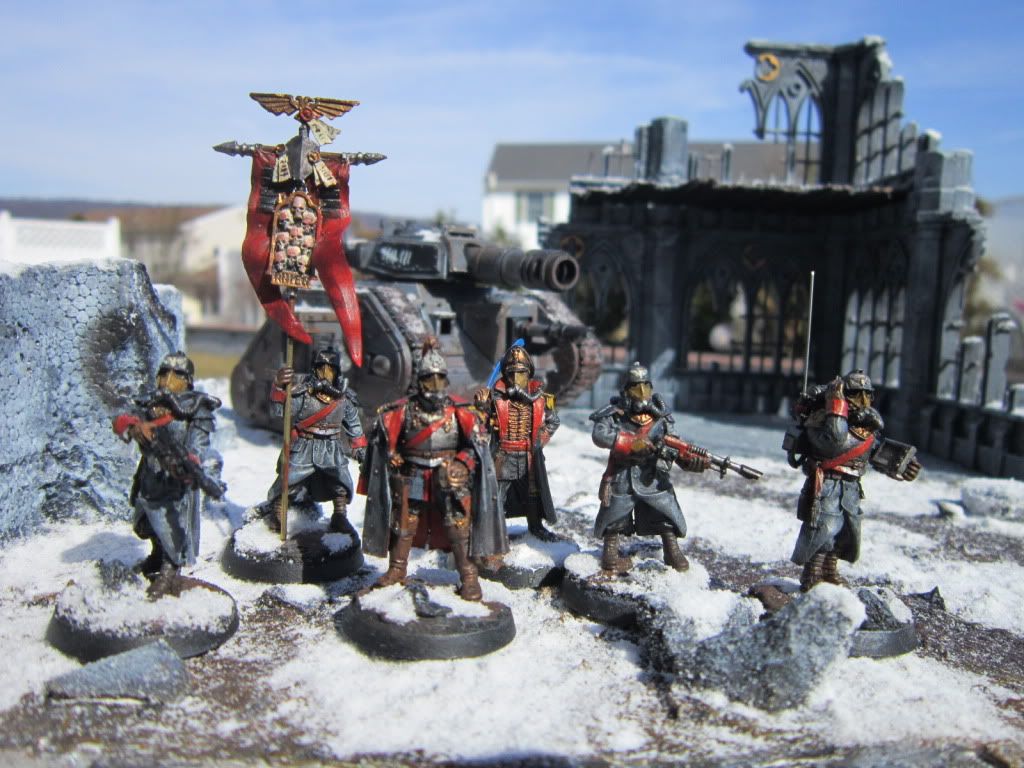   This is the final detail I have decided to add to this particular piece. Looking at the pictures I took the other day and looking at it in real life, it looks a little too open in my opinion. I decided to create a wall for the raised concrete platform area to really tie everything in. The wall is to represent either a research laboratory or manufactorum, while the ruins indicated the outer facade of the research lab/manufactorum. The building (for obvious reasons) has been destroyed allowing nature to begin taking over the area. Hence why the tracks run "through" the building. I spent most of the night working on just this piece as I wanted it to look really good. I am quite pleased with how it turned out, and I hope you all enjoy it as much as I enjoyed building it. I used bits from a Cadian CCS that was laying around and the wall itself is completely made with cardboard.  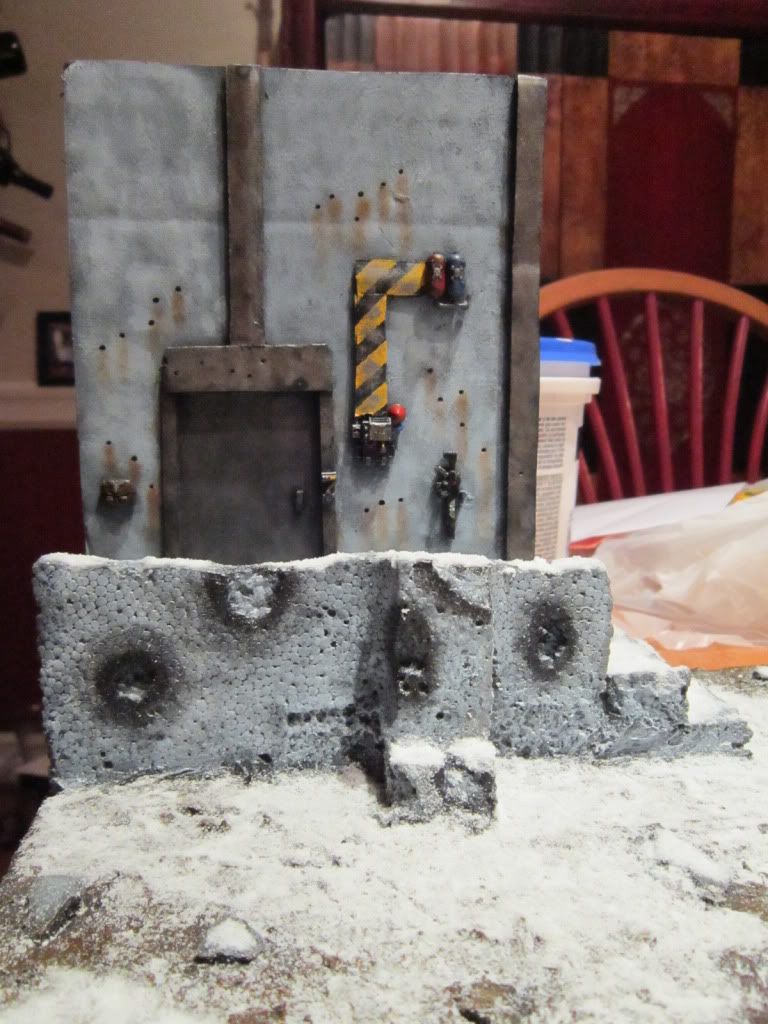   If any one has any other questions, or critiques, never hesitate!  I hope some of you found this process informative. I have another diorama in the process as I type as well. Look out for this coming next!!
|
|
|
|
Post by egon on Mar 5, 2012 12:23:07 GMT -5
Looking good! I really like the mud/tank tracks. Will this be just a diorama or will you be building matching tiles for the rest of the battleifield?
Also, how well is the styrofoam holding up? In my experience it's very fragile, even with a white glue-layer. Will you be needing to add a bottom layer fo carboard or anything?
|
|
|
|
Post by KRIEGEIRK on Mar 5, 2012 20:32:36 GMT -5
Thank you, egon! I am planning to mount this on a base once it is complete. It is quite fragile, but has been holding up very well for me. I am planning on using this as just a display piece and planning on making a table sometime down the road. There aren't very many players around here and I have limited time to even play. So for now I've just been focusing on the hobby aspect of the game. I should be posting an update later on today of what I accomplished today.
|
|
|
|
Post by dcrabb on Mar 6, 2012 11:14:08 GMT -5
I have given myself blisters from chopping up old sprue with the intention of making rubble scenery. To be honest, it looks pretty crap unless it's cut up really small, and even then still looks a bit shonky. I plan to mix in some cat litter to help the rubble / ruins effect. Yo Tread, I was cutting sprues up with clippers until I got me one of these to do the job. Just feed the sprues thru the front while you turn the handle. Turns them into nice size bits for terrain rubble. You don't have to get this specific model and it still takes some work but it is much faster and makes more realistic rubble.  grinder grinder by Doug Crabb, on Flickr |
|
|
|
Post by dcrabb on Mar 6, 2012 11:41:58 GMT -5
Which leads me to my point, I recently bought a set of ruins to use on the diorama and was wondering what you all use to make floors to give them detail and a 40kish look. The set comes with flooring for the second floor, but no floor for the first floor. As I do not want the first floor to be dirt and mud. Any ideas and suggestions would be greatly appreciated! Again I hope you all find this thread helpful as it grows, and your input and ideas are always appreciated as well! Kriegeirk, I have found the local Hobby Lobby and Michaels to be very helpful in finding terrain building stuff. For your problem of finding tile I would recommend the Doll house section, they have several different sheets of flooring that are used for doll houses but would make great flooring for a terrain piece. Here is a sample of just one I bought. They can be painted to match other color schemes and to look like they fit in a ruined building.  doll floor doll floor by Doug Crabb, on Flickr Here is another item I found in the discount area for under $1. 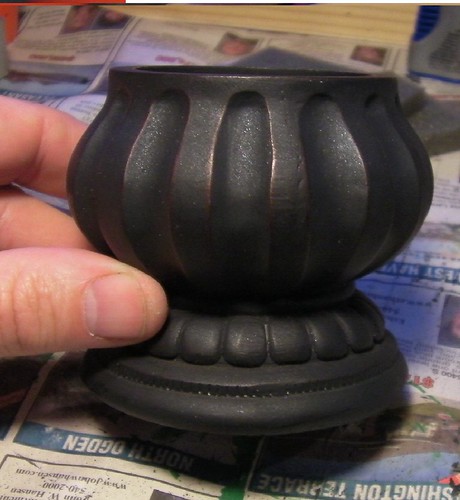 SANY0164 (2) SANY0164 (2) by Doug Crabb, on Flickr I turned it into the center piece for the terrain below. The skulls and pillars are from Michaels. The pillars are from the wedding cake section of the store. 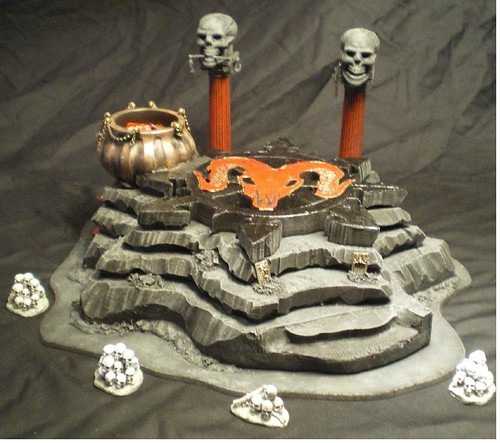 IMGP2893 IMGP2893 by Doug Crabb, on Flickr 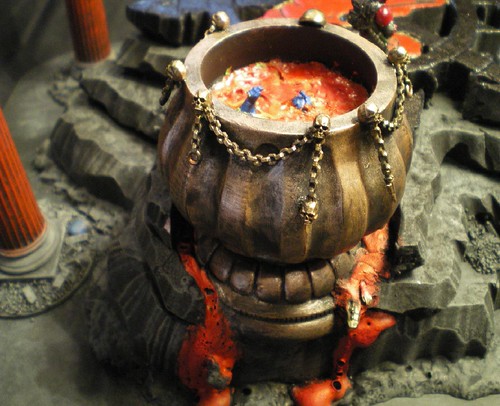 IMGP2901 IMGP2901 by Doug Crabb, on Flickr The floral part of the stores can also provide some neat stuff. I made these alien plant forms from stuff I found there. 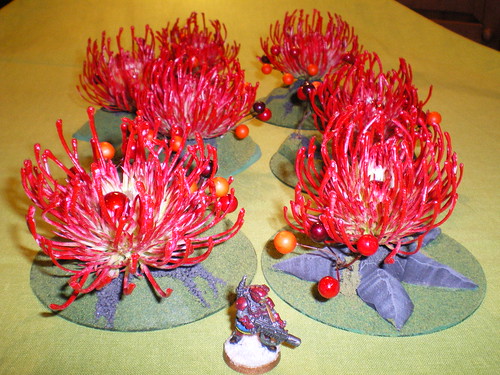 IMGP2749 IMGP2749 by Doug Crabb, on Flickr  IMGP2746 IMGP2746 by Doug Crabb, on Flickr |
|
|
|
Post by treadiculous on Mar 6, 2012 15:04:26 GMT -5
Dcrabb - Thanks!! I hadn't thought of that!..
I'll have a look into the costs, certainly would speed up the process!
I would reccommend looking at aquarium and reptile fake grass for foliage, there are some excellent mats which llok great (I'm getting some very soon, I'll post a pic when I do).
|
|
|
|
Post by KRIEGEIRK on Mar 6, 2012 15:23:15 GMT -5
Thank you for your ideas, dcrabb! Every bit helps not only myself, but anyone who needs ideas for their scenery!
|
|
|
|
Post by 3ff3ct on Mar 7, 2012 2:37:51 GMT -5
I also have snow to add as well. My only criticism would be that it looks a bit merangue-y, and that you should add some static grass or similr. Looks like you're already on it...! I'm very impressed, that was a great post which I found very informative and interesting!  |
|
|
|
Post by KRIEGEIRK on Mar 7, 2012 7:11:48 GMT -5
I added the snow and it looks a lot more natural and less like a pie filling  I should be able to post pictures today! |
|
|
|
Post by KRIEGEIRK on Mar 7, 2012 11:03:37 GMT -5
I have posted in my first update post the remaining photo's of my finished piece! I have some minor details to attend to, but it is about 99% complete.
|
|
|
|
Post by 3ff3ct on Mar 7, 2012 14:49:59 GMT -5
That was suspense building! the scroll to the bottom of the page, then back up again!!! 10/10 for theatrics! ;D An awesome job, however I would like you to paint/cover the bare polystyrene edges, it spoils what is otherwise perfect. It looks like Cosmic has something to aspire to with his shelf project  |
|
|
|
Post by KRIEGEIRK on Mar 7, 2012 15:28:05 GMT -5
That is one of the minor details I need to take care of! Thanks for the kind words, 3ff3ct!
|
|
|
|
Post by zeke on Mar 7, 2012 15:33:41 GMT -5
It looks amazing Kriegerik! I wish I had the patience to build something like that
|
|
|
|
Post by Trooper One-Nine-Seven-Four on Mar 7, 2012 15:39:59 GMT -5
Woah!  KRIEGEIRK, your diorama is looking most awesome! Outstanding work!  |
|
|
|
Post by Empirespy on Mar 7, 2012 16:57:12 GMT -5
How have I missed This thread?!?
These Are Epic!!!
|
|