|
|
Post by badgersplatter on Dec 26, 2012 13:17:50 GMT -5
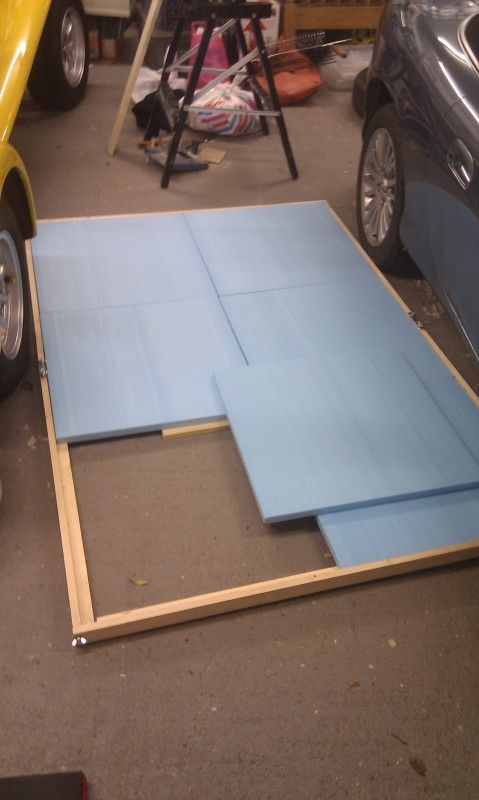 It begins! Edit: Now I'm not just uploading from my phone, let's have a little more detail. I have 2 issues. One, I don't like gaming on the floor, but my kitchen table is not 6'x4'. Two, I only have a tiny Ford Ka and game away a lot. This leads to me wanting two things - a solid gaming structure that can sit over a smaller table, and a frame that can fold down to a relatively compact size. Since I'm at it, I might as well make cool modular terrain tiles. I began by making an L shaped section for all of the sides, so that tiles could rest atop it. The 6' lengths are hinged in the middle, leaving me nothing longer than 4'. The corners and joints are all fixed in place by threads with wingnuts so it's pretty solid. Across the middle go a pair of 1"x2" batons, on top of which (via a hooky bracket thing and appropriate cutouts) the rest of the frame sits. These batons clamp to the table, and also support the 2' square tiles. The tiles are blue styrofoam from Antenocitisworkshop. Problem A: They're not actually 600mmx600mm squares, they are not even close. I will end up having to trim them down to around 595mm to make them square. Then there will be gaps around the edge. Laaaaame. There are ten tiles, double sided with a mixture of blanks, roads, rivers, crossings and trenches to be carved into them. They will have a backing of hardboard for strength, and be supported on 3 sides by the batons and L sections. They will have to be strong, since that bridge is massive and made of concrete! Hopefully anyone stuck for ideas might take some inspiration. I've had my dad's inspiration and workshop to help me, others may not be so lucky. |
|
|
|
Post by badgersplatter on Dec 26, 2012 13:23:27 GMT -5
It gets distracted. 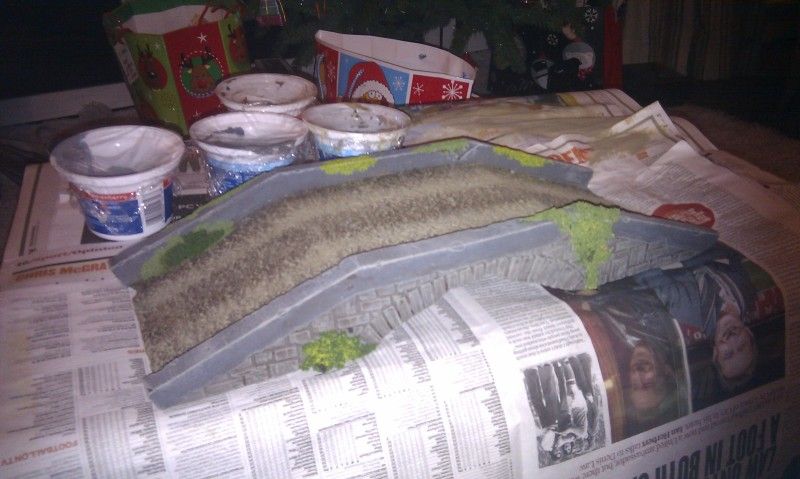 |
|
|
|
Post by hendrik on Dec 26, 2012 13:48:48 GMT -5
interesting setup, how do you plan on keeping it standing?
|
|
|
|
Post by badgersplatter on Dec 26, 2012 14:05:06 GMT -5
The boards? Since that photo, more batons have been added across the middle - it sits atop a kitchen table quite happily, and all packs down to a bundle of 2" planks about 4' long.  |
|
|
|
Post by hendrik on Dec 28, 2012 3:12:40 GMT -5
mounting it on al already existing table! great idea! could ypou post up some pictures of the framework? by the looks of it you've make it foldable?
|
|
|
|
Post by 3ff3ct on Jan 3, 2013 6:48:41 GMT -5
Time and planning? I have neither, so I copped out and bought one of the Realm of Battles  Great to see other forum members 'getting old school' and building their own. If you can get your mitts on a 'How To Build Wargames Terrain' book from GWs ancient past, it'd be worth the investment  |
|
|
|
Post by badgersplatter on Jan 4, 2013 7:17:25 GMT -5
Due to savage hand injury while carving out rivers, project is on hold until I figure out a new technique...
3 trench tiles and two rivers done though! Half way!
What are peoples' experiences with water projects? I bought some Deluxe Materials Solid Water as it looks like a good project, but having 350ml of the stuff actually here it looks very small - going to get expensive if I want a reasonable depth. Envirotex Lite is about 2/3rds the cost, but I worry it won't work well if I try to layer one over the other...
|
|
|
|
Post by Adkenpachi on Jan 4, 2013 7:25:29 GMT -5
Fill it with some kind of white filler then put a thin(ish) layer of the water stuff ontop? Thats my first thought anyway... Ive seen some techniques for water making, i think in here... But dont have the time to look right now
|
|
|
|
Post by BG. Foster on Jan 4, 2013 7:27:44 GMT -5
I personally would paint it and then depending on what the surface is either use clear resin or pva glue to give the depth. I am right in thinking PVA dries clear aren't I?
|
|
|
|
Post by Soap on Jan 4, 2013 7:42:50 GMT -5
Yeah PVA drys clear, but you can add paint too it for colour.
|
|
|
|
Post by BG. Foster on Jan 4, 2013 8:03:07 GMT -5
There you go then, problem solved. My kids are in bed time to start on my trenches.
|
|
|
|
Post by Adkenpachi on Jan 4, 2013 8:13:48 GMT -5
There you go then, problem solved. My kids are in bed time to start on my trenches. God your lucky  my son stopped napping before he was even 2...the blighter! |
|
|
|
Post by BG. Foster on Jan 4, 2013 8:38:32 GMT -5
I have one in his high chair eating, one in bed and one playing with my tape measure. Still working though.
Sent from my HTC One S using ProBoards
|
|
|
|
Post by Soap on Jan 4, 2013 8:41:42 GMT -5
Mine has just turned two, and stopped napping the last couple of weeks. On the plus side she has started going to sleep at 7pm, and not waking up till at least 8am!
|
|
|
|
Post by scotti88 on Jan 4, 2013 8:50:30 GMT -5
Well we are a lucky couple! My nipper goes bed at 7pm sleeps all way through till 8/8:30
Has a nap at 1:30 till three and it doesn't look like it will be changing anytime soon.
|
|
|
|
Post by BG. Foster on Jan 4, 2013 9:00:50 GMT -5
Both my youngest sleep 7pm till 8am
Sent from my HTC One S using ProBoards
|
|
|
|
Post by badgersplatter on Jan 4, 2013 9:30:59 GMT -5
Happy families!
PVA apparently shrinks x1000000000 and goes yellow over time, so not really an option. Solid Water and Envirotex are the main two resins I've seen, the other branded "water effects" and "easy water" type products are equally shrinky and more for mainly puddles and tiny scale railway stuff than any depth of river water like this.
My issue is that if I use the Envirotex to bulk up then finish with the Solid Water I have, I might get a defined "layer" under the surface. That said, if I dye just the top layer and use clear underneath, apparently that's a good way to make it look deeper... cunning plan!
I think this is the forum equivalent of thinking out loud?
|
|
|
|
Post by BG. Foster on Jan 4, 2013 9:34:47 GMT -5
I think you might be right.
Sent from my HTC One S using ProBoards
|
|
|
|
Post by Cosmic on Jan 4, 2013 11:29:03 GMT -5
Due to savage hand injury while carving out rivers, project is on hold until I figure out a new technique... Marvellous bridge there, Badger  Can we get close ups? As for water, I have been experimenting lately with Vallejo water effects, and the Woodland Scenics stuff......and I would go for the Woodland Scenics. Watch their videos on youtube and you'll see some great results  |
|
|
|
Post by badgersplatter on Jan 4, 2013 13:13:31 GMT -5
Thanks Cosmic  Heard just as many bad things about both of those though for this kind of work - I think it's the very nature of acrylic mediums that they will shrink as they dry over the long term, especially for larger, deeper areas. I'd probably need about a dozen bottles to do each river tile as well, in 50 coats! They're intended I think more for little puddles and "wet look" effects, although maybe you've had better results? I'll do another proper photo session when I have some more things done, but in the mean time I have carved 4 tiles and tested them out with the rest of the "bits" that arrived at or around christmas: 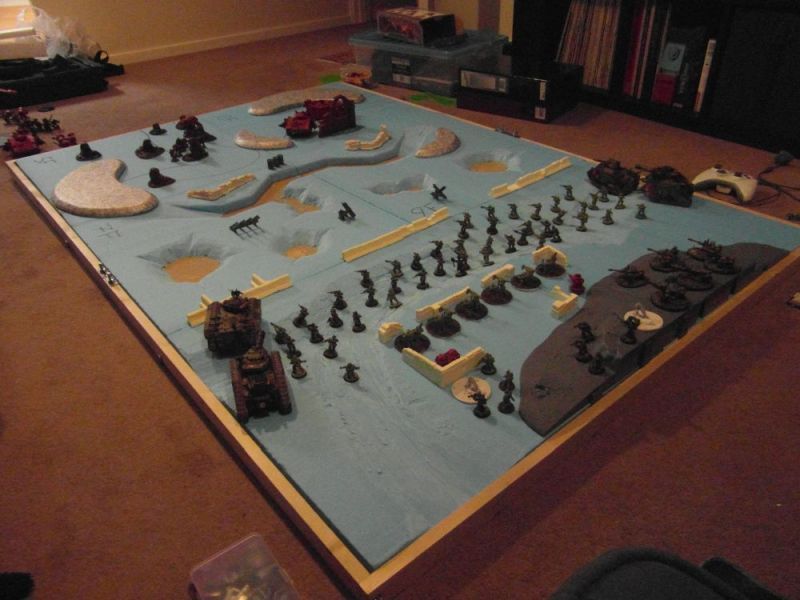 Interestingly enough the terrain played almost zero part in the battle - there was some cover from the ruined church used in turn 1, the boulders at the back came up a couple of times and the hill at the back was useful. No one actually set foot in the centre two tiles! Everything that deployed at the far end got killed there, and the rest deep-struck in behind me... |
|
|
|
Post by Adkenpachi on Jan 4, 2013 17:47:02 GMT -5
Interestingly enough the terrain played almost zero part in the battle - there was some cover from the ruined church used in turn 1, the boulders at the back came up a couple of times and the hill at the back was useful. No one actually set foot in the centre two tiles! Everything that deployed at the far end got killed there, and the rest deep-struck in behind me... Probably cause its all flat terrain, if you want cover in there you need some hills and/or buildings. |
|
|
|
Post by Trooper One-Nine-Seven-Four on Jan 4, 2013 19:15:42 GMT -5
For water, have you considered polyurethane varnish? Just paint the color you want the water to be directly on the riverbed, and then give it a coat of varnish. Of course, if you want the water to be clear-ish, and the surface of the riverbed is textured this might not work...
|
|
|
|
Post by badgersplatter on Feb 20, 2013 17:03:56 GMT -5
Done a little more work - we're onto texturing and fixing. Trenches first: 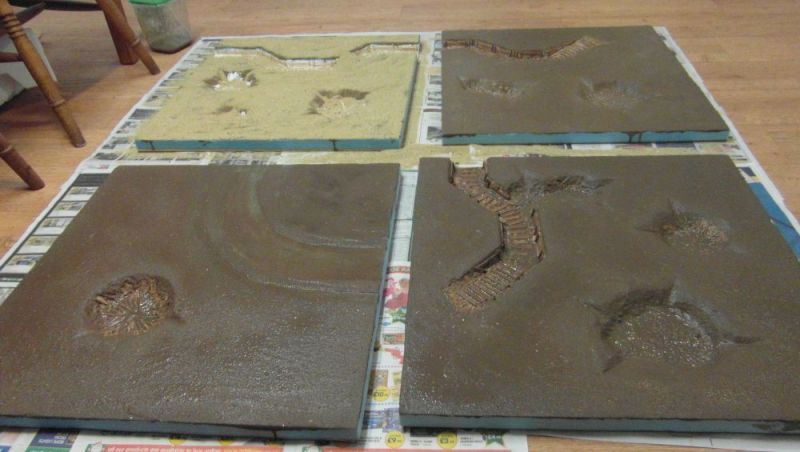 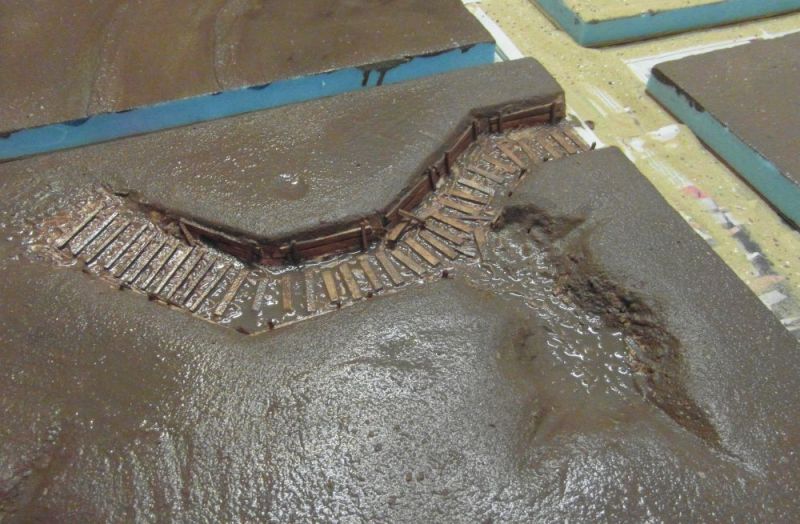 The error was trying to do four at once - on the last one, there's no way of making space to tip off the sand! Need to leave a gap next time. It'll have to wait until the others are dry... |
|
|
|
Post by 3ff3ct on Feb 21, 2013 4:00:57 GMT -5
Very cool. Could I suggest doing some modular wreaks, ruins, tree stumps, ammo dumps etc? This would really help to break up the 'no man's land' you've accidentally created, and make it possible for desparate charges into the enemie's line when playing  And it'll look cool  I do love this board though, it's looking fantastic! |
|
|
|
Post by badgersplatter on Feb 21, 2013 4:38:42 GMT -5
I have barrels, sandbags, dead trees, ruins and ammo boxes in the making  Never fear! |
|








 my son stopped napping before he was even 2...the blighter!


